
Check Your Version:
This article applies to all MetaDefender Endpoint releases deployed on Windows systems when connected to MyOPSWAT Central Management v10.
Overview
After modifying a policy in OPSWAT Central Management — for example, adding a file extension to an allowlist, adding a file or path to an exclusion list, changing a file-type restriction, or adjusting a removable media protection rule — administrators may observe that the change does not appear to take effect on their MetaDefender Endpoint instances immediately. Files that should now be allowed continue to be blocked, or files that should now be blocked continue to be allowed.
This is almost always caused by one of two well-known mechanisms, and not by a defect in MetaDefender Endpoint or Central Management. The resolution is the same in both cases: force the endpoint to re-pull the policy and re-evaluate the affected files. This article explains how.
Symptoms
A file or file extension recently added to an allowlist in Central Management is still being blocked by MetaDefender Endpoint.
A file, folder, or extension recently added to an exclusion list is still being scanned and/or blocked.
A change to a file-type restriction is not reflected in the MetaDefender Endpoint scan results panel.
The Central Management UI confirms the policy is saved and assigned to the affected endpoints.
The behavior is consistent across multiple endpoints managed by the same policy.
Why this happens
There are two contributing factors. Both are by design, not defects.
Policy propagation delay between Central Management and MetaDefender Endpoint. MetaDefender Endpoint does not receive policy changes via push. Instead, it pulls them on a periodic sync. On each sync, the endpoint sends Central Management the hash of its currently-applied configuration. Central Management replies with the current hash of the assigned policy. When the two hashes match, no action is taken; when they differ, the endpoint requests the updated configuration and applies it locally. Depending on the sync interval and the size of the deployment, propagation of a new policy can take several minutes from the moment a new configuration is applied.
Cached hash-lookup decisions on the endpoint. Before performing a full file scan, MetaDefender Endpoint can consult its hash-lookup cache to quickly return the previously-known verdict for a file. If a file was previously evaluated under the old policy — for example, blocked because its extension was not yet on the allowlist — and the policy's Threat Detection Mode is set to "Hash lookup only (fastest)" or "Hash lookup plus file scan (default)", the cached verdict may continue to be returned even after the new policy has been applied. The file content has not changed, so the hash has not changed, so the cached verdict is reused.
Together, these two mechanisms can give the impression that the new policy was not saved or was not honored, when in fact the new policy has not yet been fetched by the endpoint and/or the endpoint is short-circuiting the new scan path by reusing a hash-based verdict from before the policy change.
Resolution — How to force MetaDefender Endpoint to apply the new policy
The procedure below forces both a fresh policy fetch and a fresh file evaluation that bypasses the hash-lookup cache. The same procedure resolves the issue regardless of which policy area was modified.
Log in to OPSWAT Central Management (v7 or My OPSWAT Central Management v10) and open the affected policy.
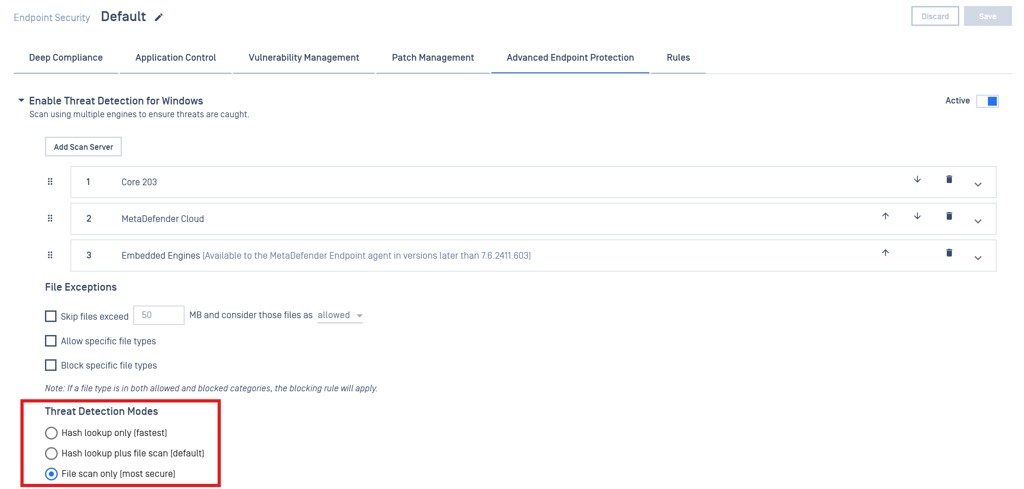
Navigate to the policy's Advanced Endpoint Protection section, and locate the Threat Detection Mode setting. It has three options: Hash lookup only (fastest), Hash lookup plus file scan (default), and File scan only (most secure).
Change Threat Detection Mode to File scan only (most secure). This temporarily disables the hash-lookup short-circuit and forces every evaluated file to be scanned fresh against the current policy — including the new allowlist or exclusion entries.
Save the policy. Saving updates the policy's configuration hash on the Central Management side. On the next sync, every endpoint managed by this policy will detect the hash change and pull the updated configuration.
Wait a few minutes for the sync to propagate. Propagation typically completes within a couple of minutes per endpoint, though it may take longer in large deployments. The endpoint's "Last Seen" timestamp in the Central Management UI will refresh once it has checked in.
Re-test the original scenario — re-insert the USB drive, re-copy the file, or re-scan the path. The new allowlist or exclusion entry should now be honored, and the scan result should reflect it.
(Optional, recommended.) Once the policy is confirmed working, change Threat Detection Mode back to its previous value (typically "Hash lookup plus file scan (default)") and Save the policy again. The next sync will propagate this back to the endpoints, restoring standard scanning behavior while preserving the new allowlist or exclusion entries.
Verification
To confirm the new policy is in effect:
In Central Management, verify the affected endpoint is reporting as online and its Last Seen timestamp is recent (within the last sync window).
On the endpoint, open the MetaDefender Endpoint UI and trigger the action that previously failed (insert the USB drive, copy the file, etc.). The scan result panel should now reflect the updated policy — for example, if a file extension was added to the allowlist, the scan result should show "File Type Restriction: .[ext] Files Allowed" for the relevant files.
If the new policy still does not appear to be applied after the sync window has passed and Threat Detection Mode has been changed and saved, collect a MetaDefender Endpoint support package and open a support case so the issue can be investigated further.
If Further Assistance is required, please proceed to log a support case or chat with one of our support engineers.