Set up PingFederate
Configurate PingFederate
Sign in to PingFederate console at
https://service-ip:service-port, whereservice-ipandservice-portrefer to the IP address and port of the machine hosting PingFederate server.In homepage, navigate to
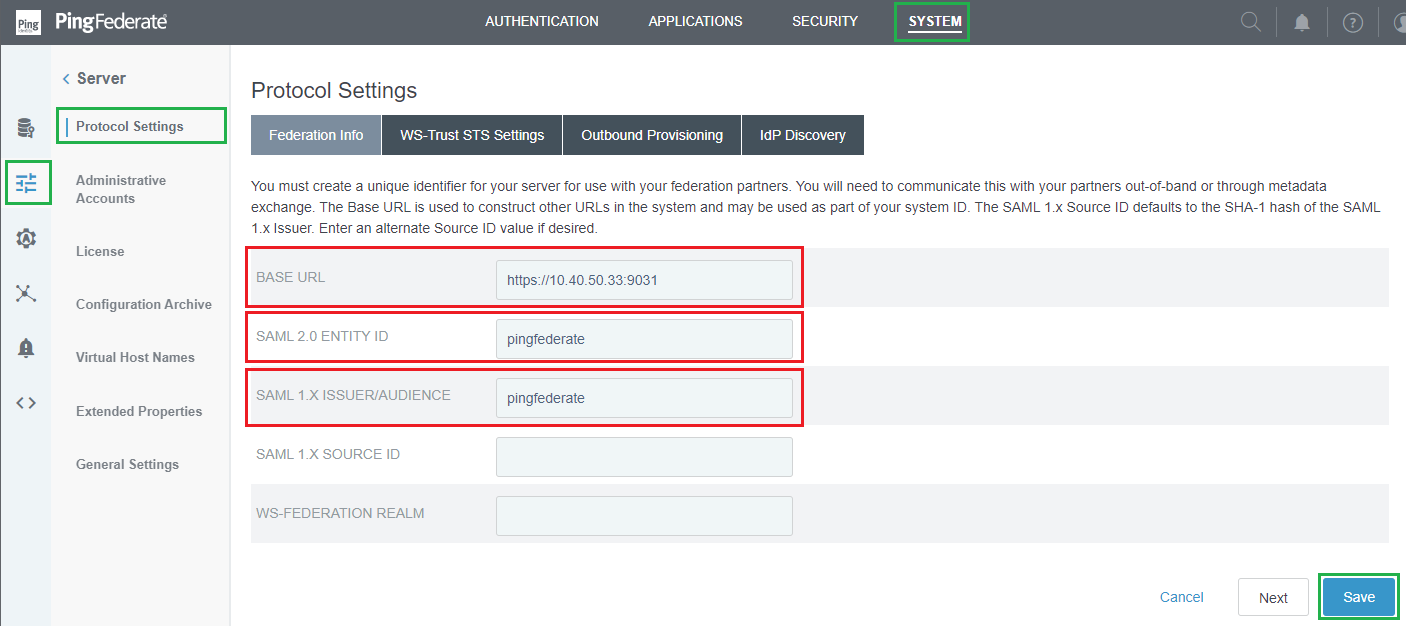
SYSTEMtab and selectServerfrom the left sidebar.Select
Protocol Settings, enterBase URL,SAML 2.0 ENTITY ID,andSAML 1.X ISSUER/AUDIENCE, then clickSaveto complete.
Set up simple Password Credential Validators
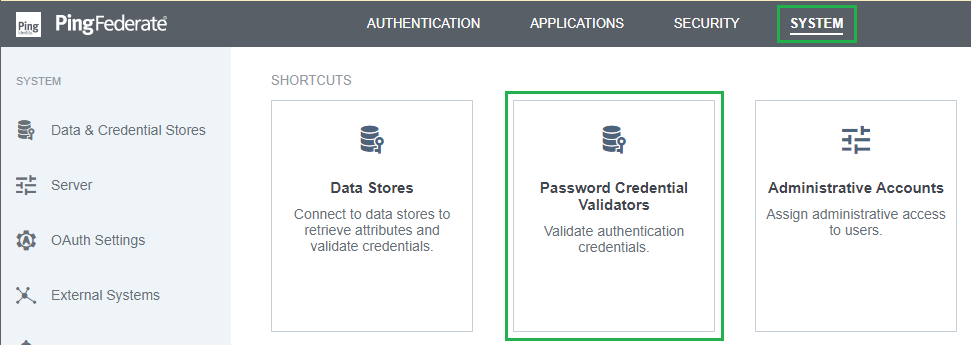
In homepage, navigate to
SYSTEMtab and click onPassword Credential Validators.
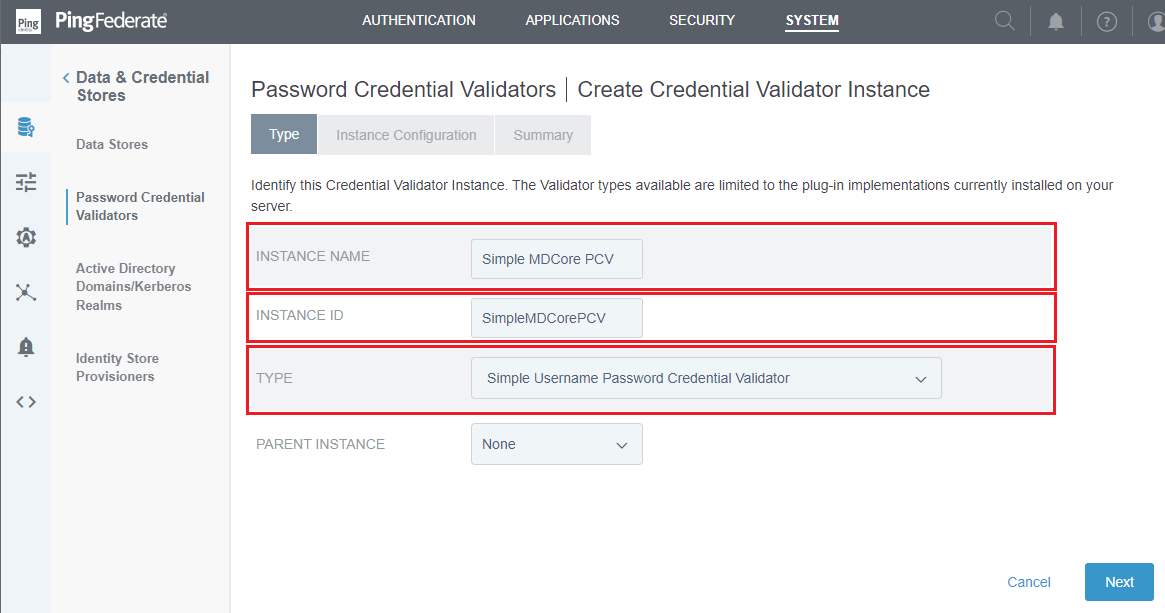
Click
Create New Instance.Enter
INSTANCE NAMEandINSTANCE ID, selectSimple Username Password Credential ValidatorforTYPE, and clickNext.
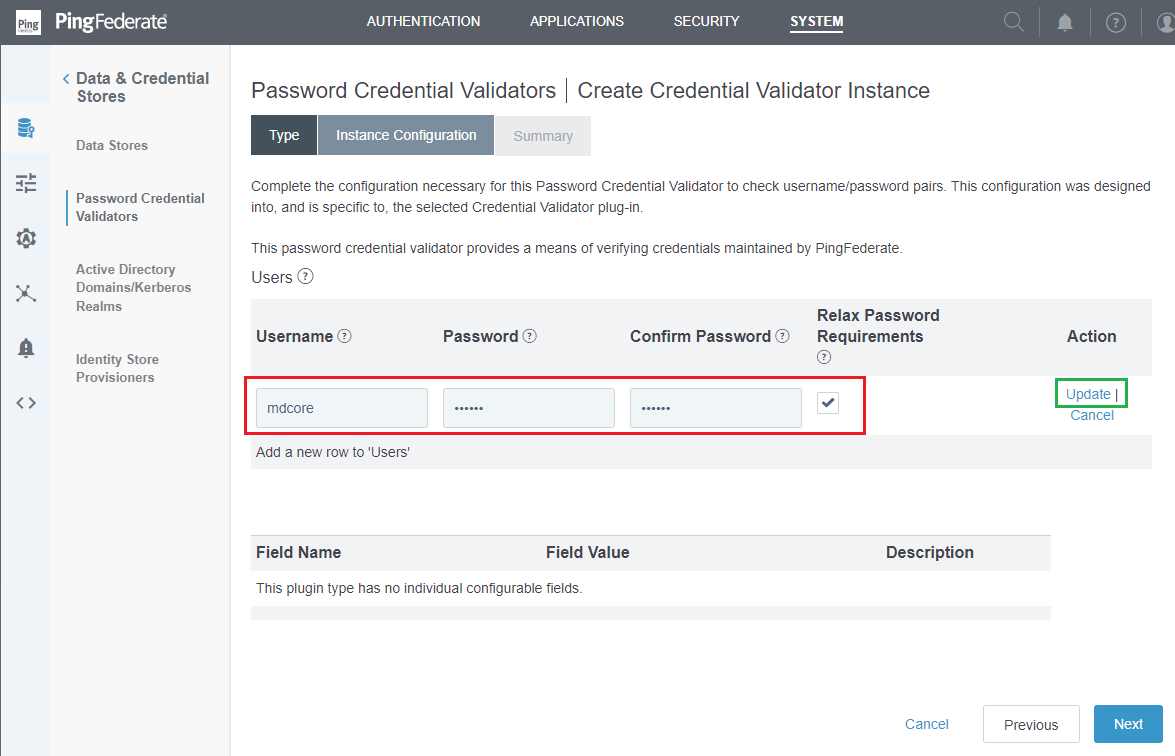
In
Create Credential Validator Instancepage, clickAdd a new row to 'Users'.
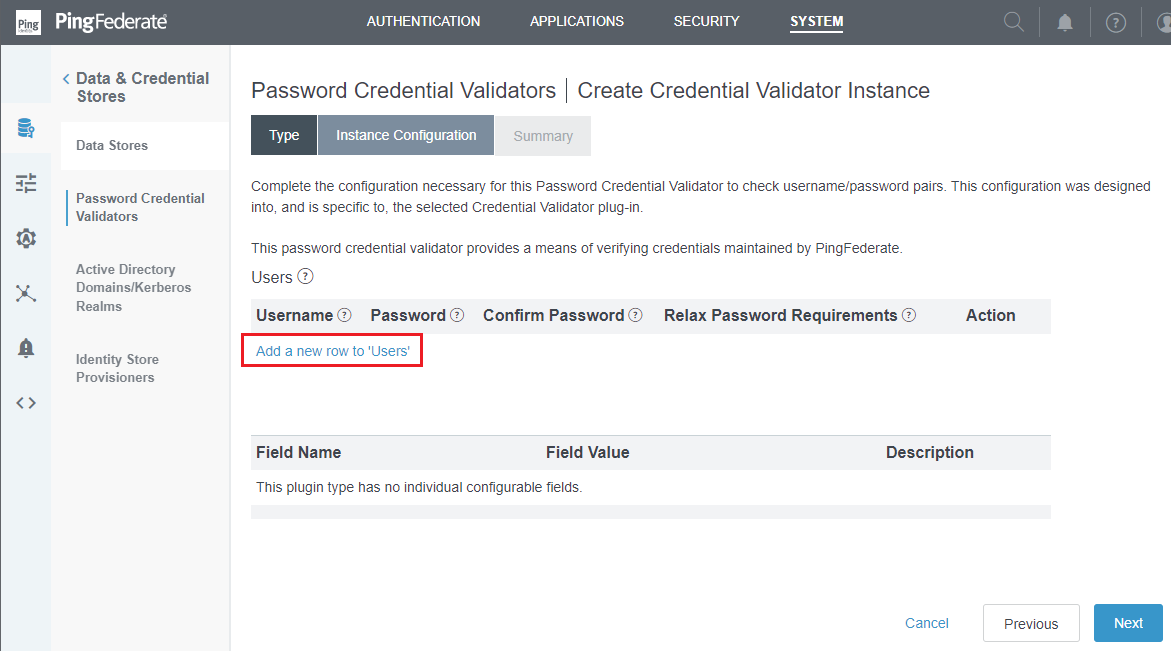
Enter
Username,Password, andConfirm Password, then clickUpdateandNext.
Review all selected options in
Summarytab, and clickSave.
Set up a simple IdP Adapter
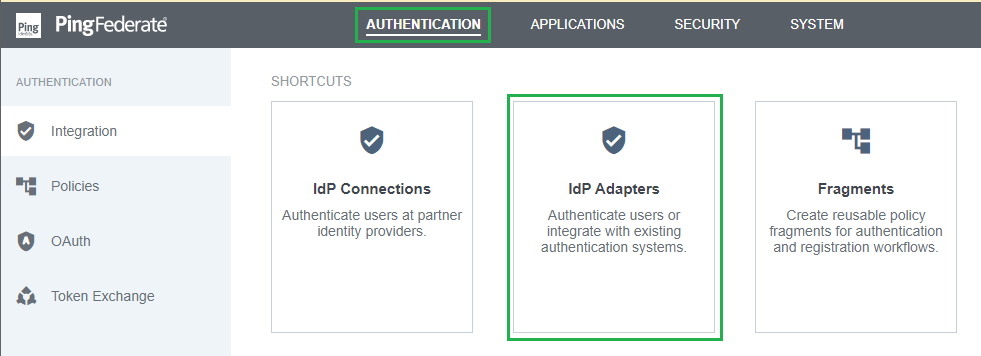
In homepage, navigate to
AUTHENTICATIONtab and click onIdP Adapters.
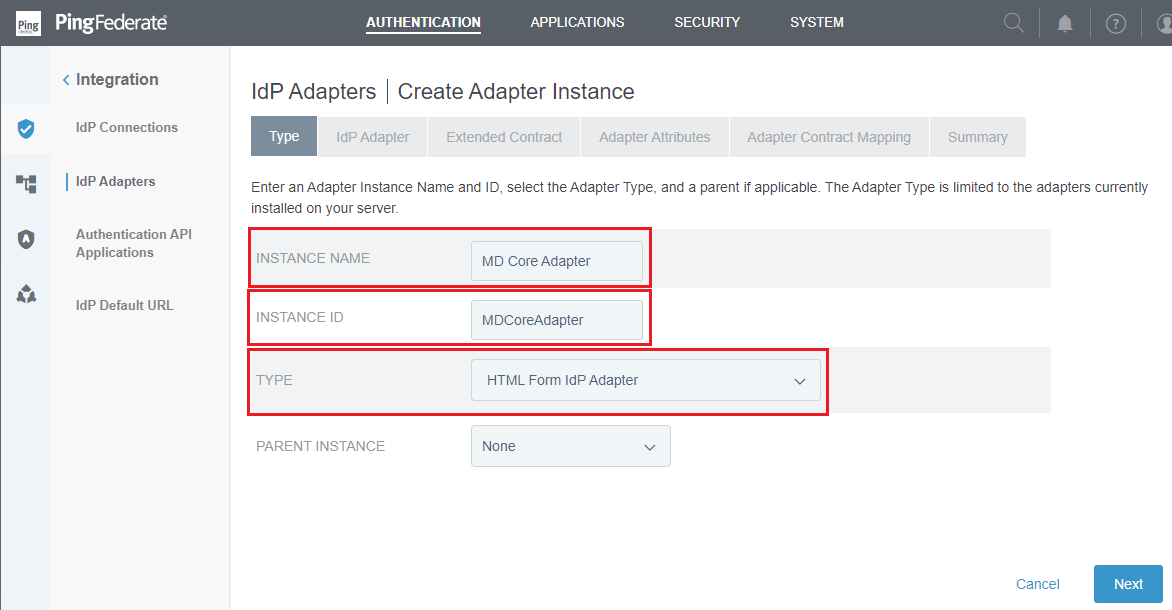
Click
Create New Instance.Enter
INSTANCE NAME,INSTANCE ID,and selectHTML Form IdP AdapterforTYPE. ClickNext.
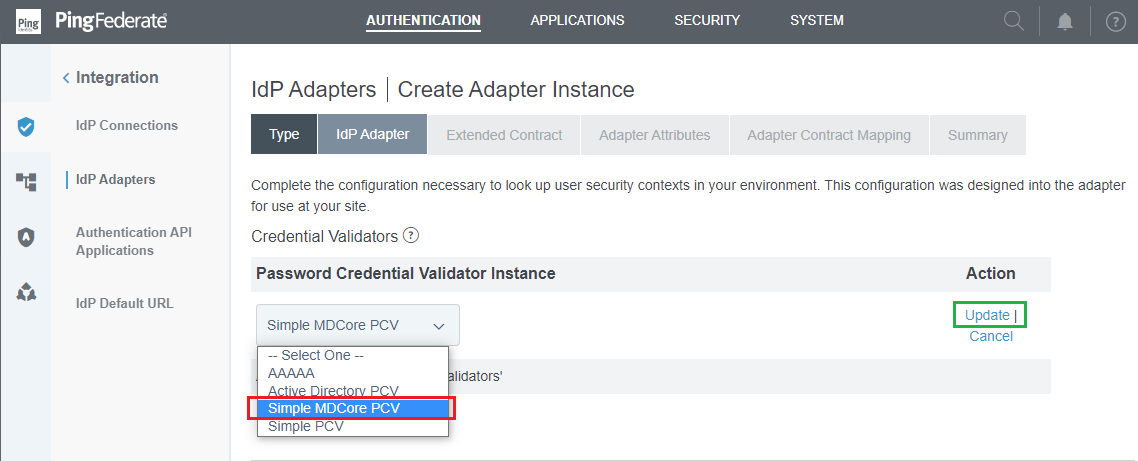
Click
Add a new row to 'Credential Validators'.

Select the Password Credential Validator created in the previous stage, that is "Simple MDCore PCV", then click
UpdateandNext.
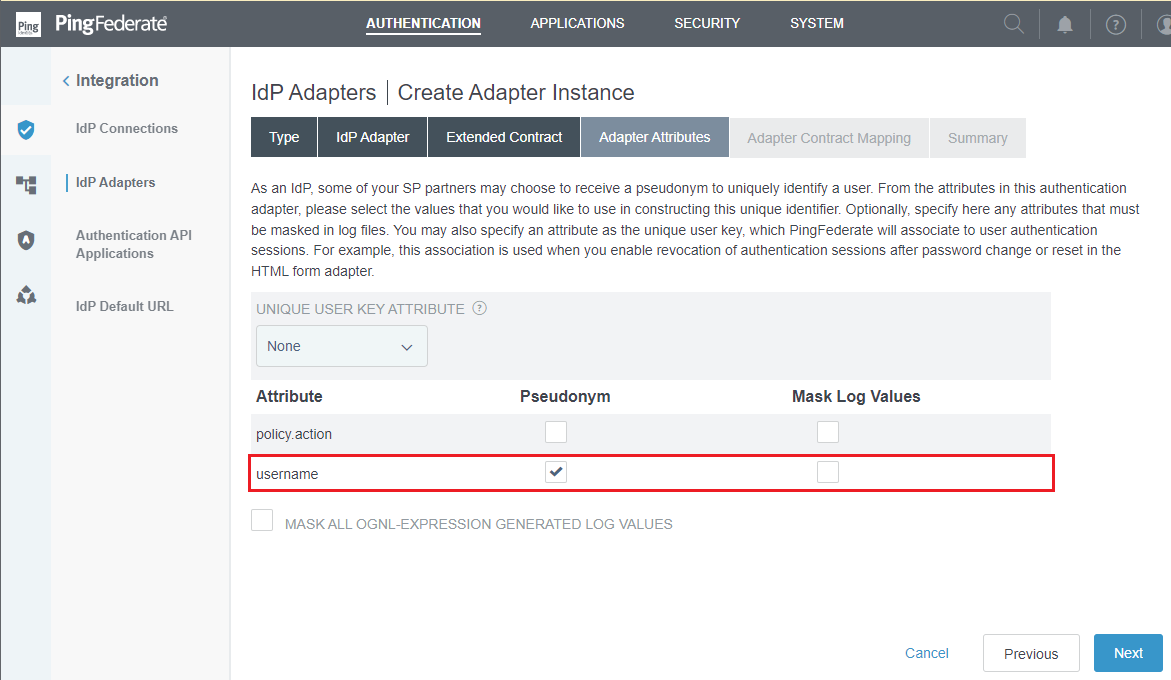
Click
NextonExtended Contracttab.In
Adapter Attributestab, toggleusernameattribute underPseudonymcolumn, and clickNext.
Click
NextonAdapter Contract Mappingtab.Review all selected options in
Summarytab and clickSaveto complete.
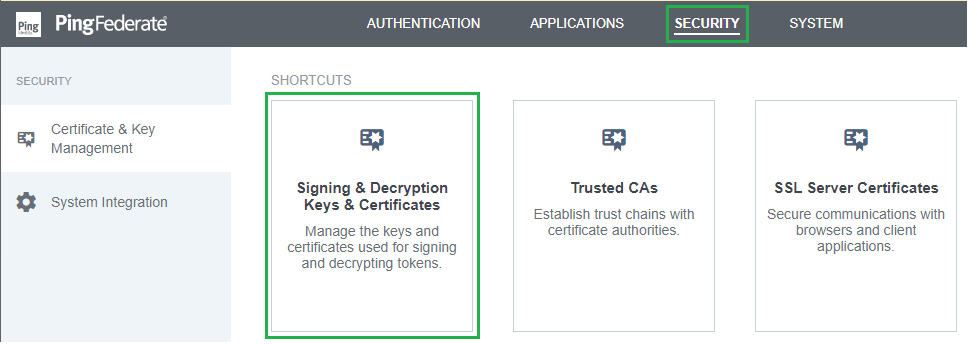
Set up Signing, Decryption Keys and Certificates
In homepage, navigate to
SECURITYtab and selectSigning & Decryption Keys & Certificates.
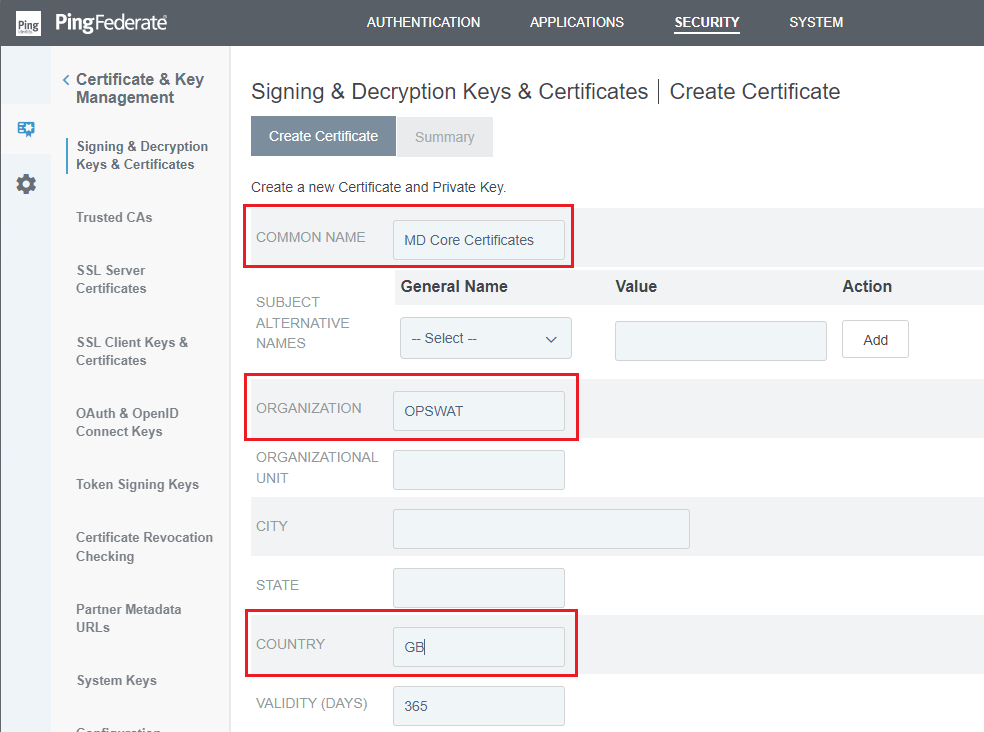
Click
Create New.Enter
COMMON NAME,ORGANIZATION, andCOUNTRY, along with any other necessary information, then clickNext.
Review all selected options in
Summarytab and clickSaveto complete.
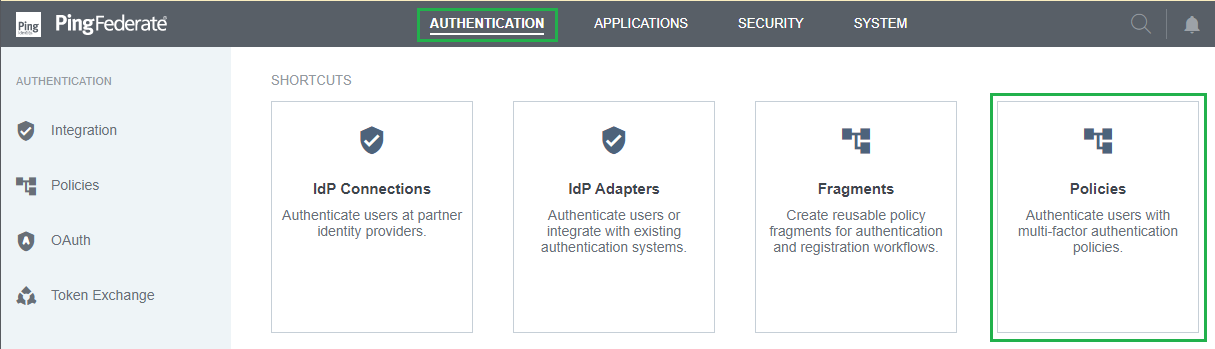
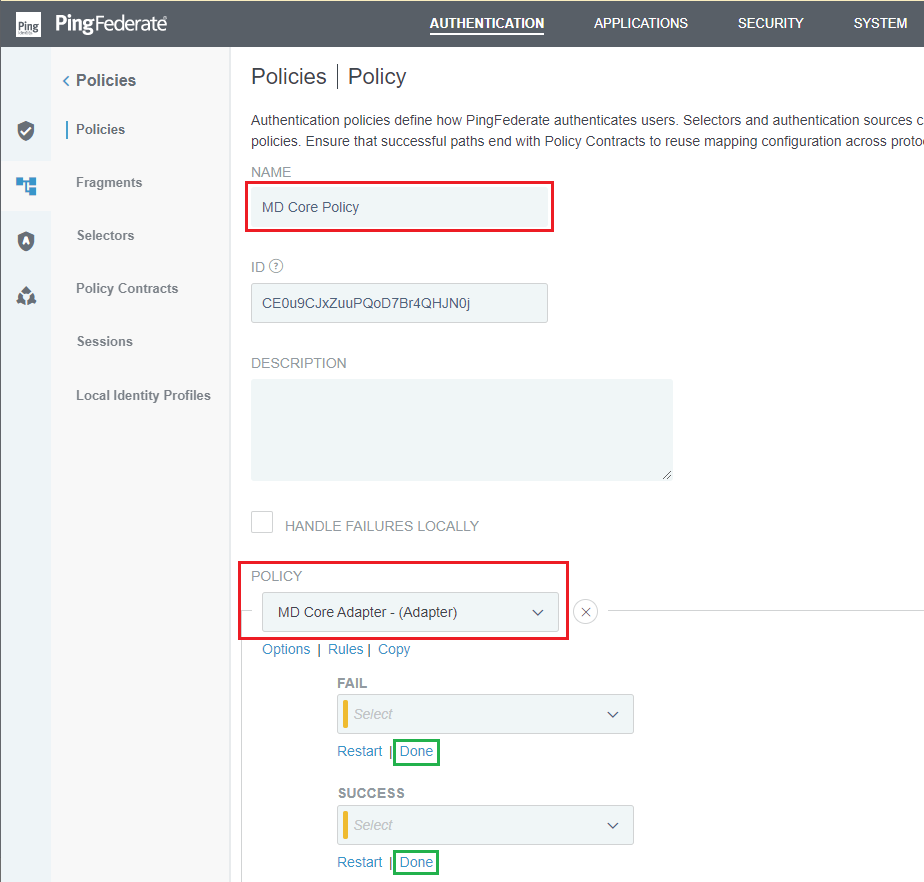
Set up Authentication Policies
In homepage, navigate to
AUTHENTICATIONtab, and clickPolicies.
Click
Add Policyin the next page.Enter
NAME, select the IdP Adapter from the previous stage forPOLICY. ClickDoneforFAILandSUCCESSoptions. Once finished, clickDone.
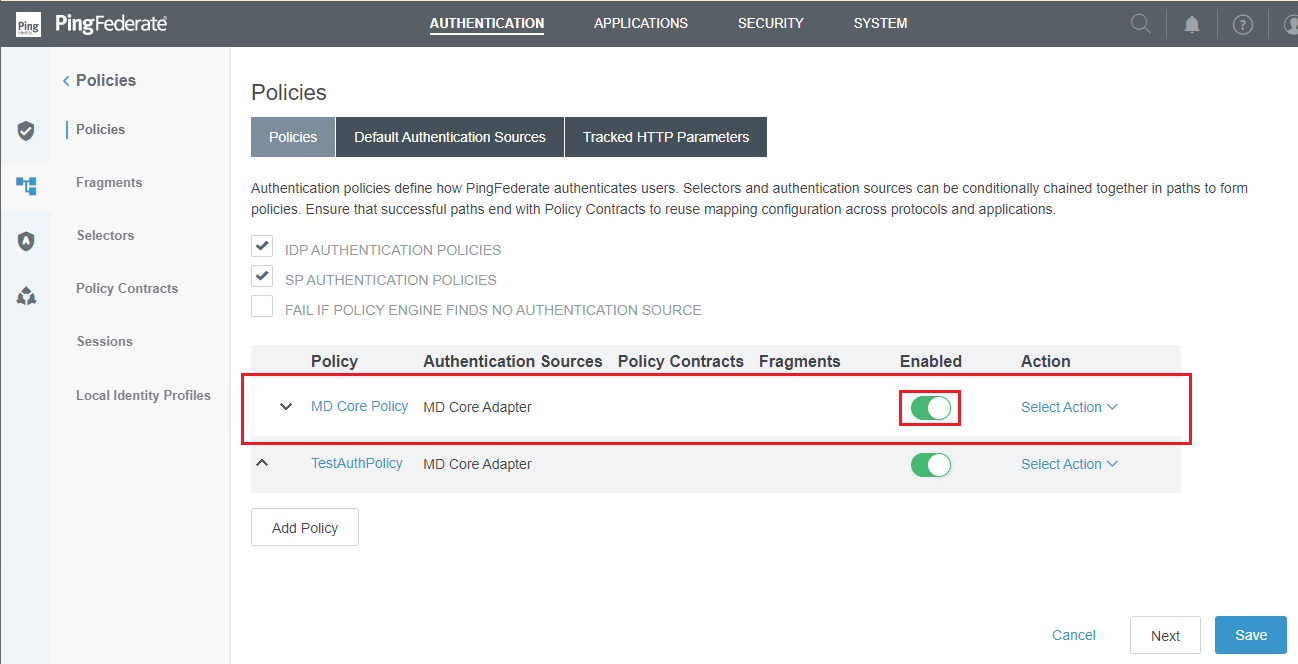
Ensure the new policy is enabled, then click
Saveto complete.
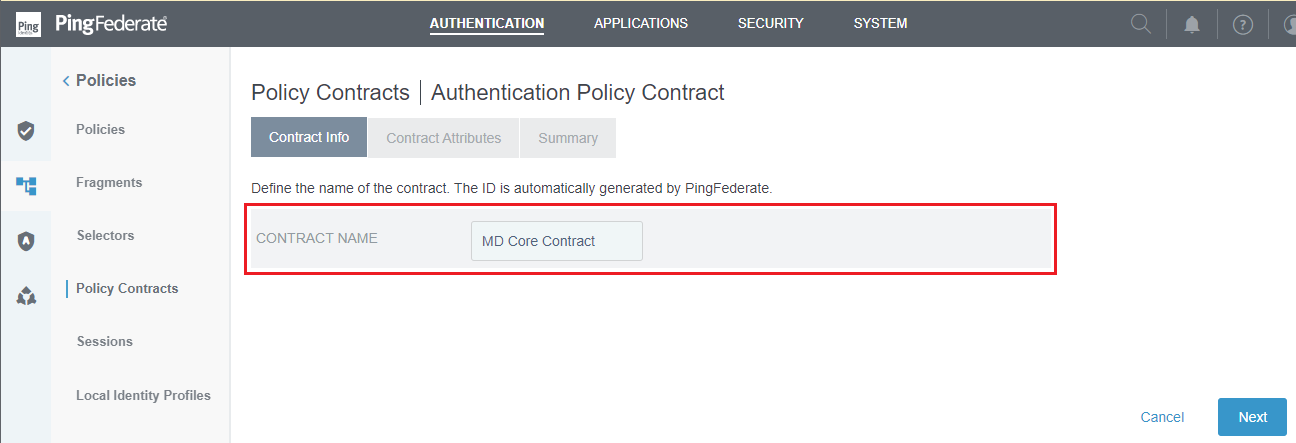
Set up Policy Contracts
In homepage, navigate to
AUTHENTICATIONtab. SelectPoliciesicon on the left sidebar, then clickPolicy Contracts.

Press
Create New Contracton the next page.In
Contract Infostep, enterCONTRACT NAMEand clickNext.
In
Contract Attributesstep, navigate toExtend the Contract, fill in claims that will be returned to MetaDefender Core, clickAddto add the claim, and thenNext.

Review all selected options in
Summarytab, then clickSaveto complete.
Set up Policy Sessions
In homepage, navigate to
AUTHENTICATIONtab and clickSessions.
In
Sessionsmenu, findOVERRIDESsubtab.Select "MD Core Adapter" for Authentication Source, tick
Enable Sessions, and clickAddto include the authentication source.
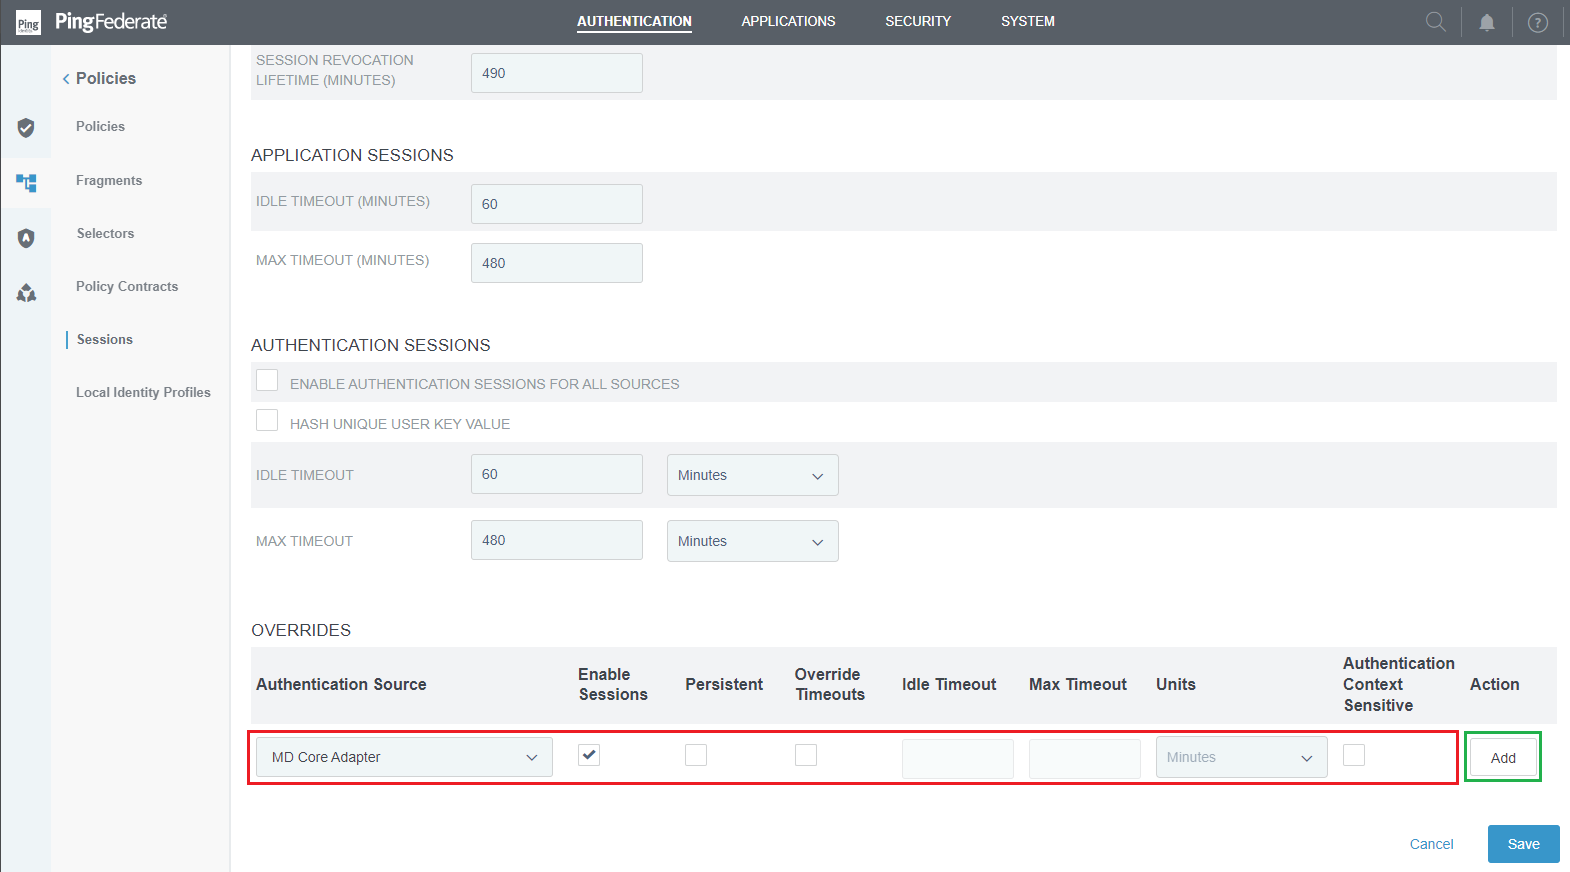
Click
Saveto complete.
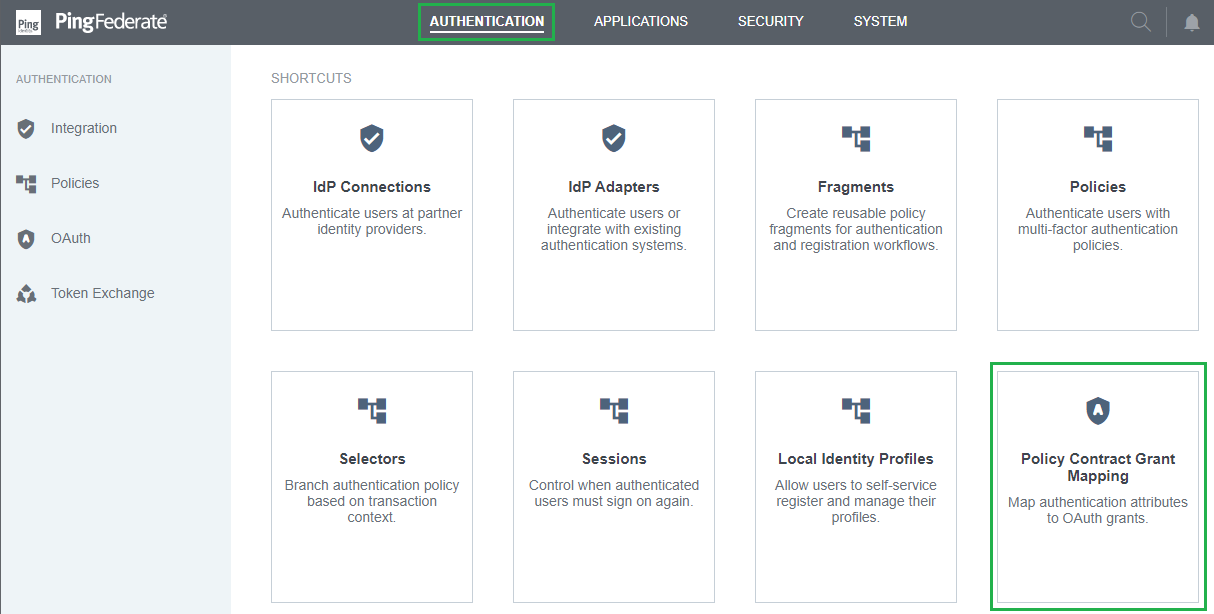
Set up Policy Contract Grant Mapping
In homepage, navigate to
AUTHENTICATIONand clickPolicy Contract Grant Mapping.
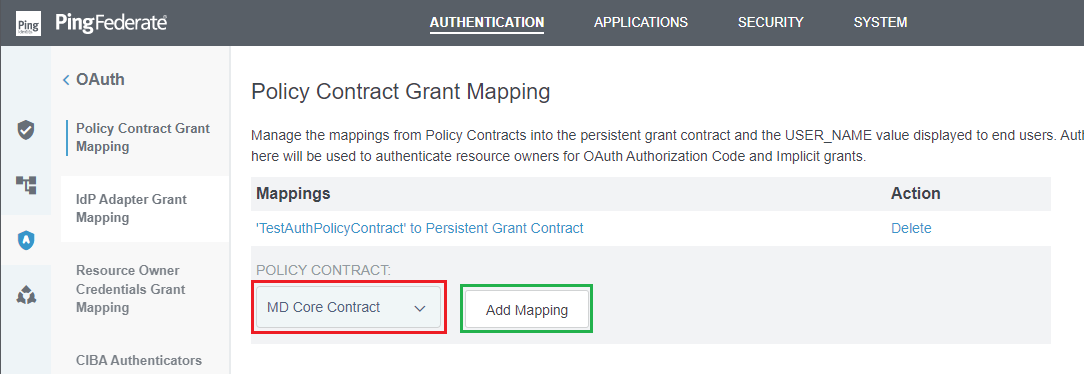
Select the Policy contract in previous stage, then click
Add Mapping.
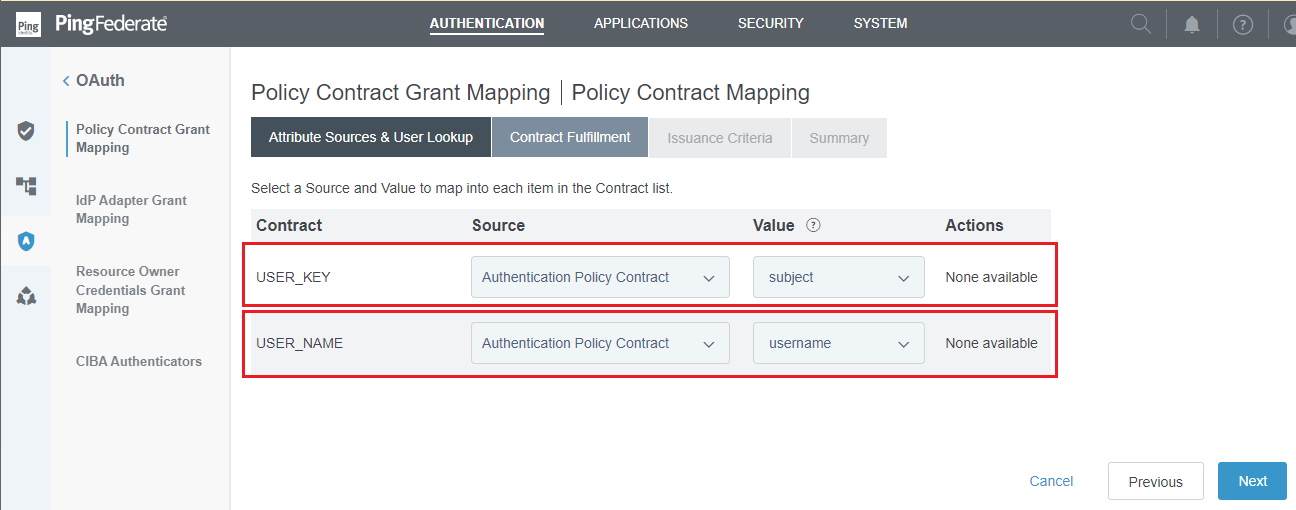
In
Attribute Sources & User Lookupstep, clickNext.In
Contract Fulfillmentstep, select the appropriate mapping forSourceandValuecolumns, then clickNext.
Click
NextinIssuance Criteriastep.Review all selected options in
Summarytab, then clickSaveto complete.
Set up IdP Adapter Grant Mapping
In homepage, navigate to
AUTHENTICATION, selectOAUTHin the left side bar, and clickIdP Adapter Grant Mapping.Under
SOURCE ADAPTER INSTANCE, select the IdP Adapter that was set up in the previous stage and clickAdd Mapping.

Click
NextinAttribute Sources & User Lookupstep.In
IdP Adapter Mappingstep, select the appropriate mapping forSource,Value, and clickNext.
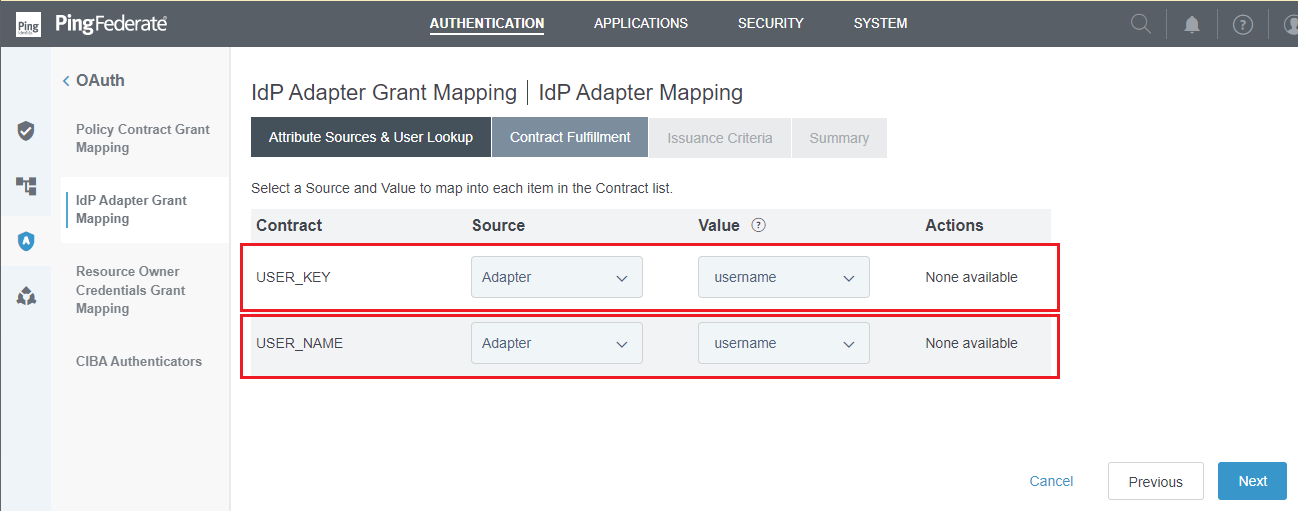
Click
NextinIssuance Criteriastep.Review all selected options in
Summarytab, then clickSaveto complete.
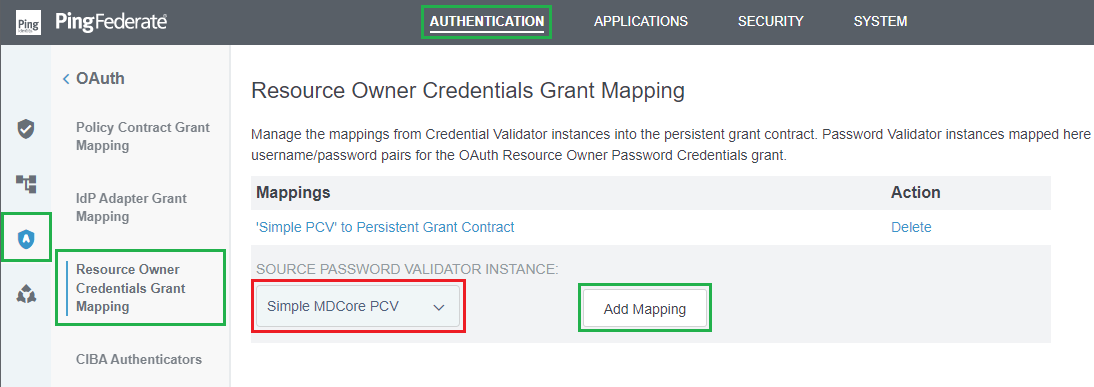
Set up Resource Owner Credentials Grant Mapping
In homepage, navigate to
AUTHENTICATION, selectOAUTHin the left side bar, and clickResource Owner Credentials Grant Mapping.Under
SOURCE PASSWORD VALIDATOR INSTANCE, select the Password Credential Validator that was set up in the previous stage, which is "Simple MDCore PCV", and clickAdd Mapping.
Click
NextinAttribute Sources & User Lookupstep.In
Contract Fulfillmentstep, choose the appropriate mapping forSourceandValue, and then clickNext.
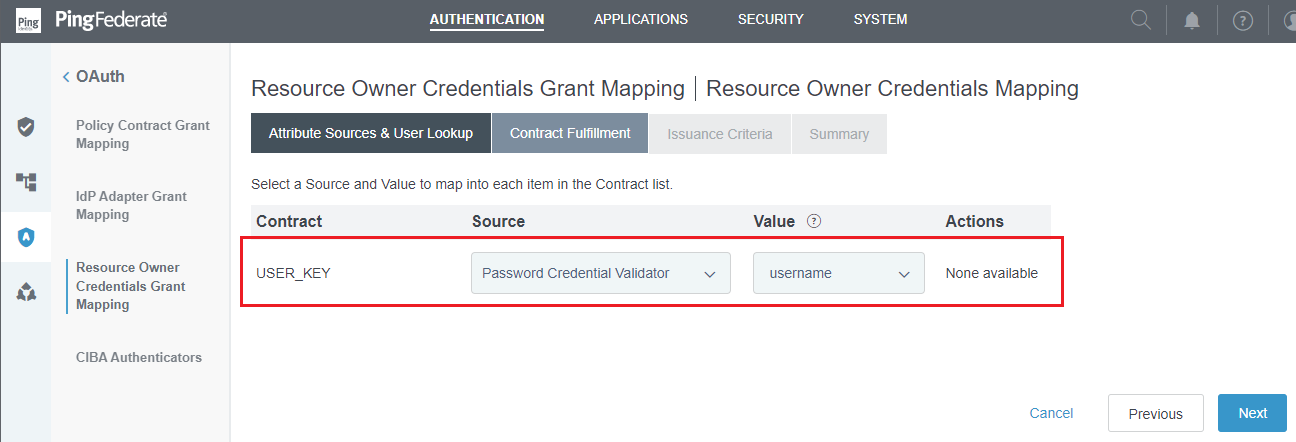
Click
NextinIssuance Criteriastep.Review all selected options in
Summarytab, then clickSaveto complete.
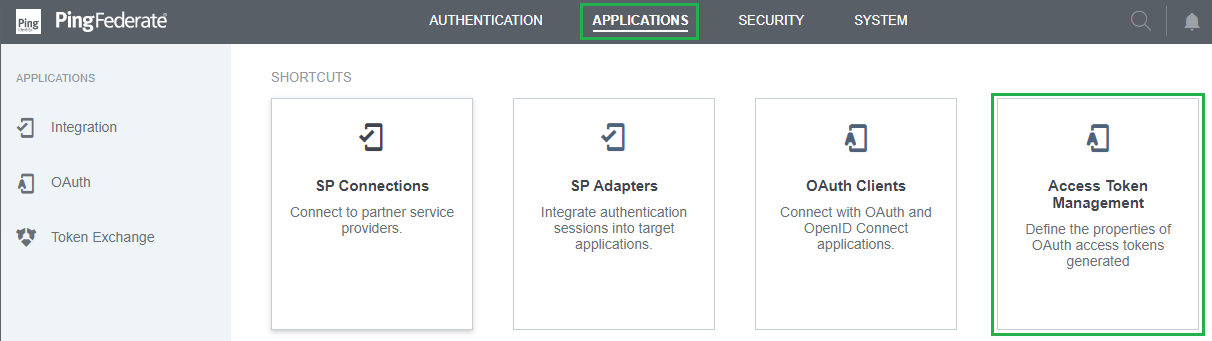
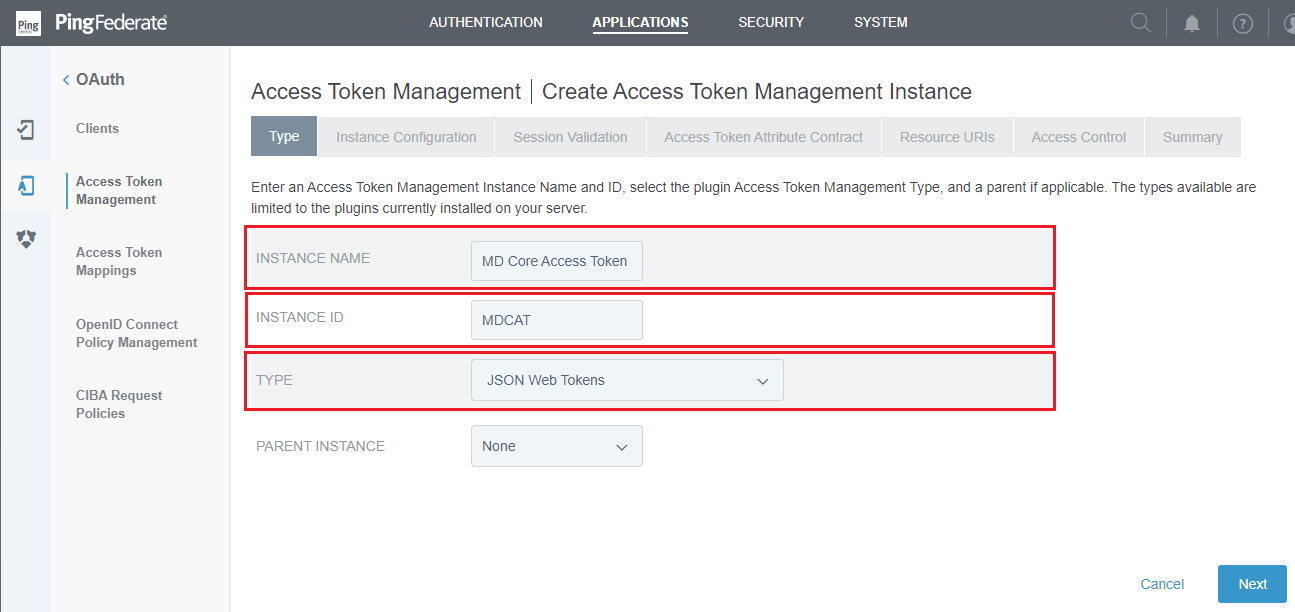
Set up Access Token Management
In homepage, navigate to
APPLICATIONS, and clickAccess Token Management.
Click
Create New Instance.Enter
INSTANCE NAME,INSTANCE ID, and selectJSON Web TokensforTYPE. ClickNextto continue.
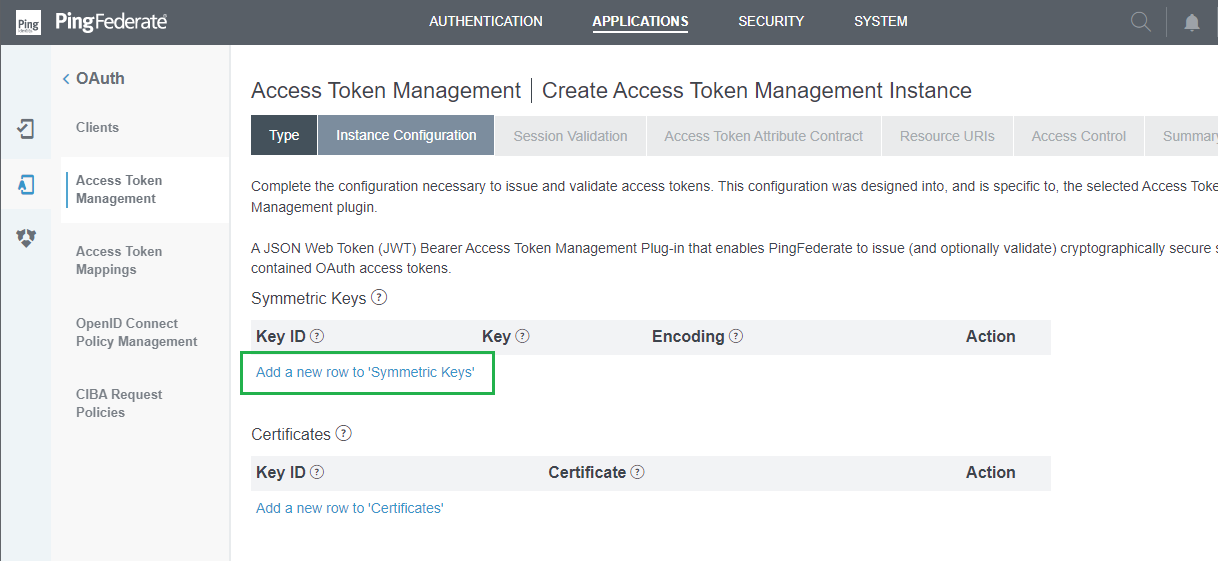
In
Instance Configurationstep, clickAdd a new row to 'Symmetric Keys'underSymmetric Keys.
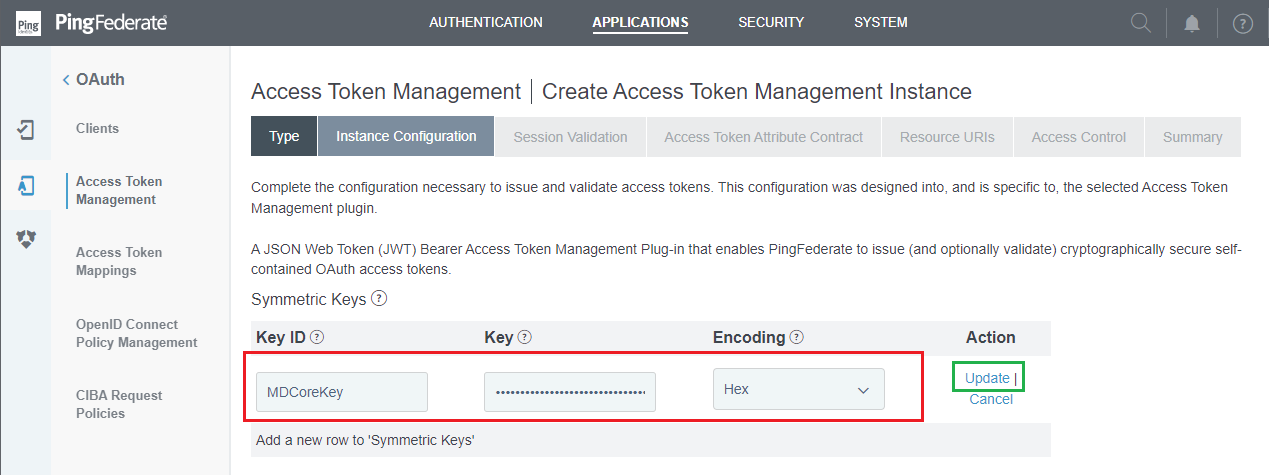
Enter
Key ID,Key, and select the correctEncoding. ClickUpdate.
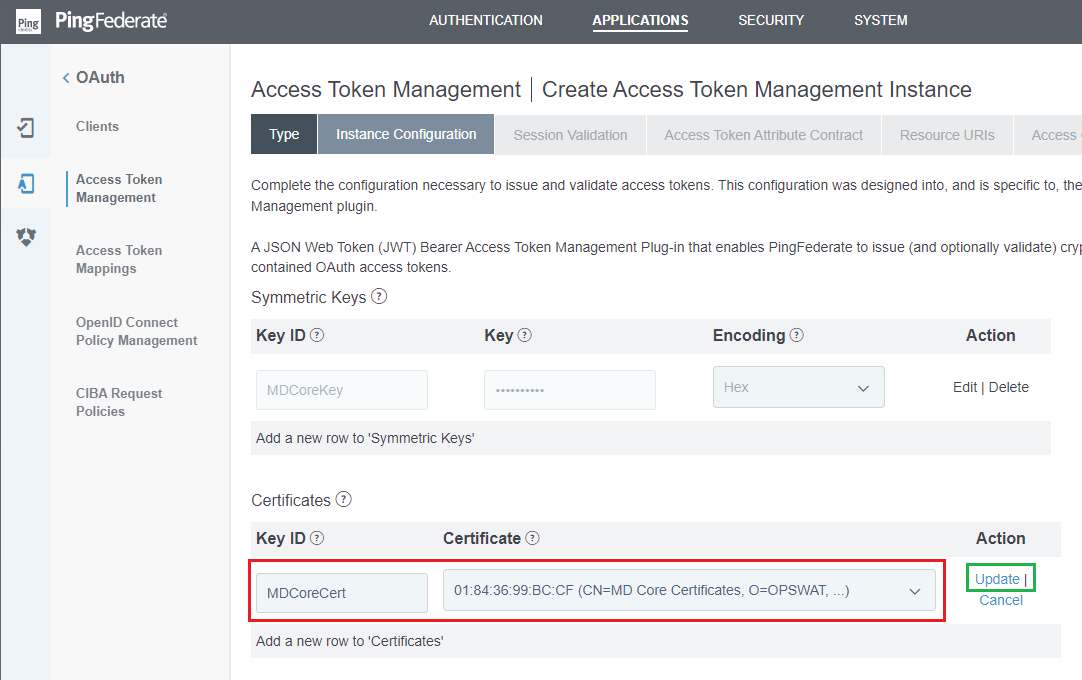
Back to
Instance Configurationstep, clickAdd a new row to 'Certificates'underCertificates.
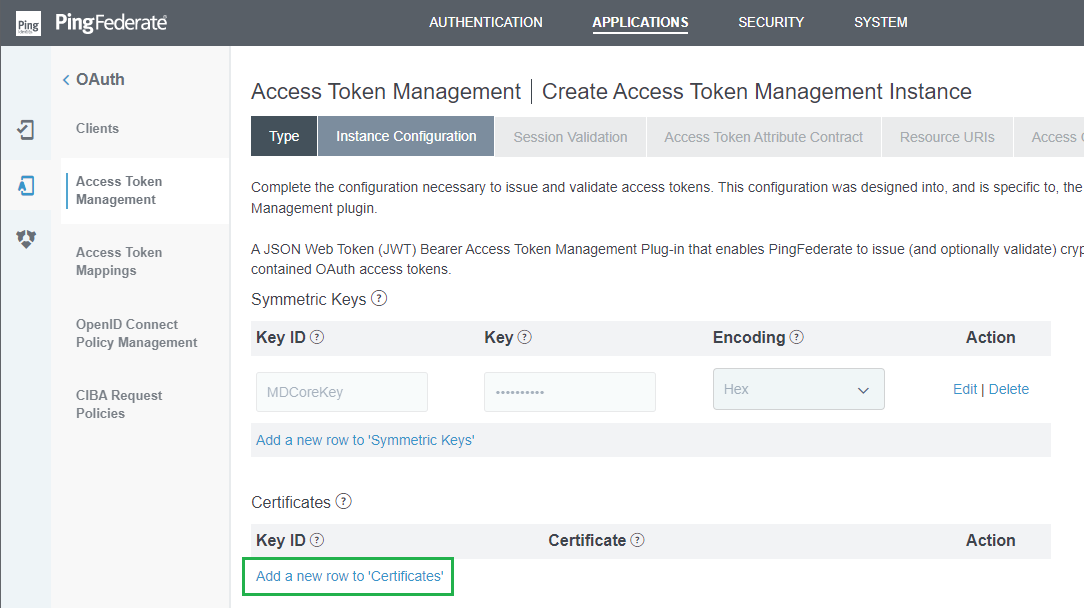
Enter
Key IDand chooseCertificatefrom the previous stage. Then clickUpdate.
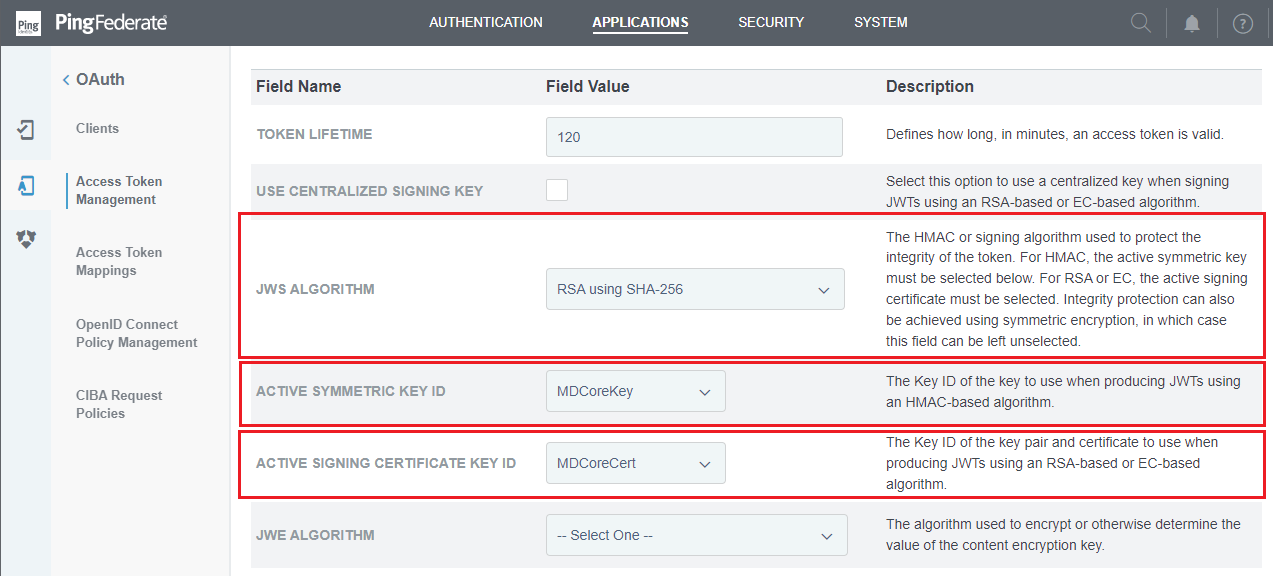
Back in
Instance Configurationstep, navigate toJWS ALGORITHMand select the appropriate algorithm. Proceed toACTIVE SYMMETRIC KEY IDandACTIVE SIGNING CERTIFICATE KEY ID, then select the key and certificate that were set up in steps 4 and 5 of this stage. ClickNextwhen finished.
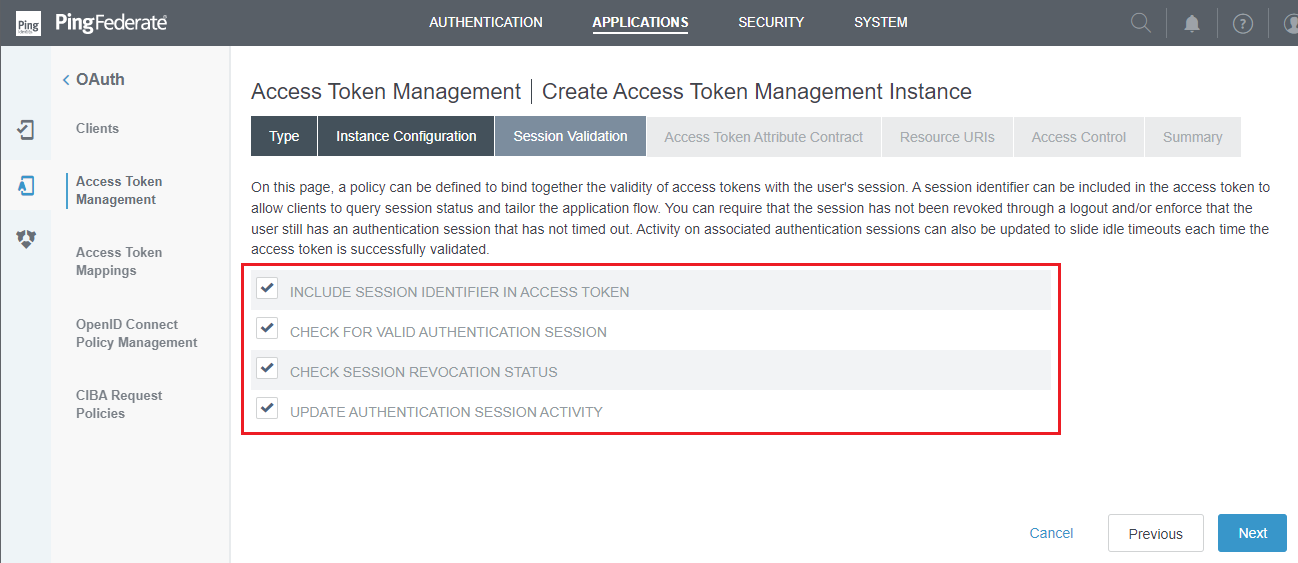
In
Session Validationstep, check all options and clickNext.
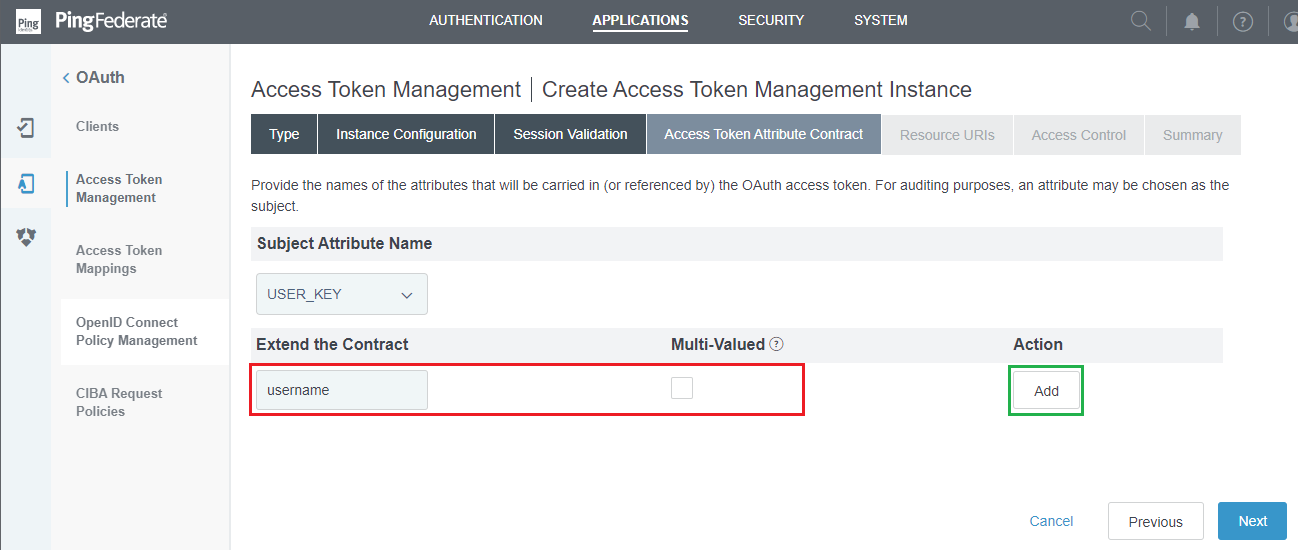
In
Access Token Attribute Contractstep, navigate toExtend the Contractand add the same claims that have already been set up in the stages:Policy Contract Grant Mapping,IdP Adapter Grant Mapping, andResource Owner Credentials Grant Mapping. ClickNext.
Click
NextinResource URIs andAccess Controlsteps.Review all selected options in
Summarytab, then clickSaveto complete.
Set up Access Token Mappings
In homepage, navigate to
APPLICATIONSand click onAccess Token Mappings.
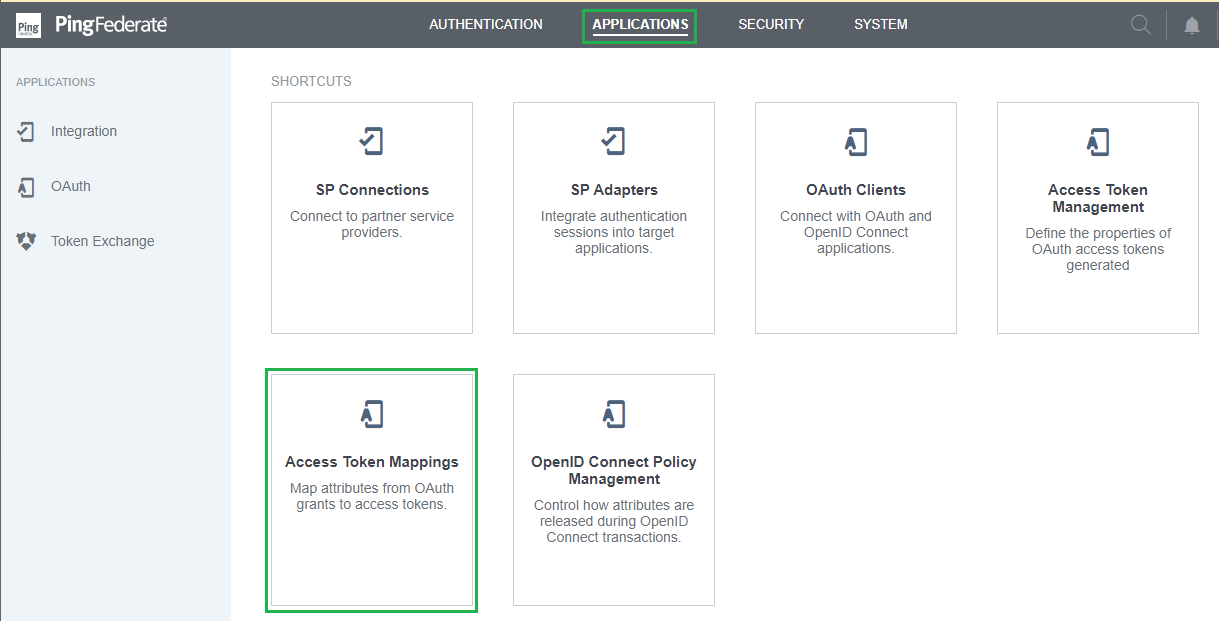
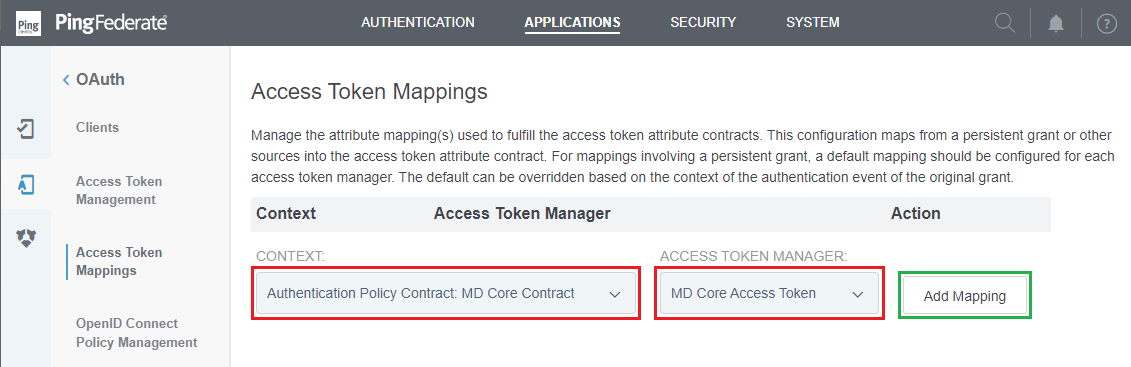
In
Access Token Mappingspage, select the Authentication Policy Contract from the previous step to map toACCESS TOKEN MANAGER. ClickAdd Mapping.
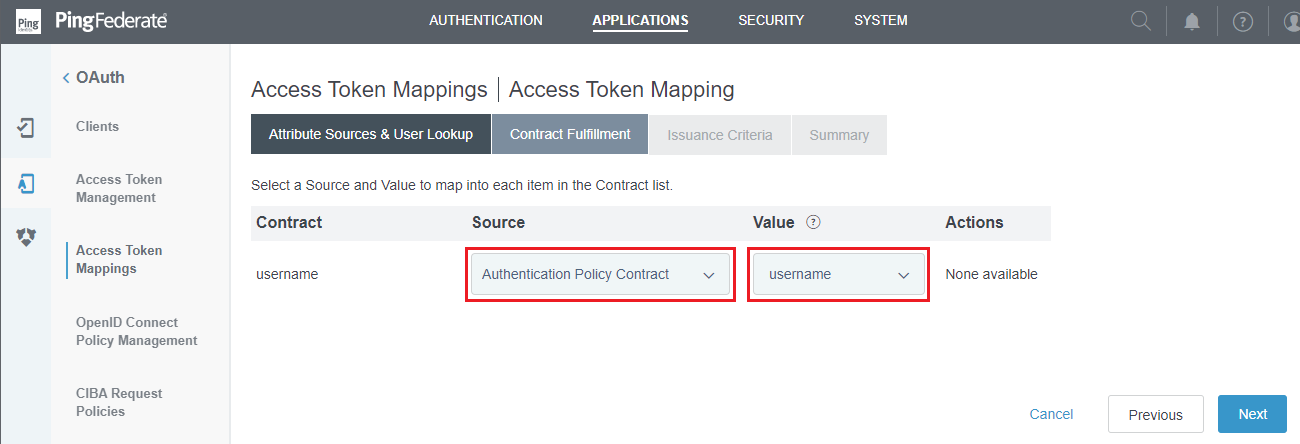
Click
NextinAttribute Sources & User Lookupstep.In
Contract Fulfillmentstep, select the appropriateSourceandValue, then clickNext.
Click
NextinIssuance Criteriastep.Review all selected options in
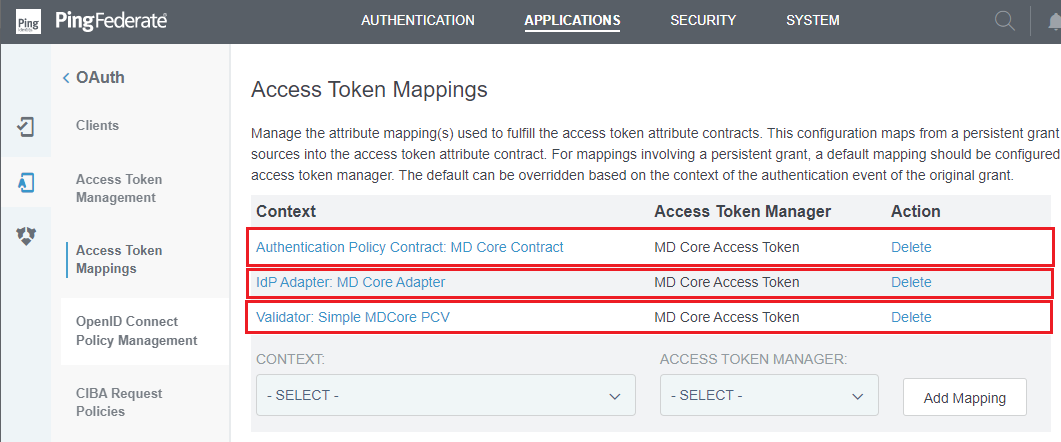
Summarytab, then clickSave.Return to
Access Token Mappingspage and repeat the steps 2 to 6 for Validator and IdP Adapter.
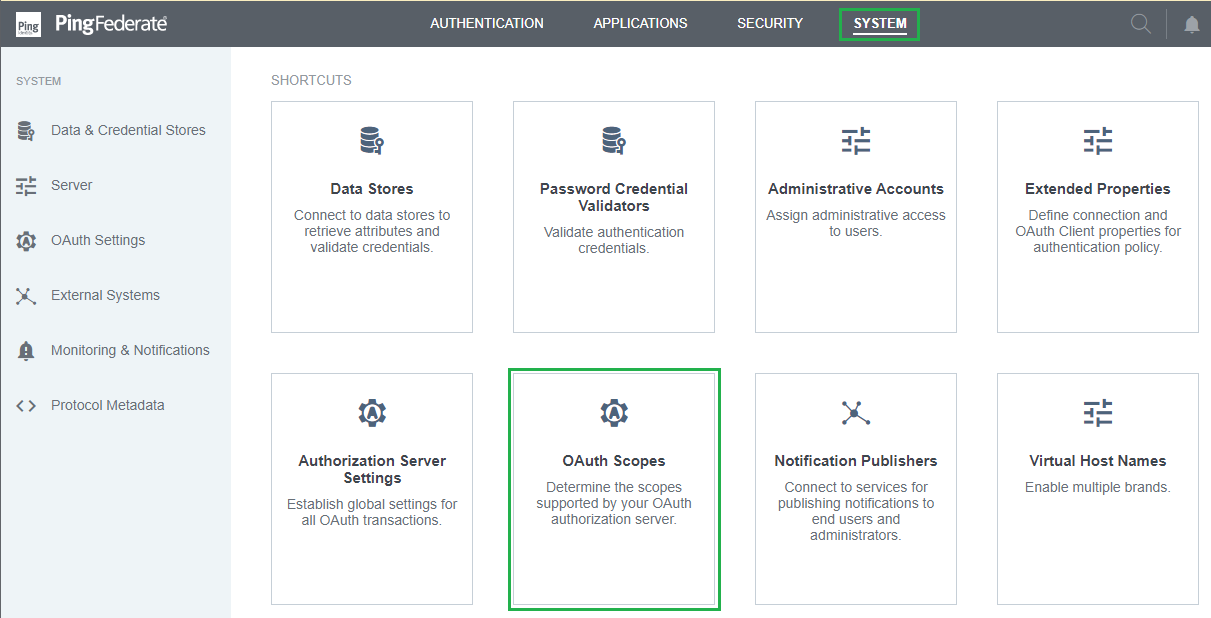
Set up Scope Management
In homepage, navigate to
SYSTEMand clickOAuth Scopes.
Under
Scope Management, atCommon Scopestab, clickAdd Common Scope.
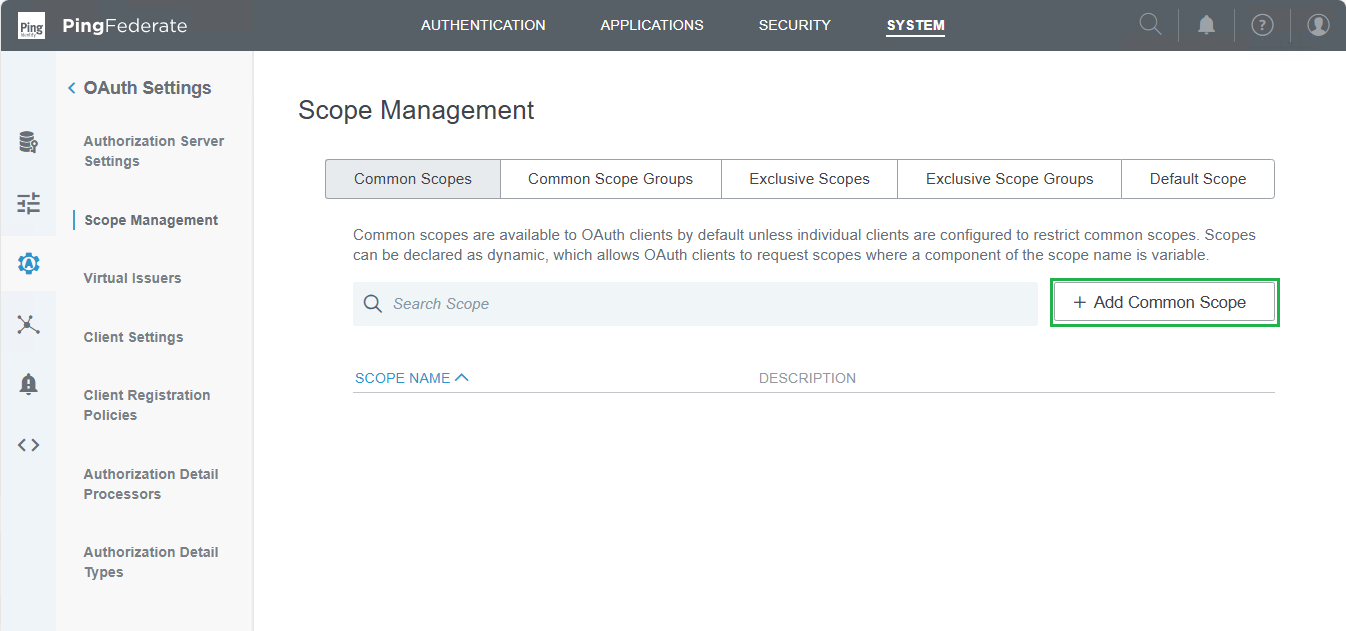
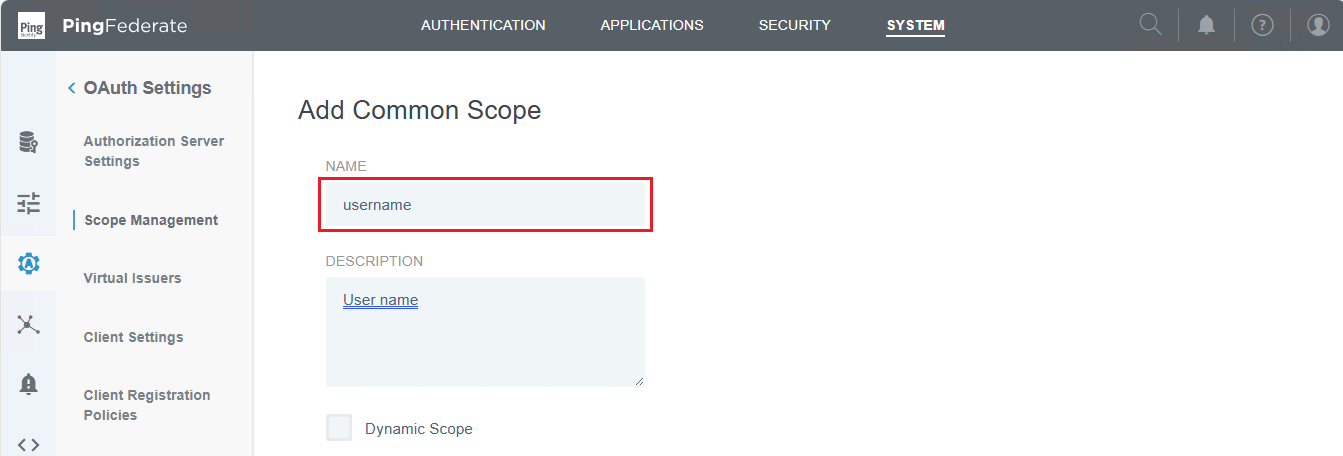
Due to MetaDefender Core requires profile scope, fill the scope name and click
Save.

Repeat the above step to add
usernamescope.
Click
Saveto complete.
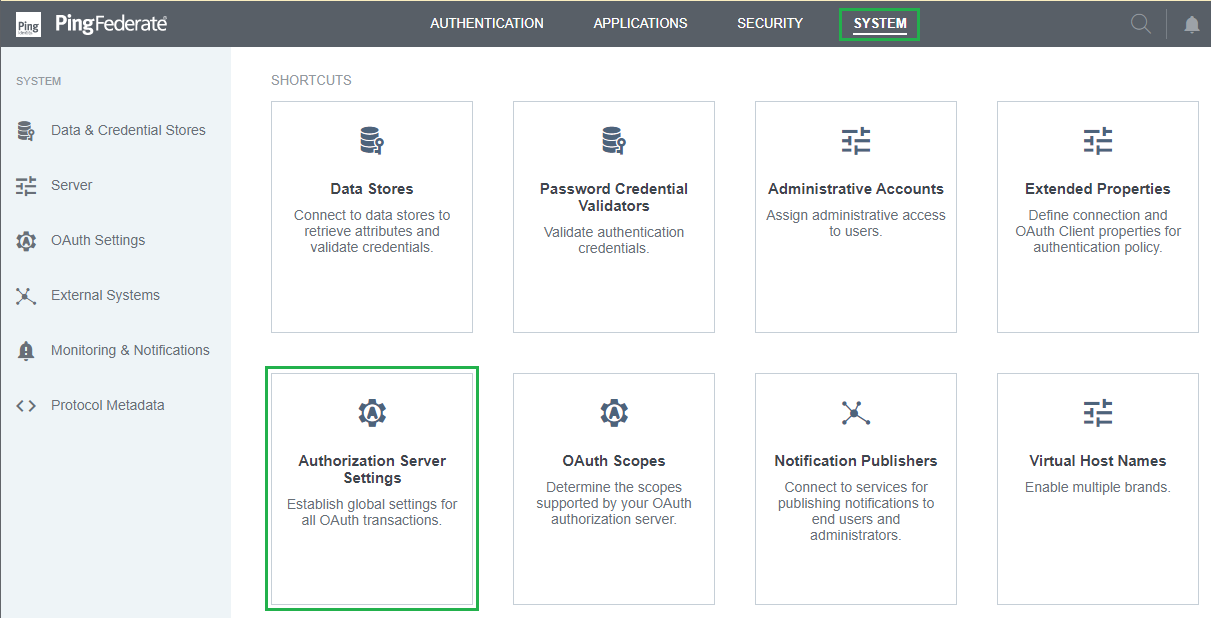
Setup Authorization Server Settings
In homepage, navigate to
SYSTEMand clickAuthorization Server Settings.
Navigate to
OAuth Administrative Web Services Settingsand select the password credential validator that was set up in previous stage forPASSWORD CREDENTIAL VALIDATOR.Navigate to
Persistent Grant Management API.Select the access token manager and scope that were set up in the previous stage for
ACCESS TOKEN MANAGERandREQUIRED SCOPE, respectively.
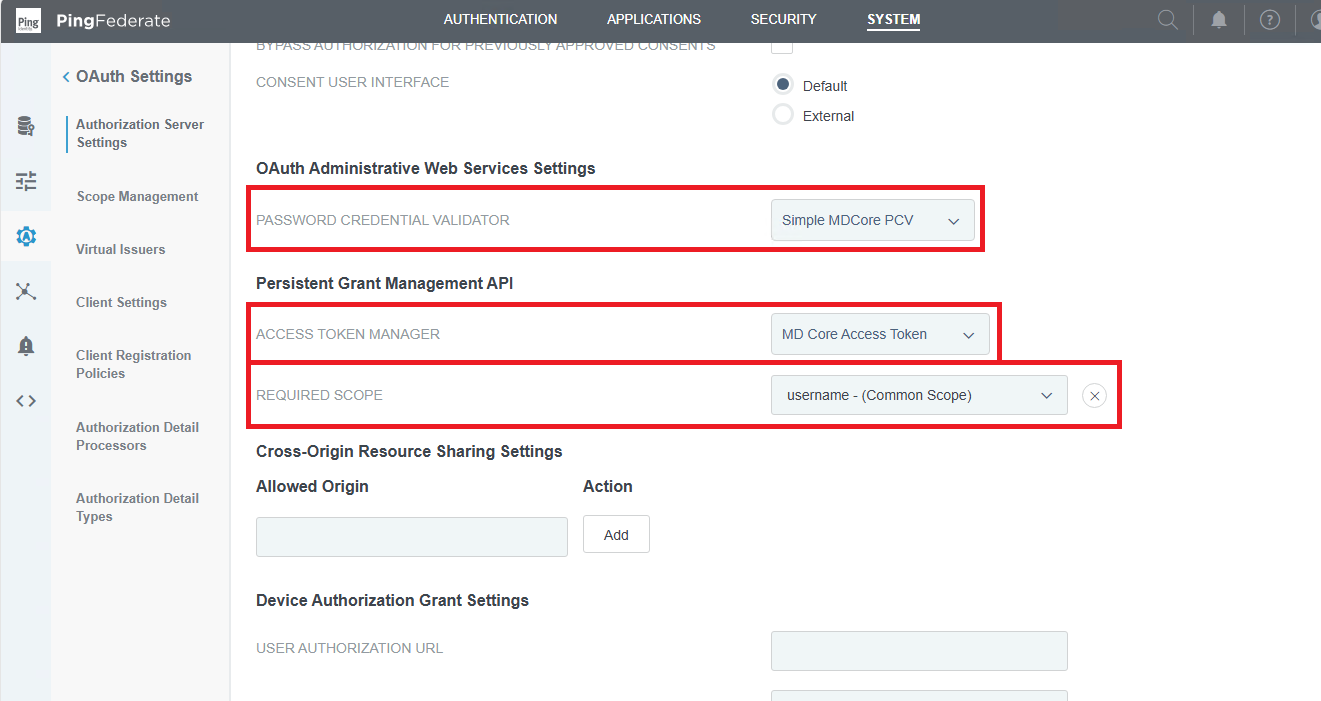
Click
Saveto complete.
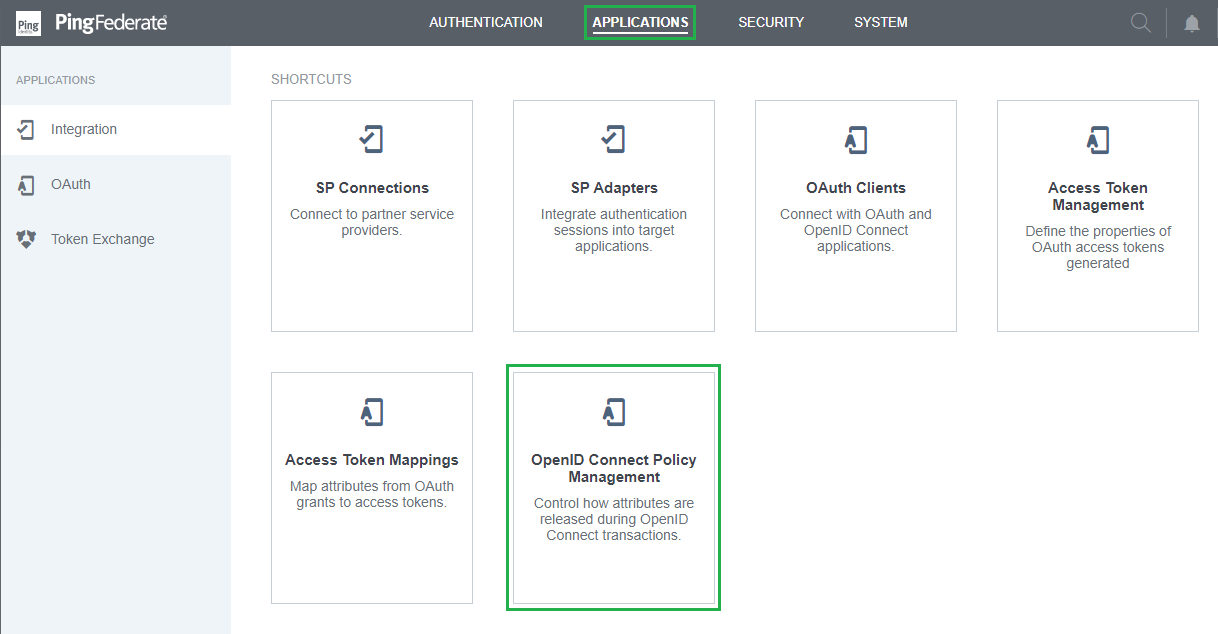
Set up OpenID Connect Policy Management
In homepage, navigate to
APPLICATIONSand clickOpenID Connect Policy Management.
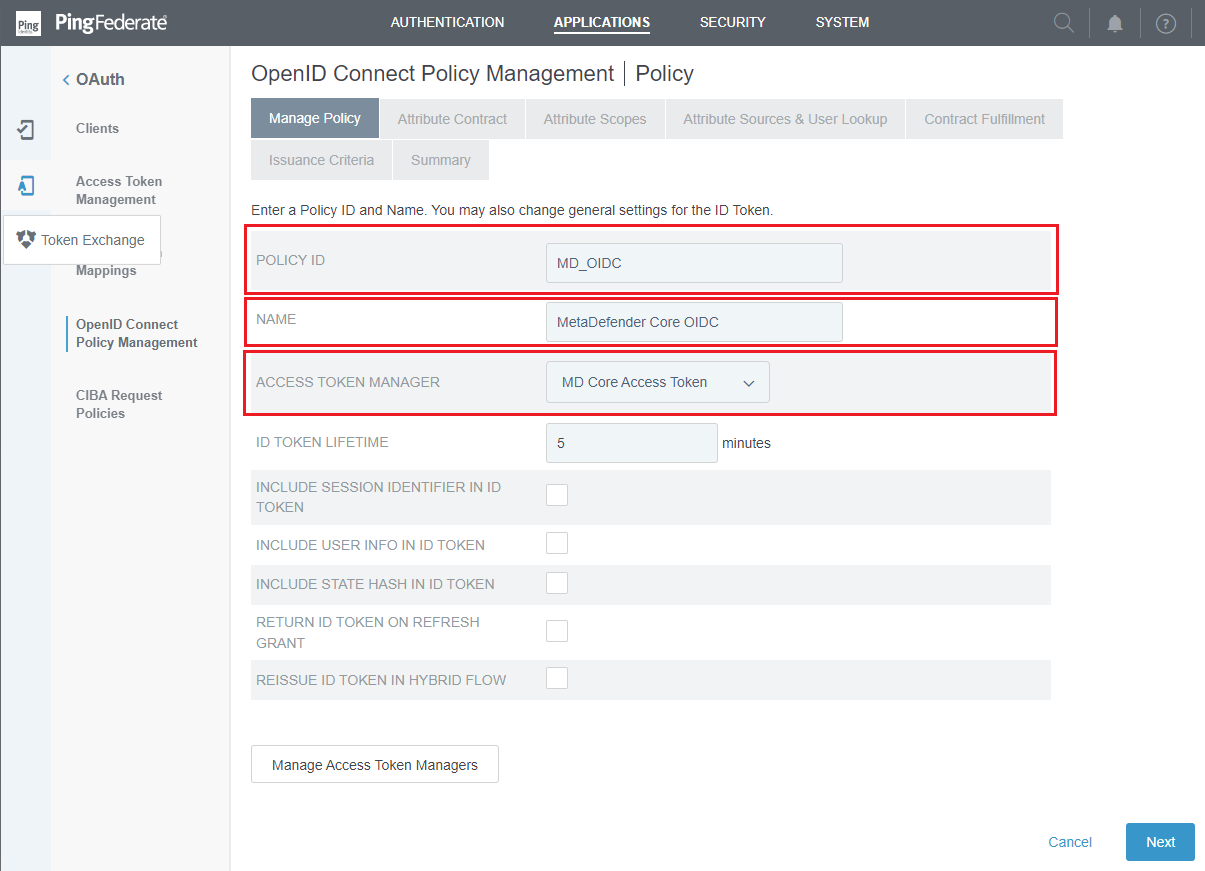
Click
Add Policyin the next page.In
Manage Policystep, enterPOLICY ID,NAMEand select the manager that was set up in previous stage forACCESS TOKEN MANAGER. ClickNexton done.
Store the value assigned to POLICY ID as policy_id. It will be used later on fetching metadata in MetaDefender Core.
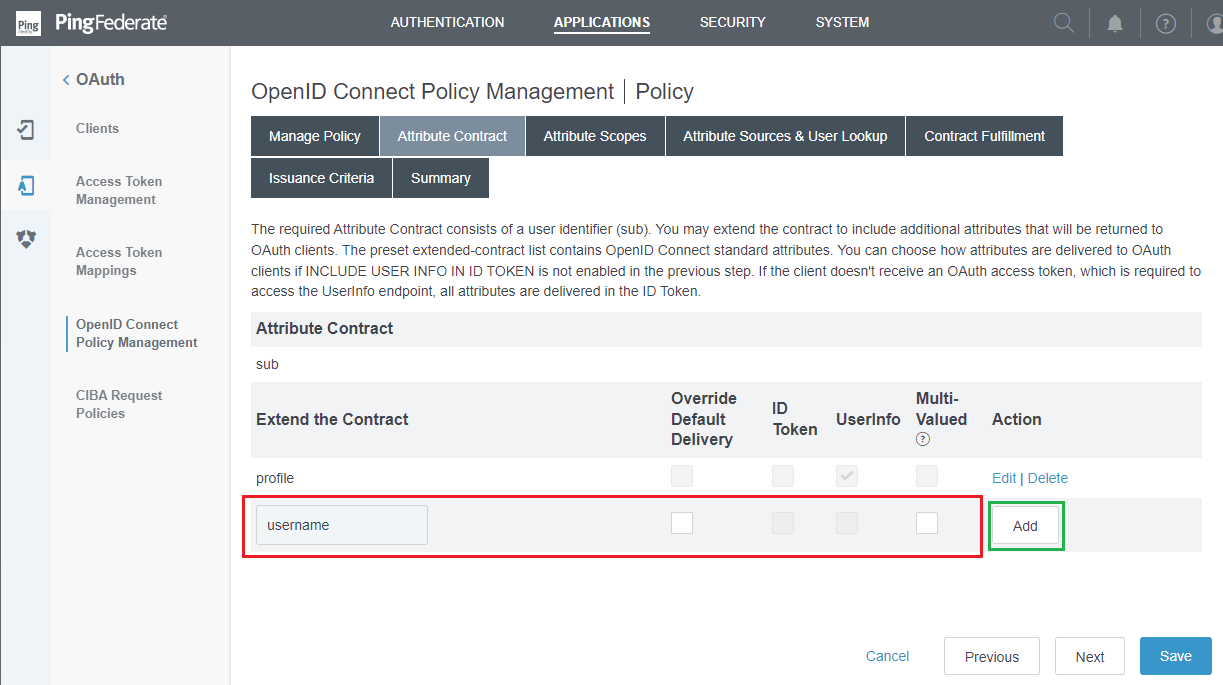
In
Attribute Contractstep, navigate toExtend the Contract, add the scopes requested by MetaDefender Core (i.e. username), and clickNext.
PingFederate, by default, lists all extended contracts. Within the scope of the instructions, only profile contract is required, all the remaining ones must be deleted.
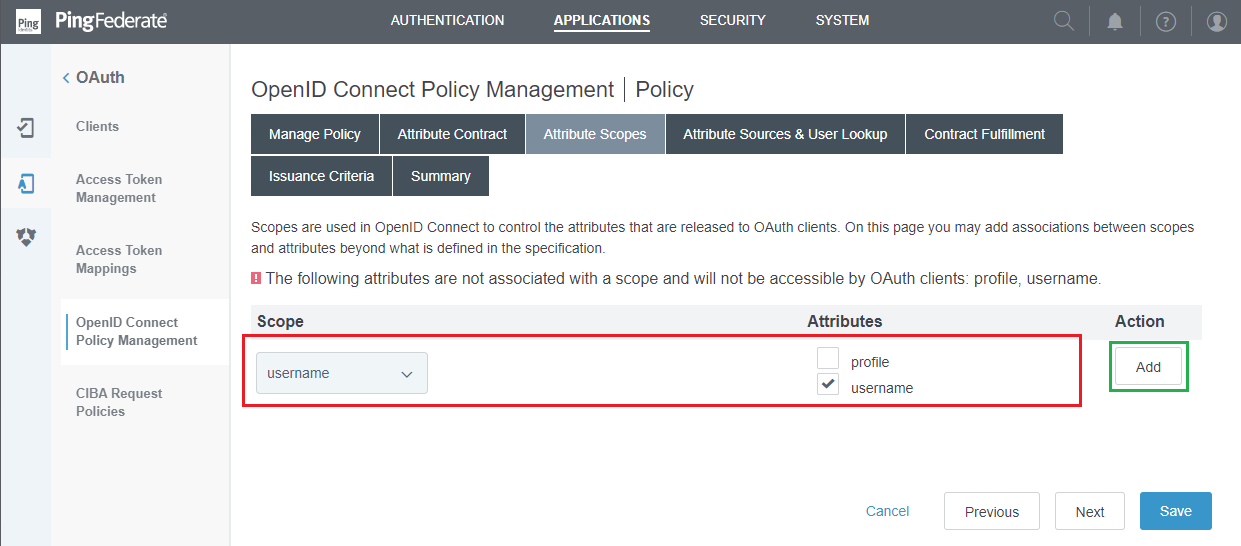
In
Attribute Scopesstep, match the scope with its attributes and clickNext.
Click
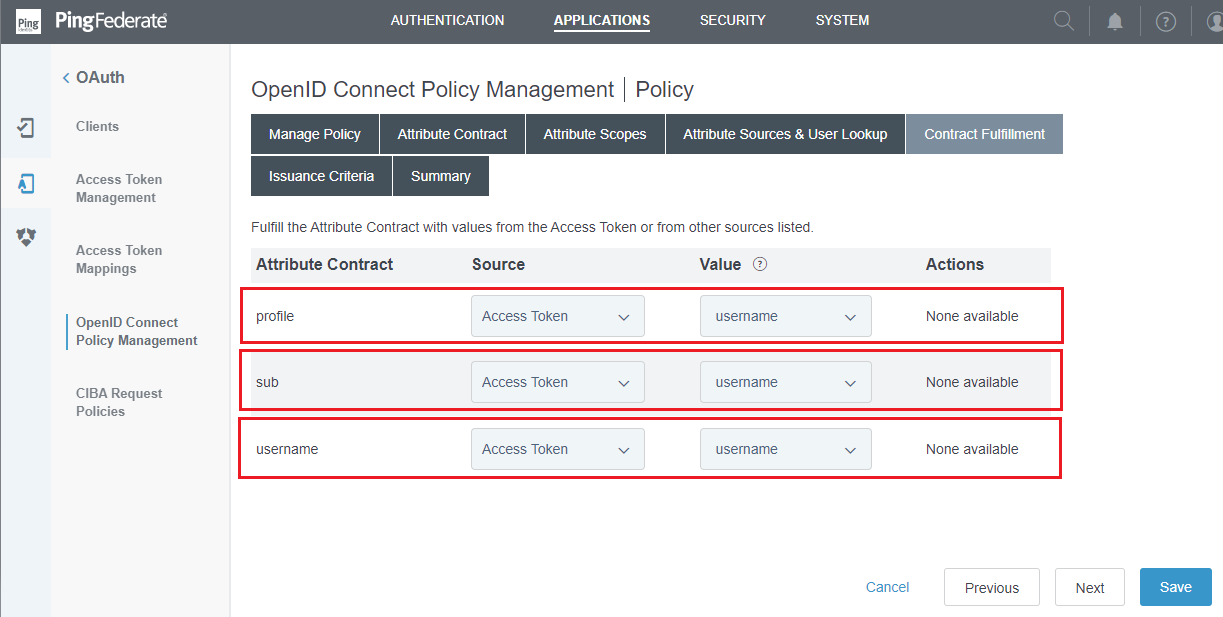
NextinAttribute Sources & User Lookupstep.In
Contract Fulfillmentstep, select the appropriateSourceandValue, and clickNext.
Click
NextinIssuance Criteriastep.Review all selected options in
Summarytab, then clickSave.
Add OAuth client
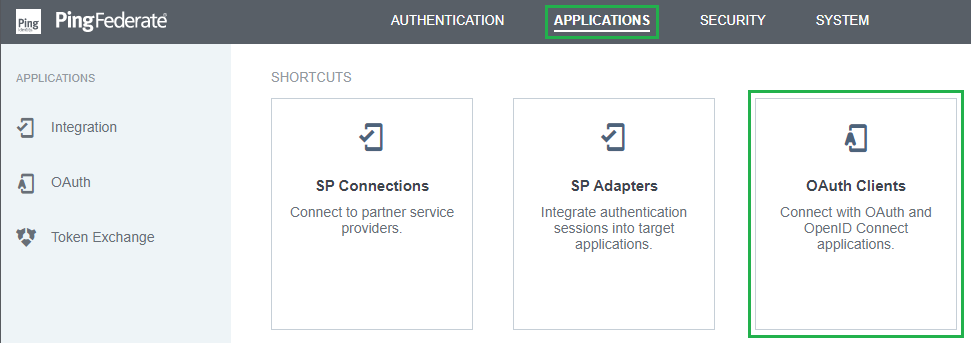
In homepage, navigate to
APPLICATIONSand clickOAuth Clients.
Click
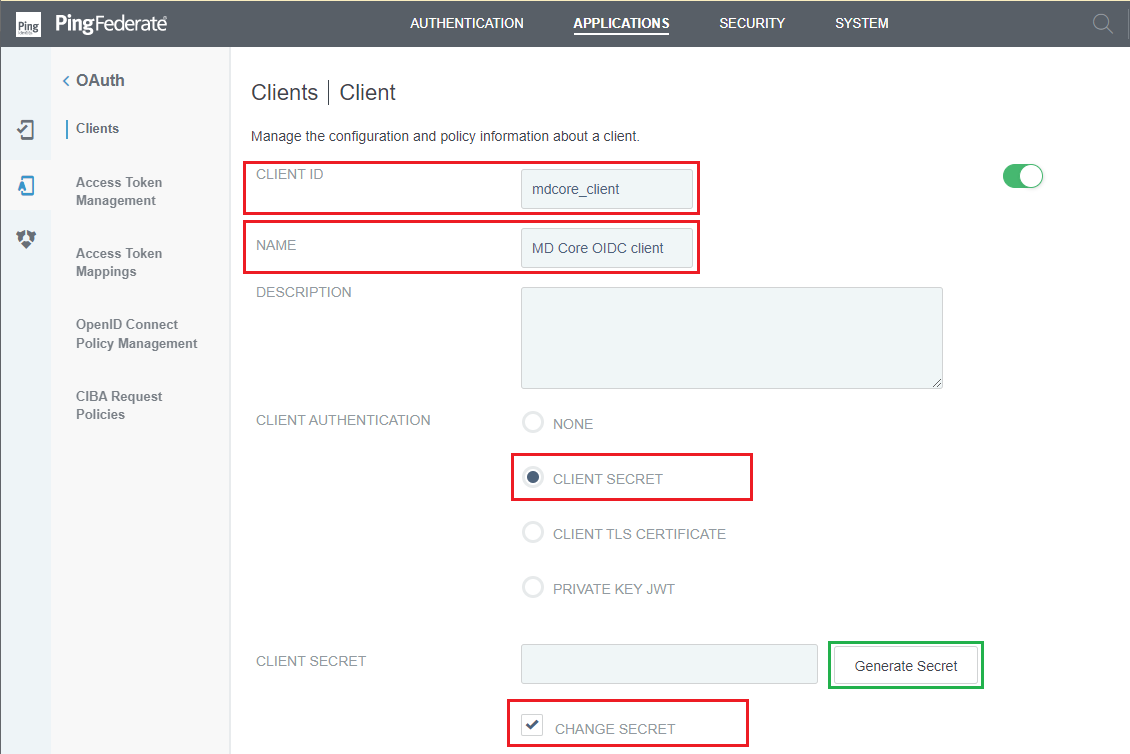
Add Clientin the next page.Enter
CLIENT IDand store to client_id.Enter
NAME.Choose
CLIENT SECRETforCLIENT AUTHENTICATION.Navigate to
CLIENT SECRET, checkCHANGE SECRETbox, clickGenerate Secret, and store the generated string as client_secret.
client_id and client_secret will be used later on setting up MetaDefender Core.
Navigate to
REDIRECT URIS, fill in a temporary Redirection URI, and clickAdd.
A temporary redirection URI is used at this step to complete configuration in PingFederate. We will return to update this setting with the correct URI from MetaDefender Core later.
Navigate to
ALLOWED GRANT TYPES, and tickAuthorization Code.Navigate to
DEFAULT ACCESS TOKEN MANAGER, and select Access Token Manager that was set up previously.
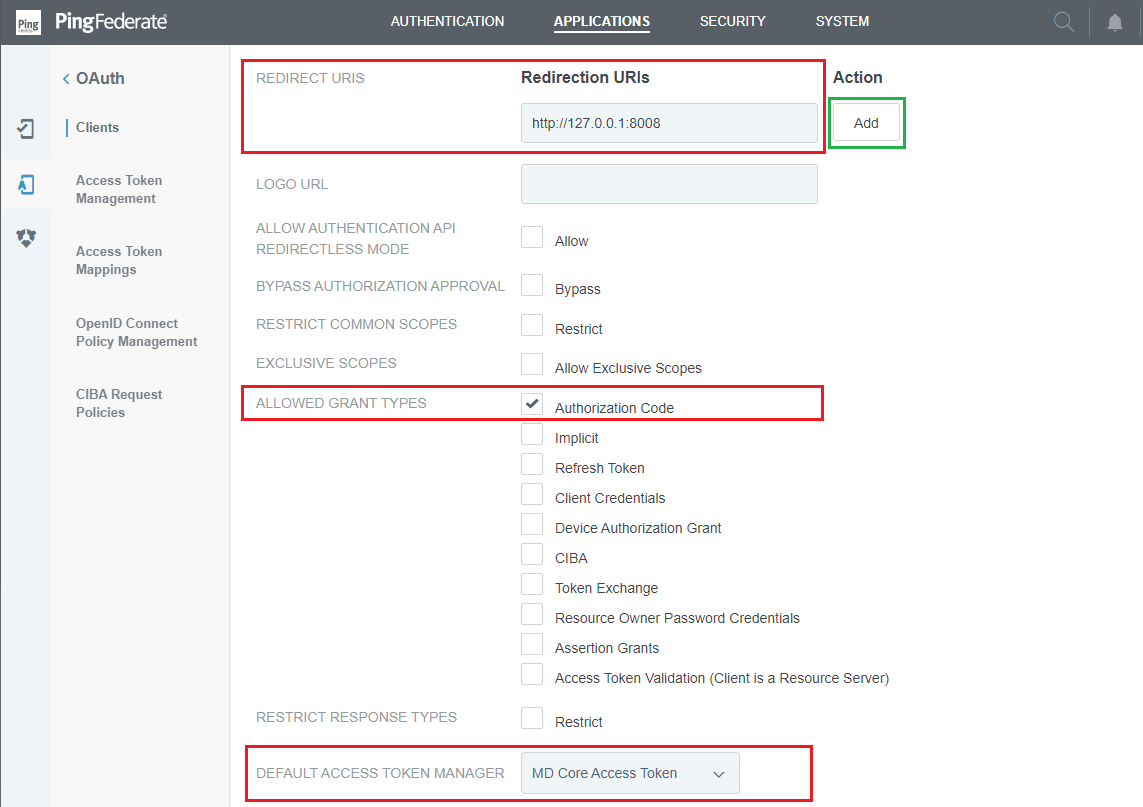
Navigate to
OPENID CONNECT, underPolicy, select OpenID connect policy that was set up previously.
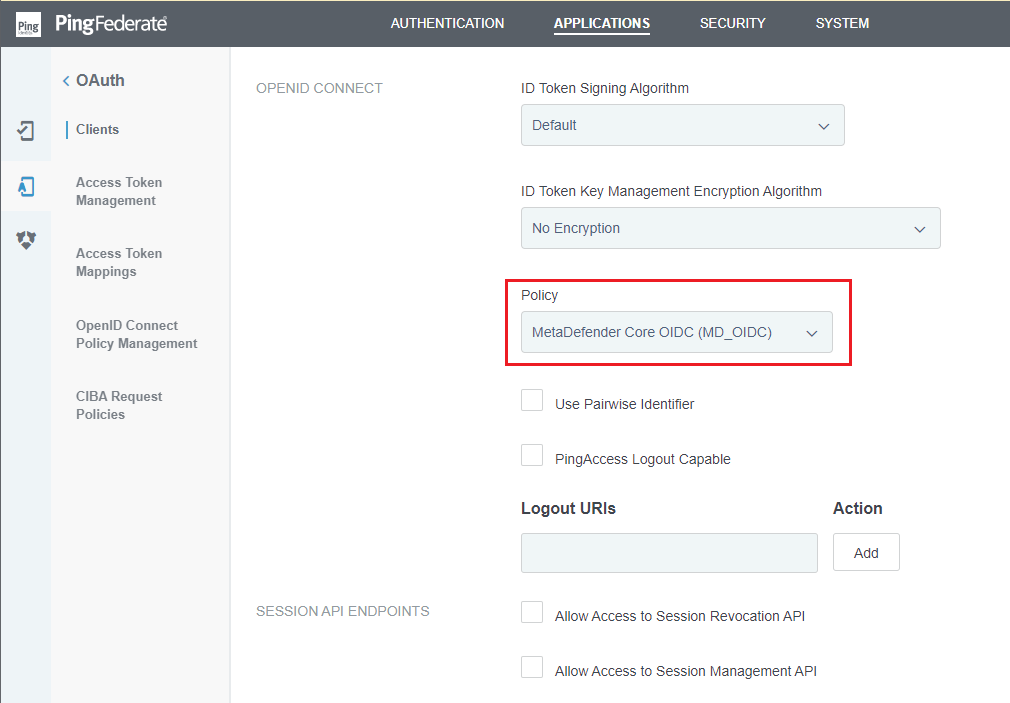
Click
Saveto complete.
Set up MetaDefender Core
Install PingFederate certificate
In homepage, go to
SECURITYand clickSSL Server Certificates.
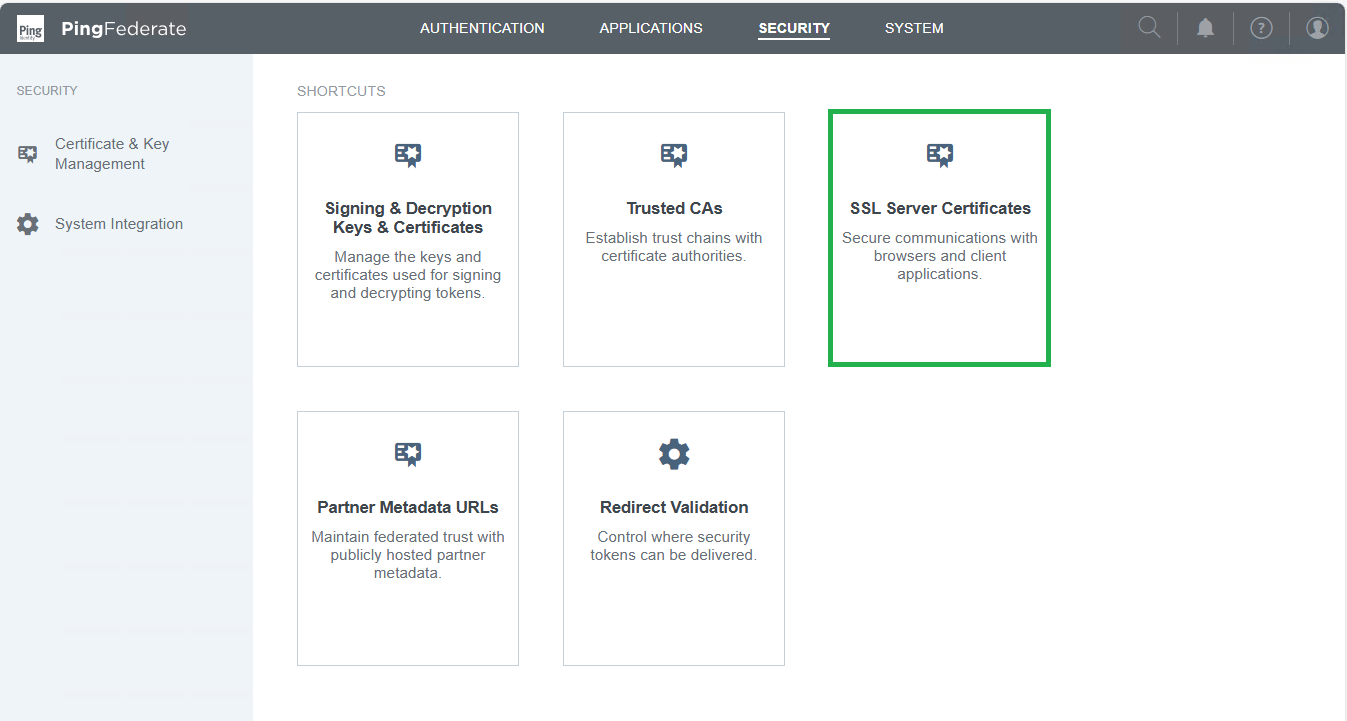
Click
Create Newto generate a new certificate.
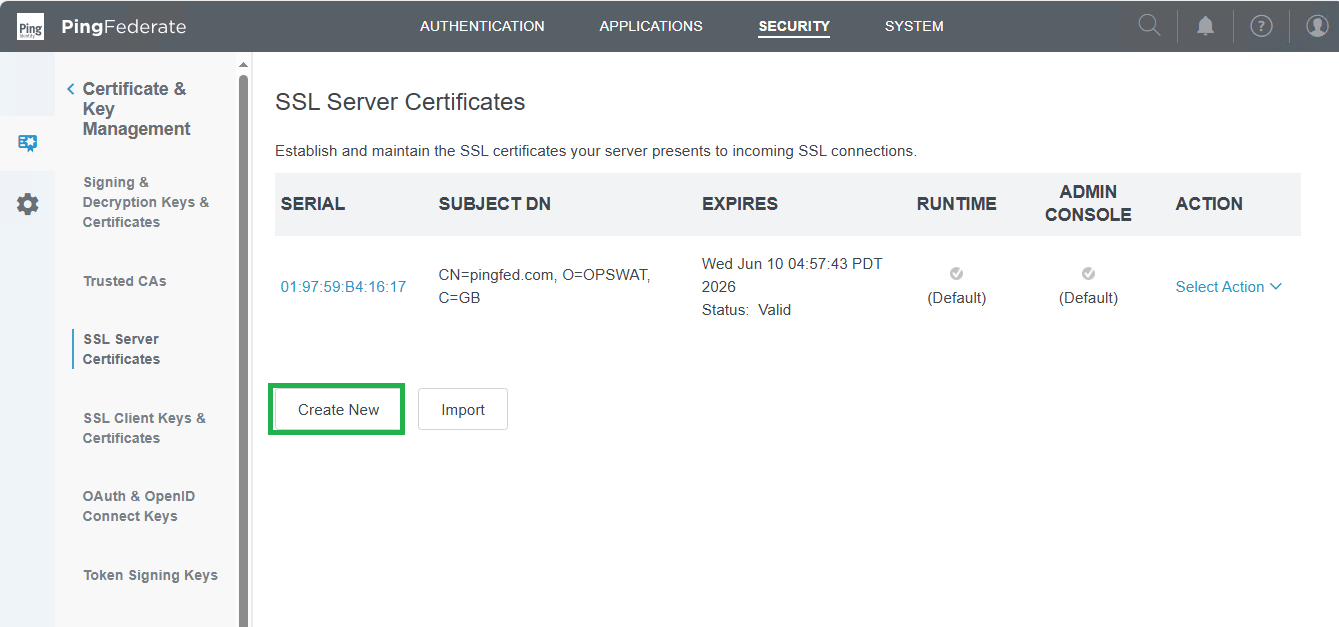
Complete the information for the new certificate, click
NextandSave.
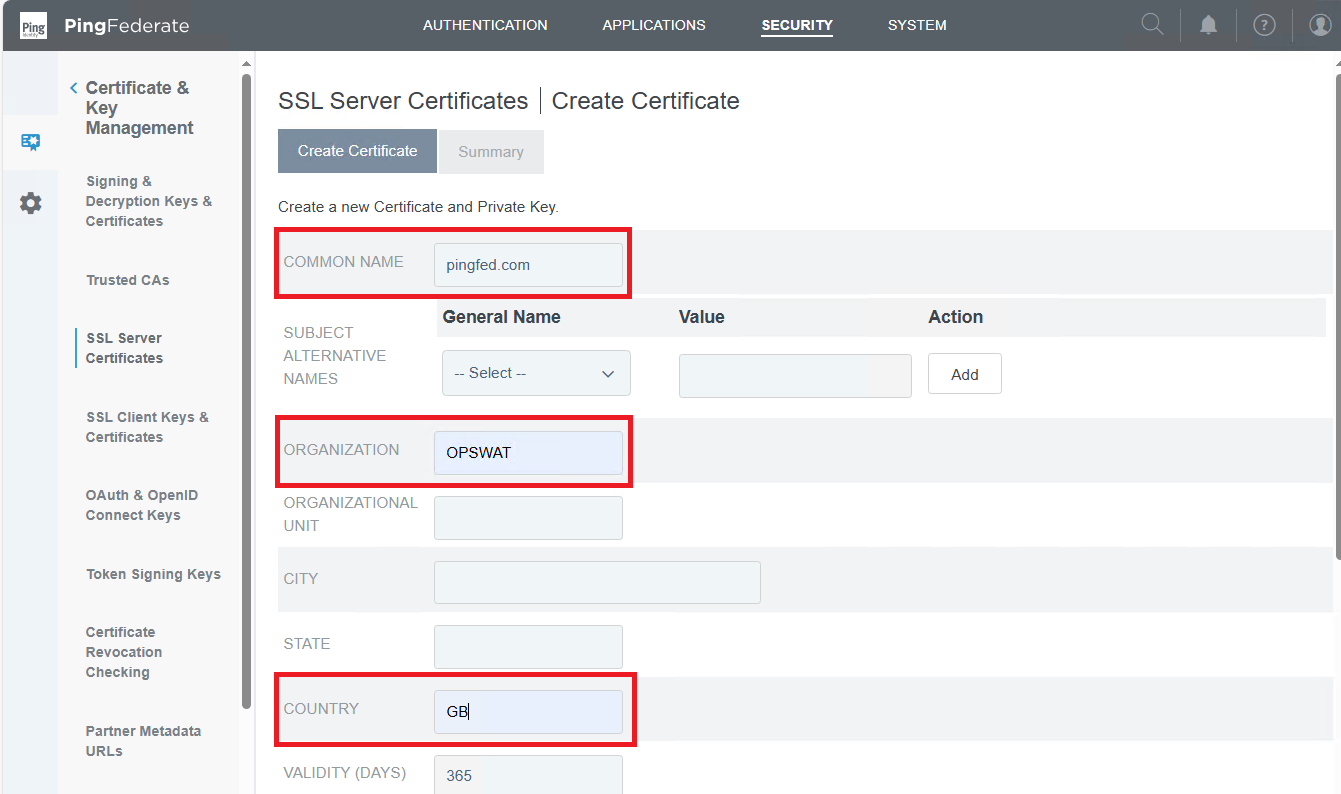
COMMON NAME must refer to the domain or IP address hosting PingFederate.
Activate the new certificate.
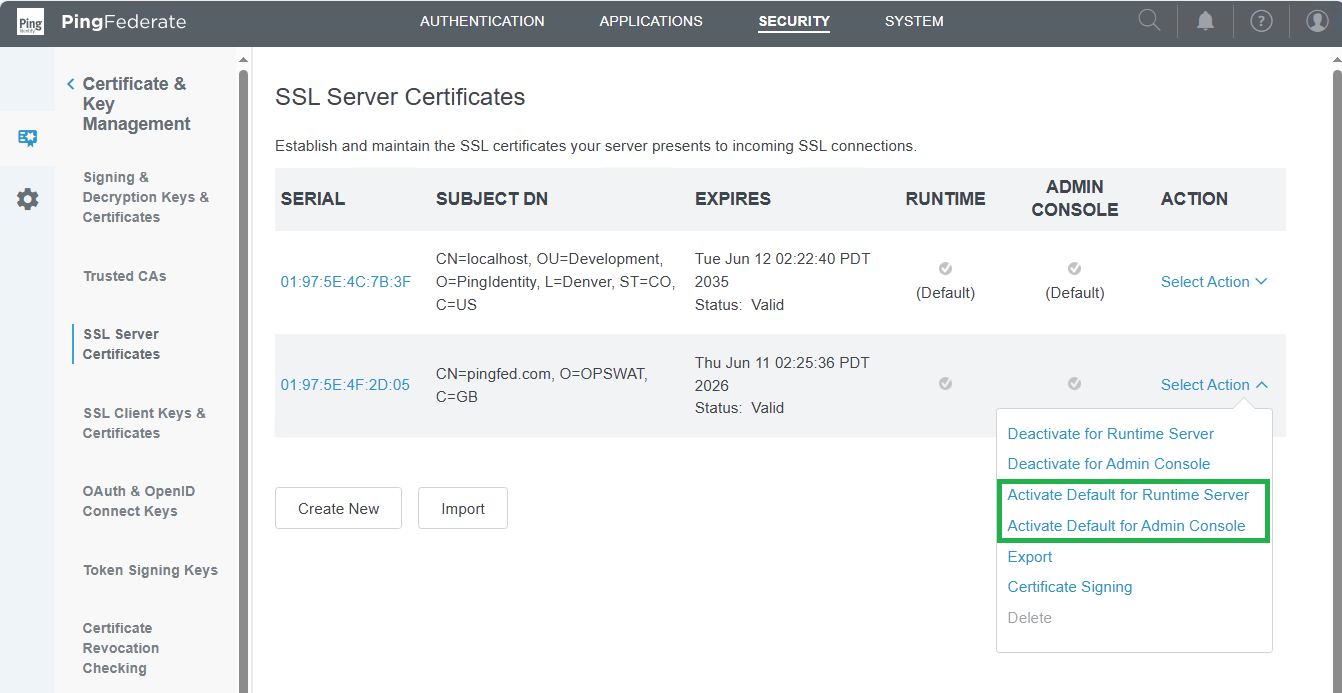
Activating the certificate will end all current sessions, and users will need to sign in again into PingFederate using the domain or IP specified in the certificate.
Select the certificate and select
Export.

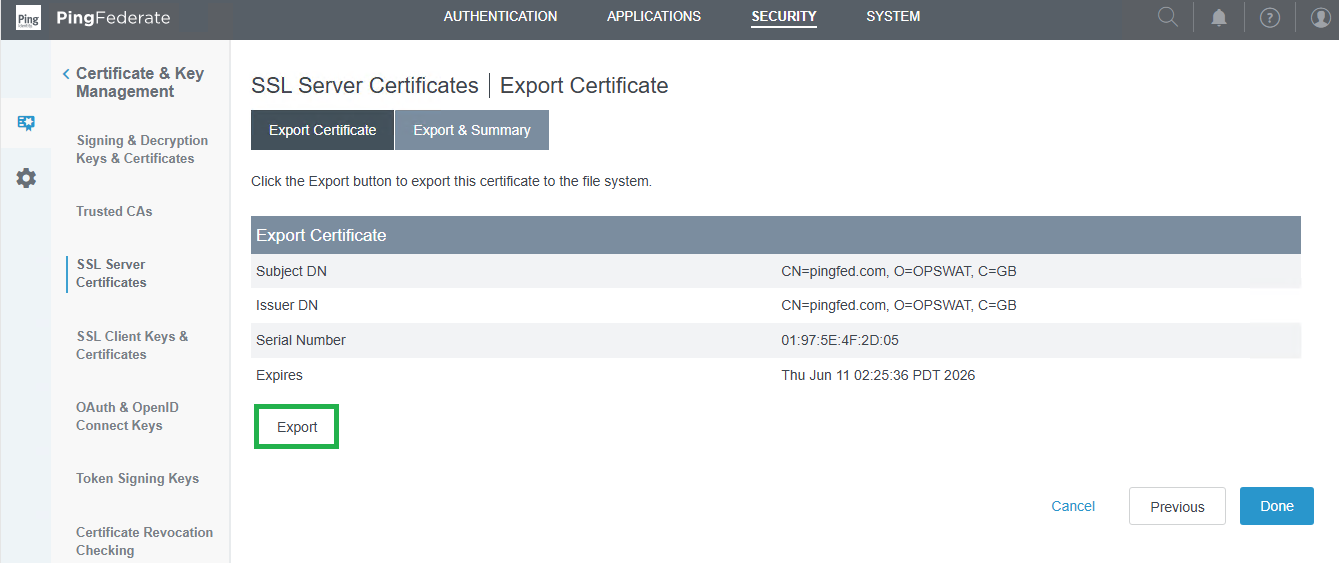
Retain the default settings and click
Next.Click
Exportto download the certificate.
Install the certificate on the server running MetaDefender Core.
Restart MetaDefender Core for the changes to take effect.
Configure OIDC in MetaDefender Core
Sign in to MetaDefender Core.
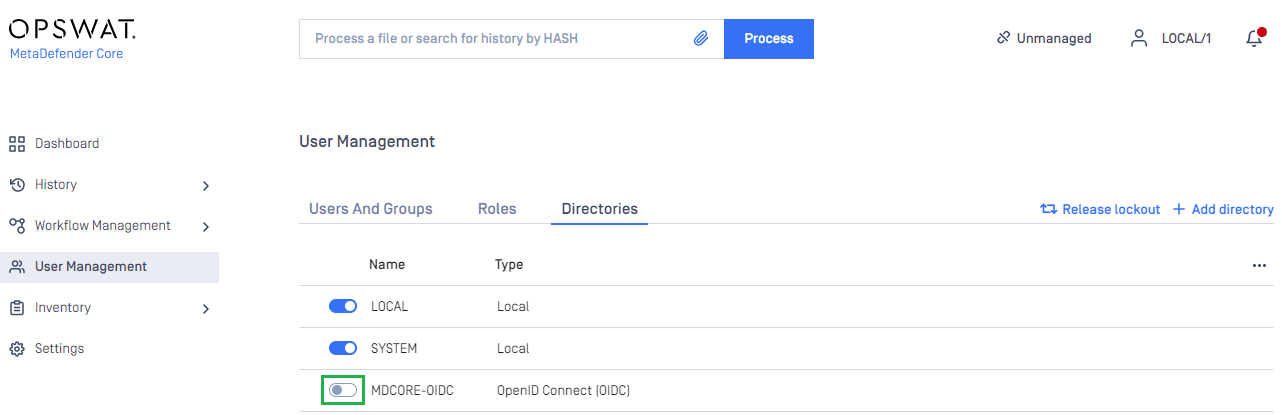
In the dashboard, click on
User Managementin the left sidebar.On
User Managementpage, selectDirectoriestab and clickAdd Directoryin the top right corner.

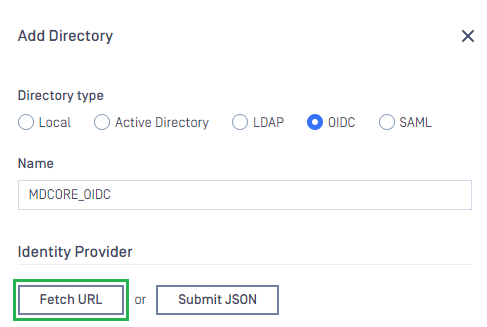
In
Add Directorypage, select OIDC asDirectory type, and enter a name for the new directory, such as MDCore-OIDC.Click
Fetch URL.
Enter PingFederate metadata URL and click
OK.
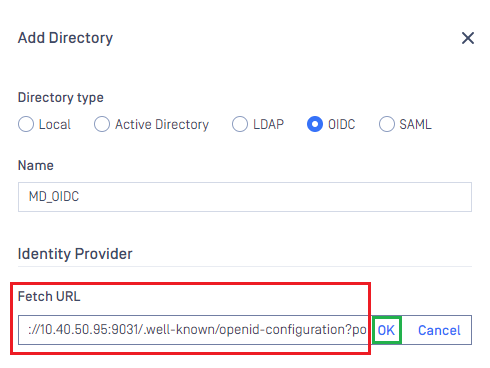
PingFederate metadata URL is in format of <host>:<port>/.well-known/openid-configuration?policy_id=<policy_id> , in which:
hostandportare the host/IP and port of the machine hosting PingFederate. The default port is 9031.policy_idis policy_id that is set toPOLICY_IDin the stage of Setup OpenID Connect Policy Management.
Under
Service Provider, paste client_id and client_secret to boxes underClient IDandClient secretrespectively.Fill in
Host or IPwith the host or IP where MetaDefender Core is hosted, such as http://127.0.0.1:8008 for this example.

Copy
Login URLand store it as login_url.
login_url is used to update Redirection URI setting in PingFederate in the next stage.
Fill in
User Identified bywith ${username}.Select the default role and choose the appropriate role for the login user.
Click
Addto complete.In
User Managementpage, toggle the new directory, MDCORE-OIDC in this example. A dialog box will appear to confirm the action. OnceEnableis clicked, all sessions will expire immediately.
Complete configuration in PingFederate
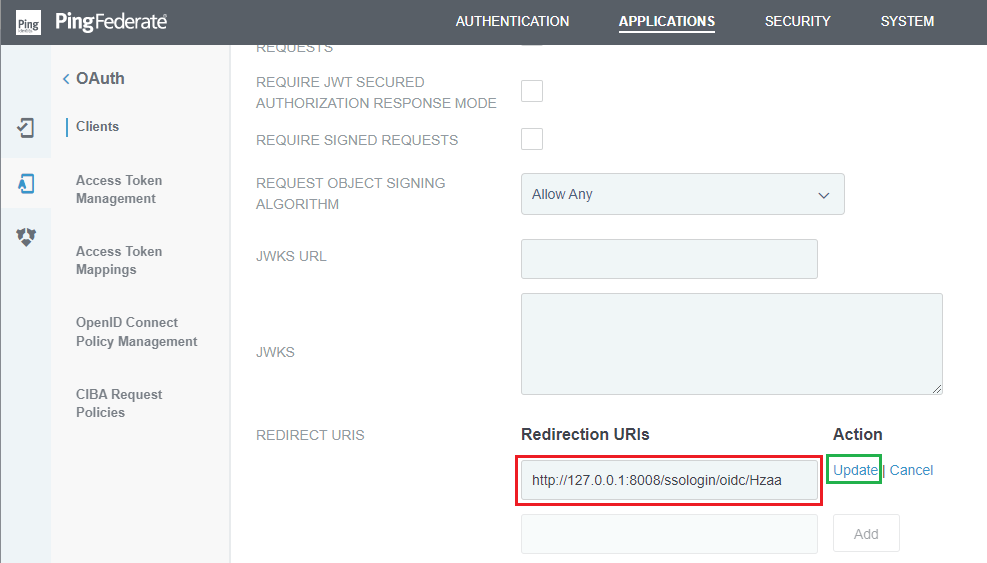
Back to PingFederate, in
OAuth, navigate toClientsin the sidebar.In
APPLICATIONStab, navigate toRedirection URIs, clickEdit, modify the URI with login_url copied from MetaDefender Core.Click
UpdateandSave.
Test the integration
On the home screen of MetaDefender Core, click
Login; the user is redirected to PingFederate Sign-on page.
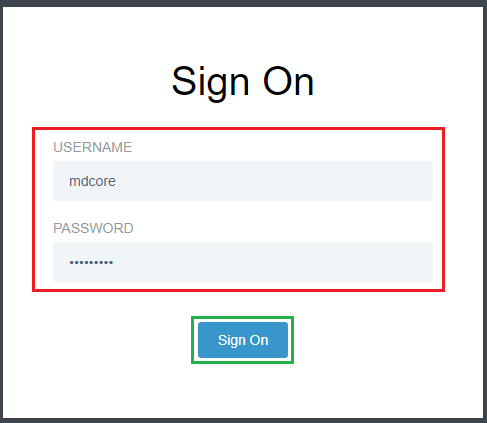
Sign in using the account registered with PingFederate.
If everything goes well, MetaDefender Core dashboard is displayed with the user identity in the top right corner.

Otherwise, access backup login page at
<mdcore-host>#/public/backuploginfor trouble shooting.