A security dongle must be inserted in the server that you want to change, RED or BLUE.
Prerequisites
Before you configure any transfer parameters:
Ensure a dongle is inserted in the server you want to modify.
Ensure MetaDefender Diode X BLUE and RED network addresses are configured.
Ensure the current license and personality are uploaded.
FTP
FTP must be configured on both the BLUE and RED sides . Each side has its own management UI.
You can define several FTP servers in the Diode X UI to send files from BLUE to RED. To do so, just follow the instructions bellow.
Go to the management UI and insert user and password to login.
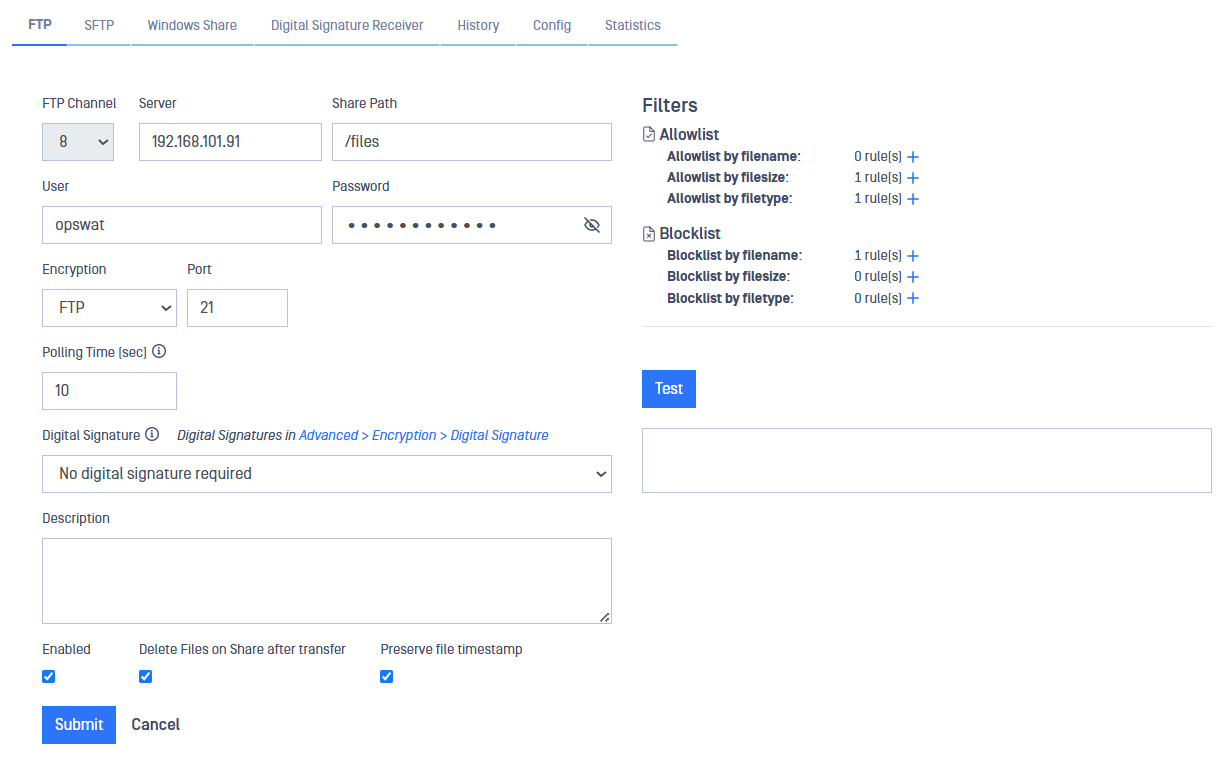
Click the File Transfer link, select the FTP label and then click on the Add FTP Share button.
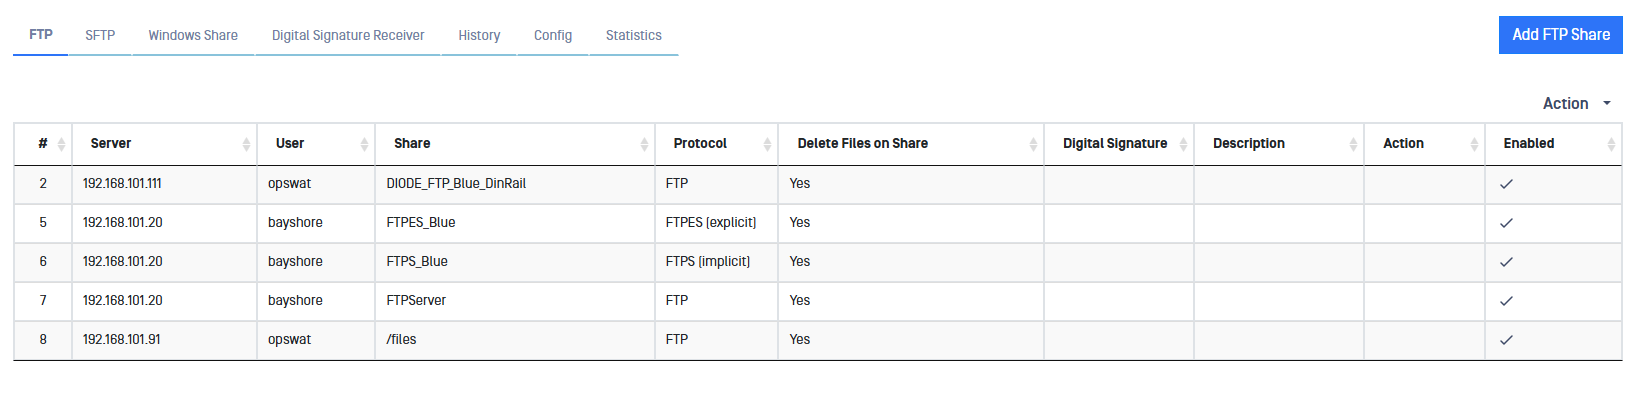
Complete the following fields:
FTP Channel: Assign a channel number.
This FTP Channel must be the same on both sides, BLUE and RED.
User: Username for FTP file transfer server
Password: Password for the FTP server
Server: Name or IP address for the FTP server
Share Path: Folder on FTP server. The value can be a folder name or a ‘/’, depending on how you set up file sharing on the FTP server.
Diode X BLUE: Location on the BLUE zone server that contains the data to be transferred
Diode X RED: Location on the RED zone server that will receive the transferred data
Description (optional): Description of the FTP transfer.
Encryption: Select FTP for no encryption, FTPS for implicit FTPS and FTPES for explicit FTPS
Port: The default port will change selecting FTPS.
Polling Time: configure how often to poll the file share for files (default value is 10 seconds).
MetaDefender Core Workflow: Deploy the dropdown list to select a MetaDefender Core Workflow for the current channel. User can select different Workflows for every channel.
Digital Signature: Choose a Digital Signature to sign to sign the file transfer on the current channel. You can generate or import key pairs on the link next to the icon.
Enabled: File transfer will be enabled if this checkbox is ticked.
Delete Files on Share after transfer: If this checkbox in ticked, files will be erased from the Share folder once the file transfer have been completed. This option will be present only in the sending side.
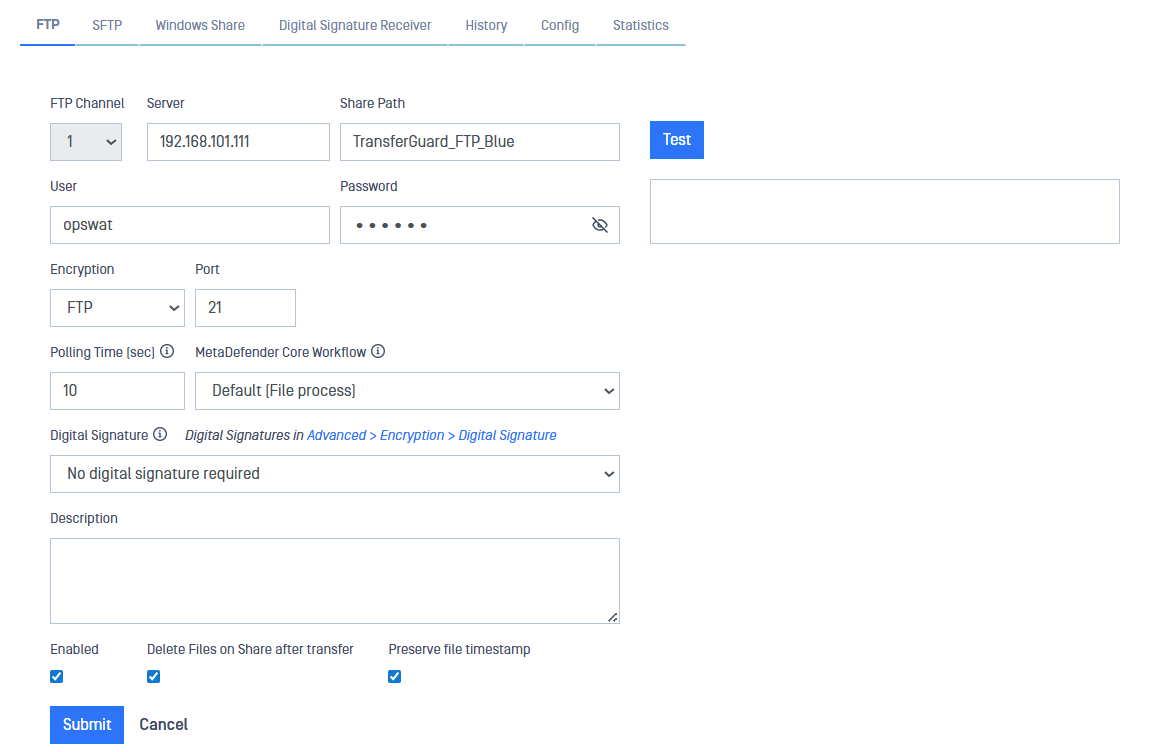
After filling in the fields, click on the Submit button to save configuration.
SFTP
SFTP must be configured on both the BLUE and RED sides . Each side has its own management UI.
You can define several SFTP servers in the Diode X UI to send files from BLUE to RED. To do so, just follow the instructions bellow.
Go to the management UI and insert user and password to login.
Click the File Transfer link, select the SFTP label and then click on the Add SFTP Share button.

Complete the following fields:
SFTP Channel: Assign a Channel Number
The SFTP Channel Number must be the same on both the BLUE and RED sides.
User: Username for SFTP file transfer server.
Auth: Select between password or Private Key depending on what is the preferred authentication method.
Password/Private Key: insert here the password or Private Key depending on the authentication method selected.
Server: Name or IP address for the SFTP server.
Port: Default port for SFTP file transfer is 22 but it can be changed by the user.
Share Path: Folder on SFTP server. The value can be a folder name or a ‘/’, depending on how you set up file sharing on the SFTP server.
Diode X BLUE: Location on the BLUE zone server that contains the data to be transferred.
Diode X RED: Location on the RED zone server that will receive the transferred data.
Polling Time: configure how often to poll the file share for files (default value is 10 seconds).
MetaDefender Core Workflow: Deploy the dropdown list to select a MetaDefender Core Workflow for the current channel. User can select different Workflows for every channel.
Description (optional): Description of the SFTP transfer.
Digital Signature: Choose a Digital Signature to sign to sign the file transfer on the current channel. You can generate or import key pairs on the link next to the icon.
Enabled: File transfer will be enabled if this checkbox is ticked.
Delete Files on Share after Transfer: If this checkbox in ticked, files will be erased from the Share folder once the file transfer have been completed. This option will be present only in the sending side.
Connection can be tested to check the configuration pressing Test button.
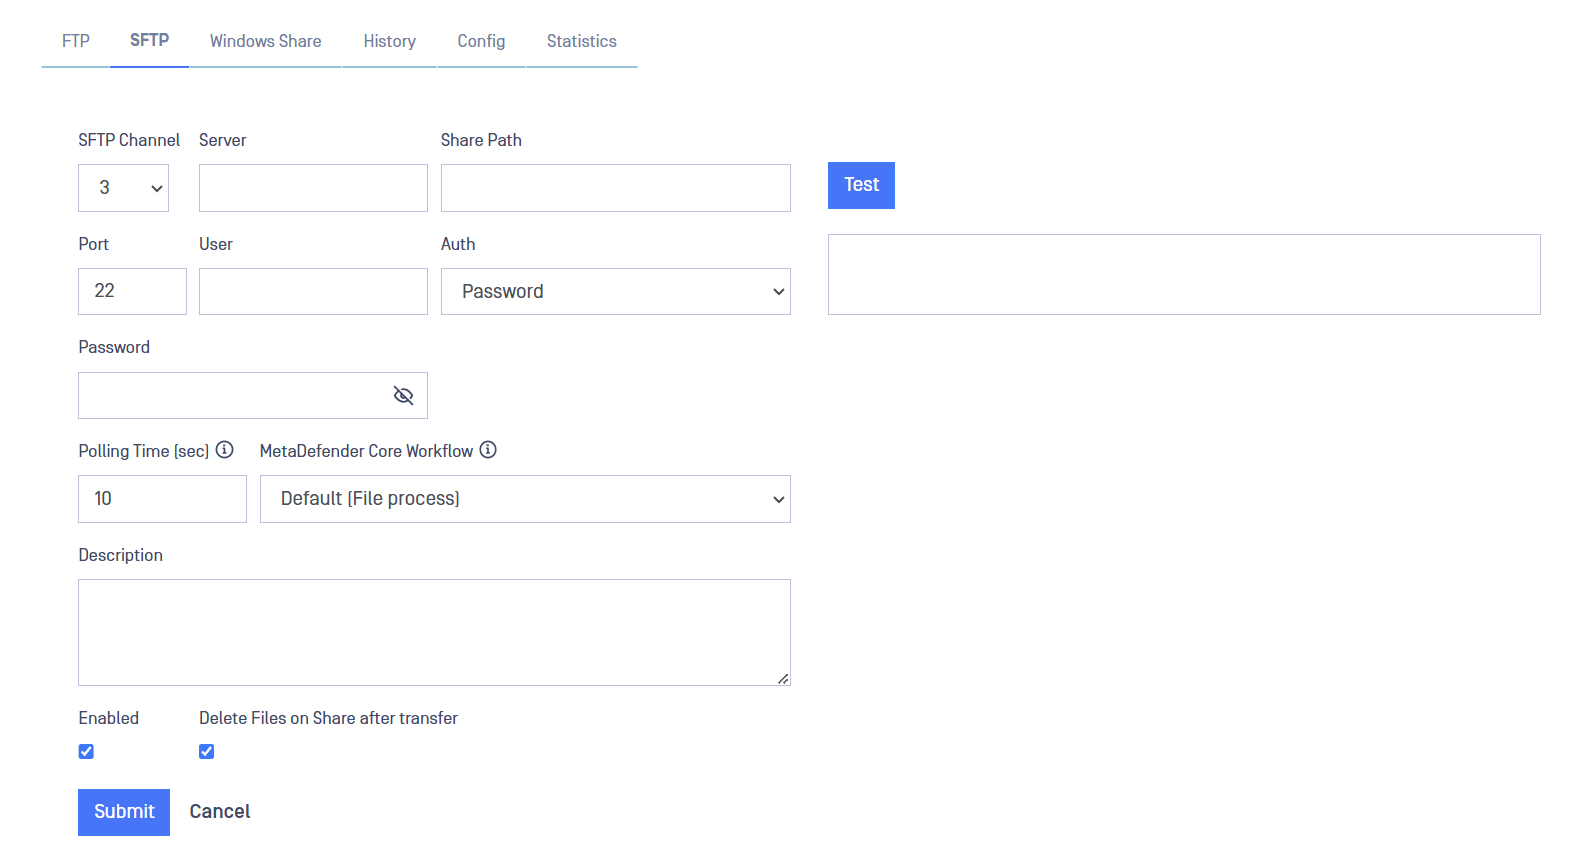
After filling in the fields, click on the Submit button to save configuration.
Windows File Share
Windows File Share (WFS) must be configured on both the BLUE and RED sides . Each side has its own management UI.
Go to the management UI and insert user and password to login.
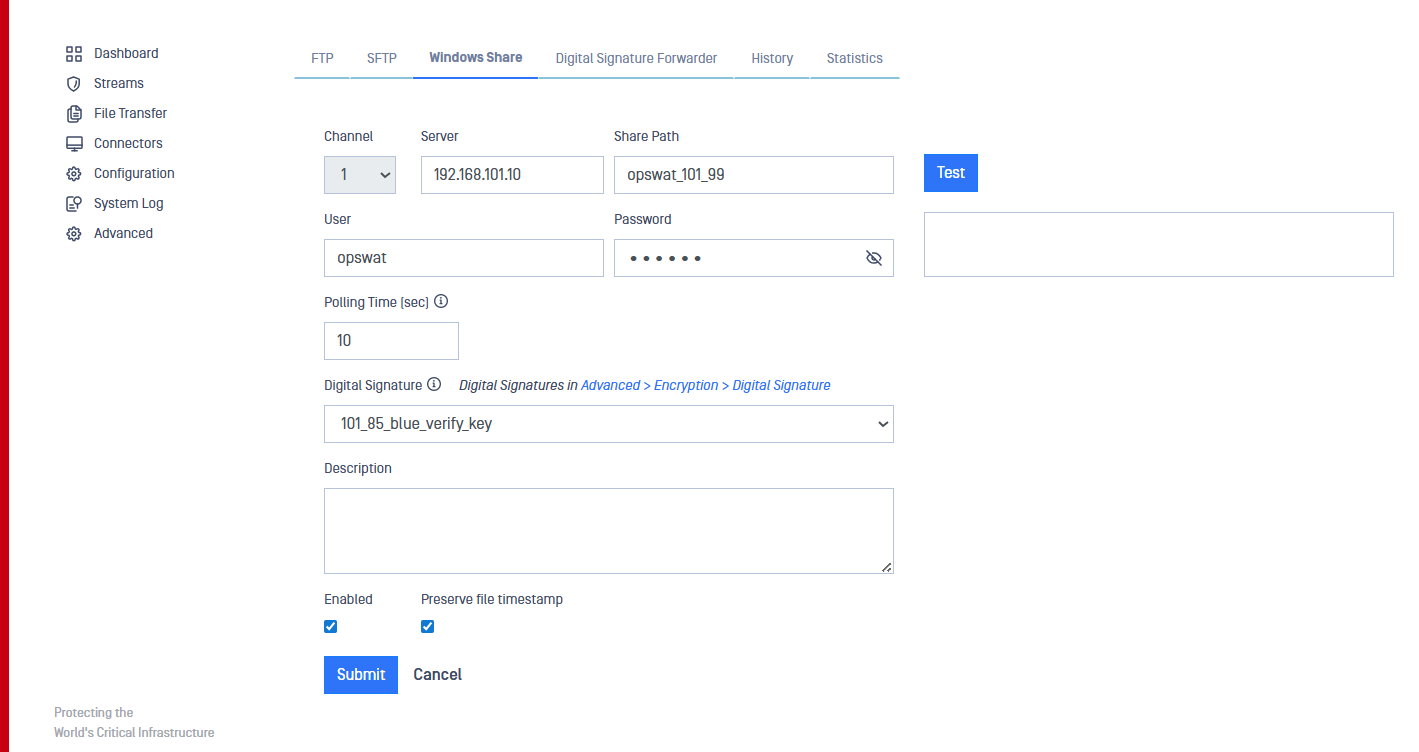
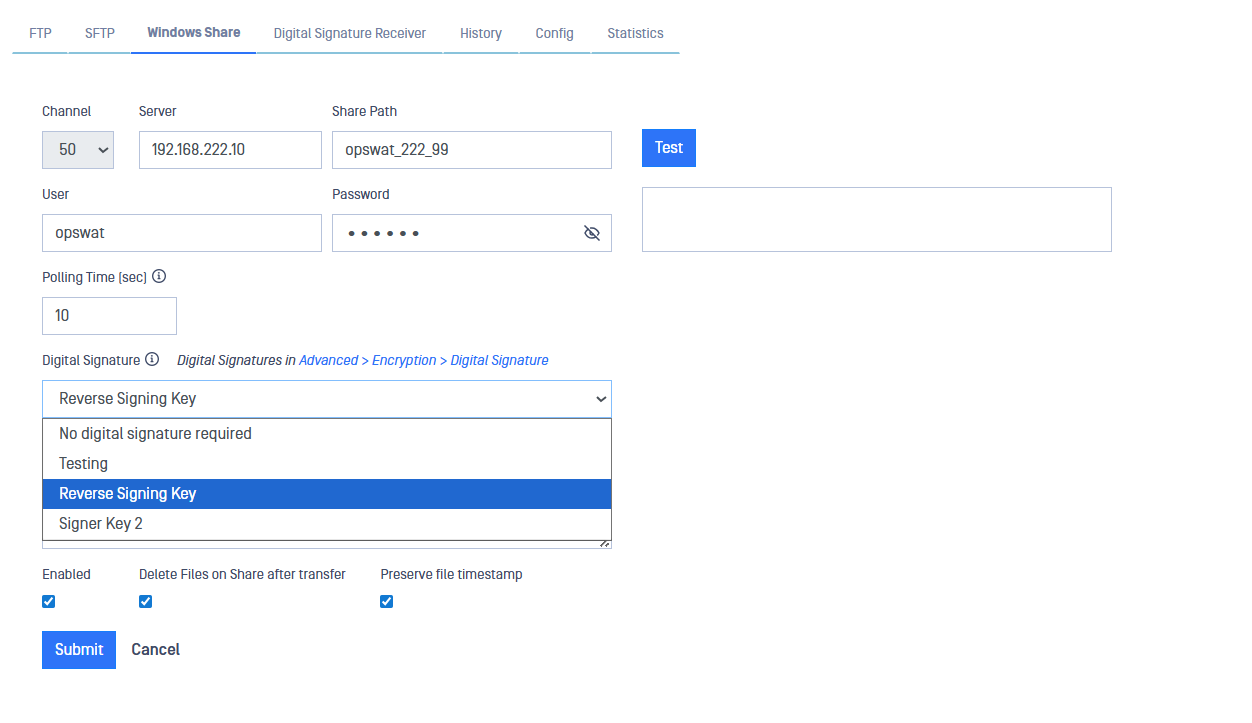
Click the File Transfer select the Windows Share label and then click on the Add Windows Share button.

Complete the following:
Channel: Assign a channel number.
The WFS Channel Number must be the same on both the BLUE and RED sides.
User: Username for the Windows File Sharing server
Password/Re-enter: Password for the Windows server
Server: Name or IP address for the Windows server
Share: Folder on Windows File Sharing. This value must be a folder name
Diode X BLUE: Location on the BLUE zone server that contains the data to be transferred
Diode X RED: Location on the RED zone server that will receive the transferred data
Polling Time: configure how often to poll the file share for files (default value is 10 seconds).
MetaDefender Core Workflow: Deploy the dropdown list to select a MetaDefender Core Workflow for the current channel. User can select different Workflows for every channel.
Digital Signature: Choose a Digital Signature to sign to sign the file transfer on the current channel. You can generate or import key pairs on the link next to the icon.
Description (optional): Description of the Windows Share transfer.
Enabled: File transfer will be enabled if this checkbox is ticked.
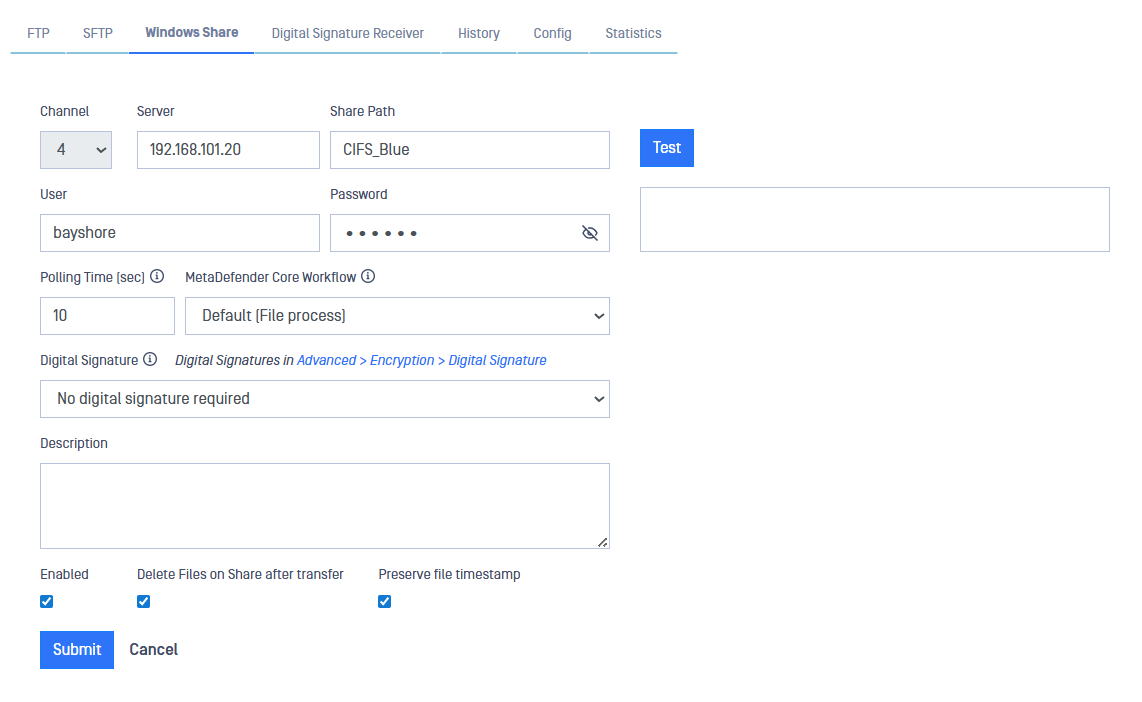
After filling in the fields, click on the Submit button to save configuration.
Mixed Format File Transfer Protocols
The Diode X allows the user to configure mixed file transfers. For instance a user can configure a WFS file share on the BLUE side and a FTP share on the RED side. The Diode X BLUE will take files from the Windows Share, transfer them to the Diode X RED then transfer the files to a FTP server configured on the RED side. To do that:
Configure your preferred file transfer protocol for the BLUE side and configure it as previously indicated.
Configure your preferred file transfer protocol for the RED side and configure it as previously indicated.
The Channel Number must be the same on both BLUE and RED sides.
Initiate your file transfer from the BLUE side and check the files have been received in the RED side.
File Transfer Filters
Diode X provides the ability to Allow or Block files based on File Name, Size and Type. This feature is available for FTP, SFTP and Windows File Share formats. Filter configuration is required on the BLUE side only.
Click on the File Transfer link, select the FTP, SFTP or WFS label and then click on the Channel Number to be filtered.
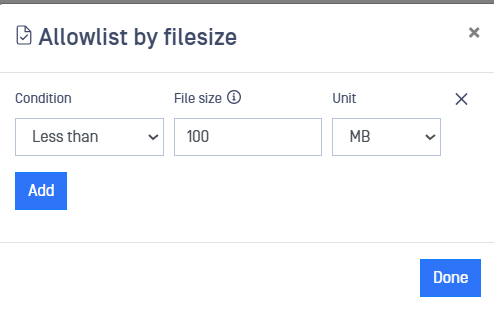
Click on "+" of the Allowlist/Blocklist filter to be configured.
Allowlist by File Name: Must be a valid regular expression. Max length: 100 characters.
Allowlist by File Size: Valid range: 0 - 8589934591.
Allowlist by File Type: Must be a valid MIME type (example" 'application/JSON'). Max length: 100 characters.
Blocklist by File Name: Must be a valid regular expression. Max length: 100 characters.
Blocklist by File Size: Valid range: 0 - 8589934591.
Blocklist by File Type: Must be a valid MIME type (example" 'application/JSON'). Max length: 100 characters.
Historical Data
Diode X will keep a record of the files transferred from BLUE to RED. To review Historical data just click on the History tab within File Transfer section.
Please note that File Transfer Historical Data is not stored in backups.
Once the data is loaded it can be filtered in several ways.
Undelivered: Only shows undelivered transfers. File haven't been received by RED side.
Time Filters: Daily, weekly and monthly filters can be applied. A date range can also be defined.
Search Box can be used to search for specific files by typing text.
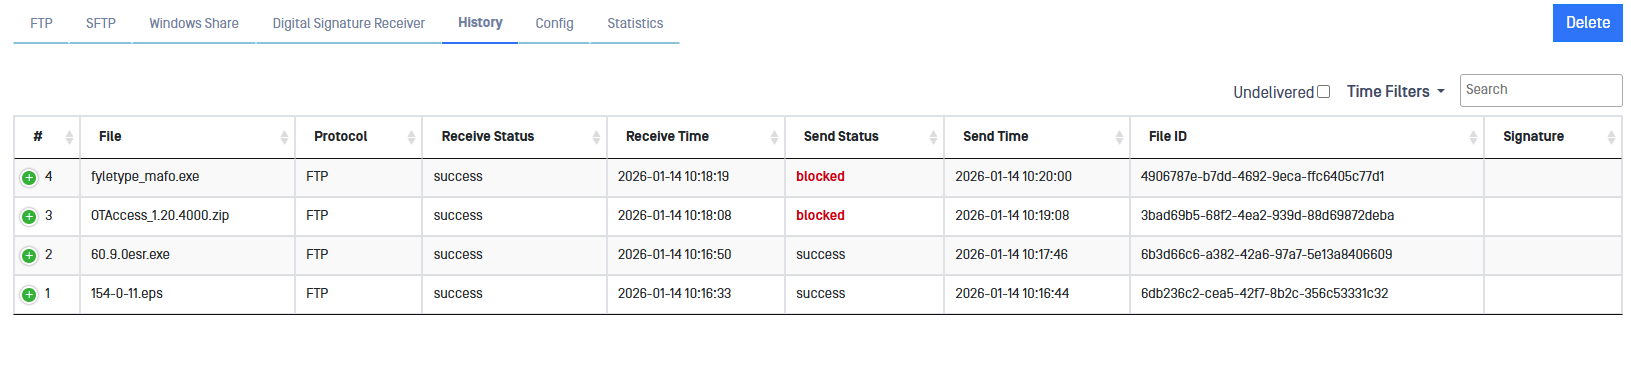
Please, note that historical information can be viewed on both the BLUE and RED sides .
File Transfer Priority
If Diode X is transferring many files, the transfers will consume bandwidth and other resources to the point that it may degrade TCP Stream performance.
Diode X provides a priority mechanism (High, Medium, Low), designed to limit the resources consumed by File Transfer. This throttling mechanism can lower the impact of large volume file transfers as well as compensate for a RED destination File Server that operates slower than the BLUE source File Server.

Digital Signature and Verification
How it Works
MetaDefender Diode X can be configured to apply a digital signature on a file and validate the signature when transferring files between two sites or domains. The feature requires the use of two Diode X devices, one at Site A and another at Site B. The Diode X can be configured to perform one of the following options:
· Signing an incoming file
· Verifying a signature of an incoming file
· None of these actions (default)
Workflow Description
Obtain private/public signing key from a Certificate Authority or self-generated pair (Private/Public Key: Advanced->Encryption->Digital Signature). The private key is installed on Diode X BLUE A, while the Public key are installed on Diode X RED A, BLUE B and RED B.
BLUE A copies a file from a source File Server and signs its hashed (SHA256) content using a Private Key from Digital Signature store.
The file along with metadata, containing the signature is transferred from BLUE A to RED A. The hash and the signature are verified by RED A to ensure the data integrity of the file transfer.
The signed file, along with metadata is transferred from RED A, over the untrusted network to BLUE B. To ensure confidentiality, mutual TLS is employed. BLUE B receives the file, verifies the hash and signature to check its integrity. The file is transferred from BLUE B to RED B.
RED B verifies the signature by using the public key imported within the Digital Signature (Advanced -> Encryption -> Digital Signature).
Files with valid digital signatures are delivered from RED B to the destination File Server.
Rejected files are reported via syslog and discarded.
Configuration
BLUE A - Create/Export Signer Key
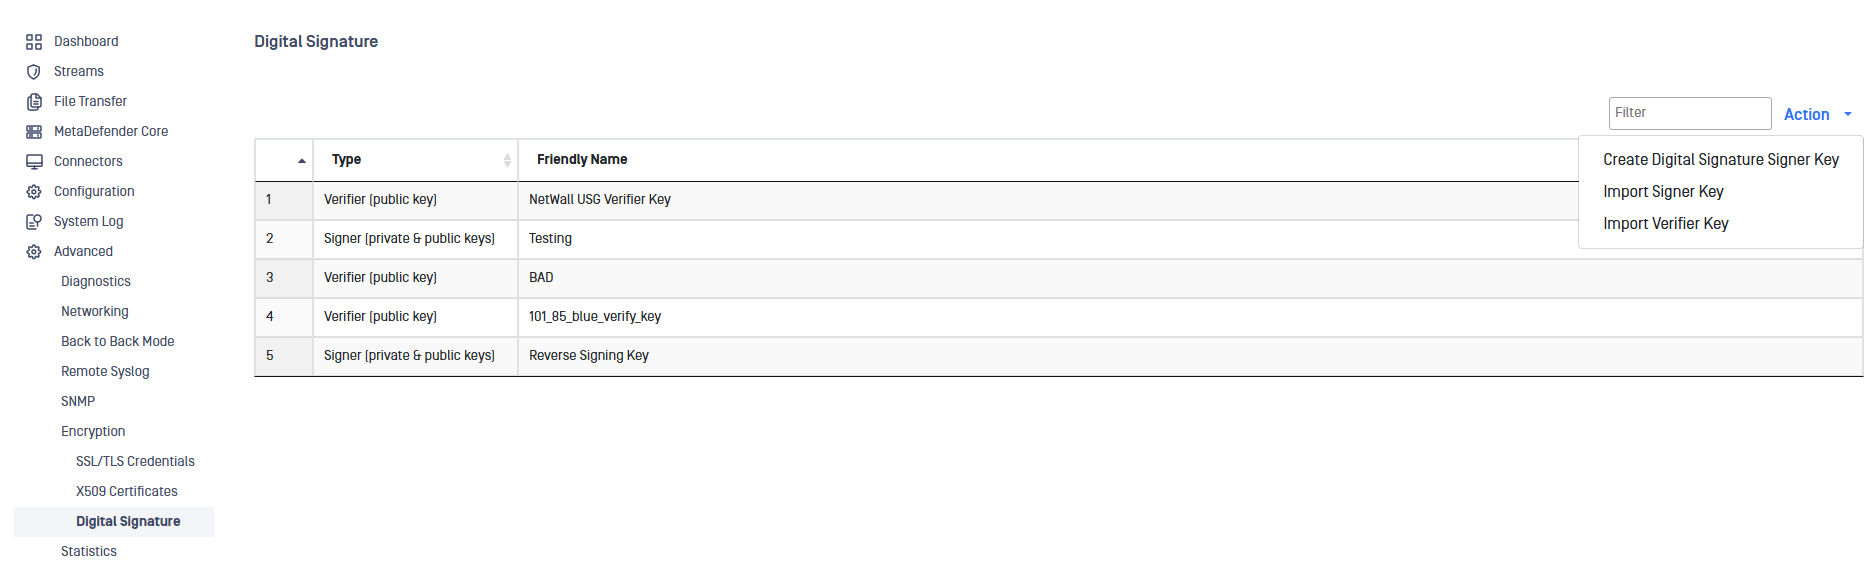
On BLUE A, Navigate to: Advanced>Encryption>Digital Signature Menu.
Select "Create Digital Signature Signer Key" or "Import Signer Key".
Assign a Friendly Name for "Create Digital Signature Signer Key".
Select Signer Key just created.
Export Signer Key (Public Key) to Desktop or Directory.
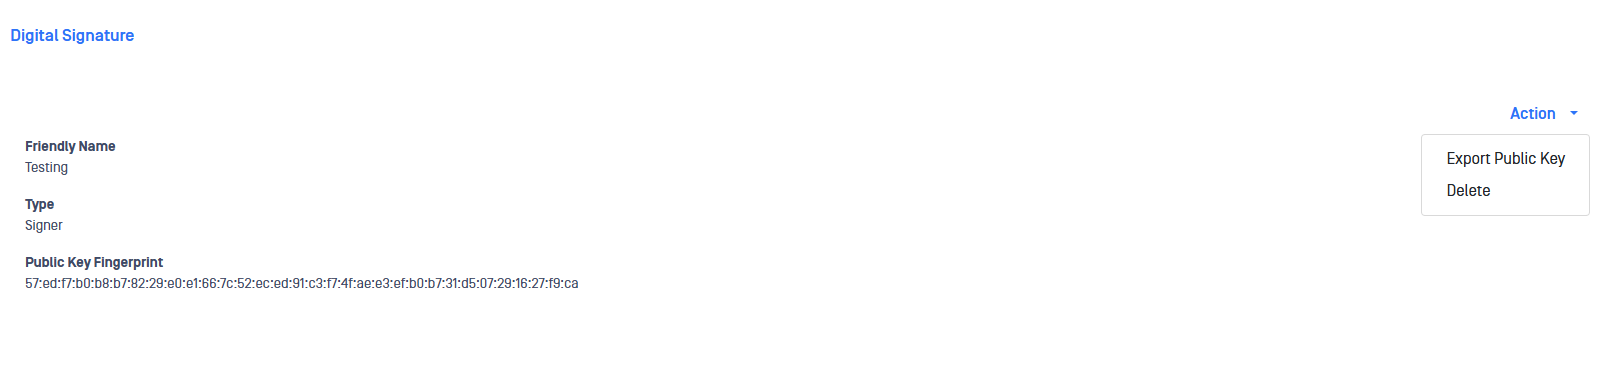
Signer Key (Public Key) must be imported on RED A, BLUE B and RED B.
BLUE A - Configure File Transfer
Navigate to: File Transfer and select File Transfer method (FTP, SFTP or Windows File Share).
Configure File Transfer channel as per instructions in previous FTP, SFTP or Windows File Share section.
Select previously created or imported Signer Key.
RED A - Create Digital Signature Forwarder
Navigate to File Transfer and select the Digital Signature Forwarder tab.
Select Add Forwarder.
Fill in fields:
Channel Number: Must match Channel Number assigned on BLUE A
Port: Port defined on BLUE B
Destination IP/Hostname: Destination IP Address or Hostname on BLUE B
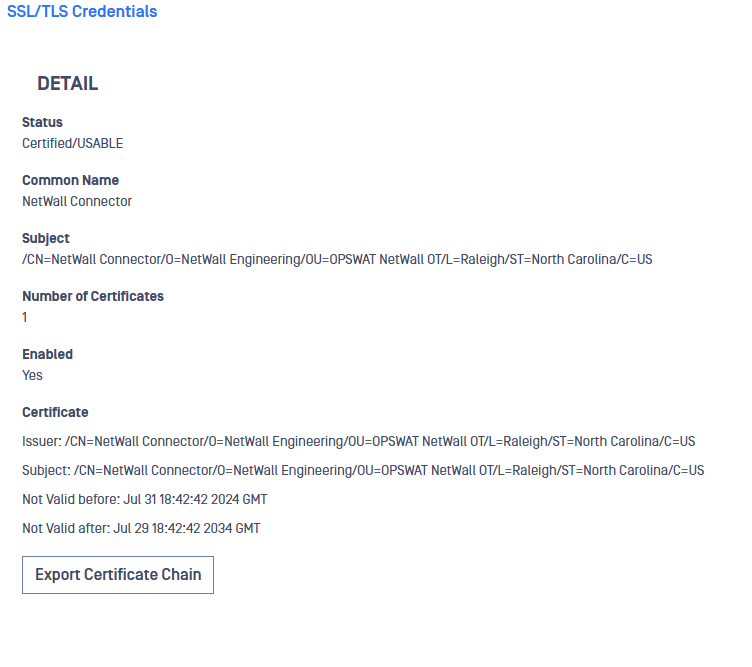
Certificate: Select a Certificate to be use for Digital Signature. Certificates in Advanced > Encryption > SSL/TLS Credentials
Digital Signature: Select a Digital Signature for the Forwarder. Digital Signatures in Advanced > Encryption > Digital Signature
Description: Friendly name

BLUE B - Create Digital Signature Receiver
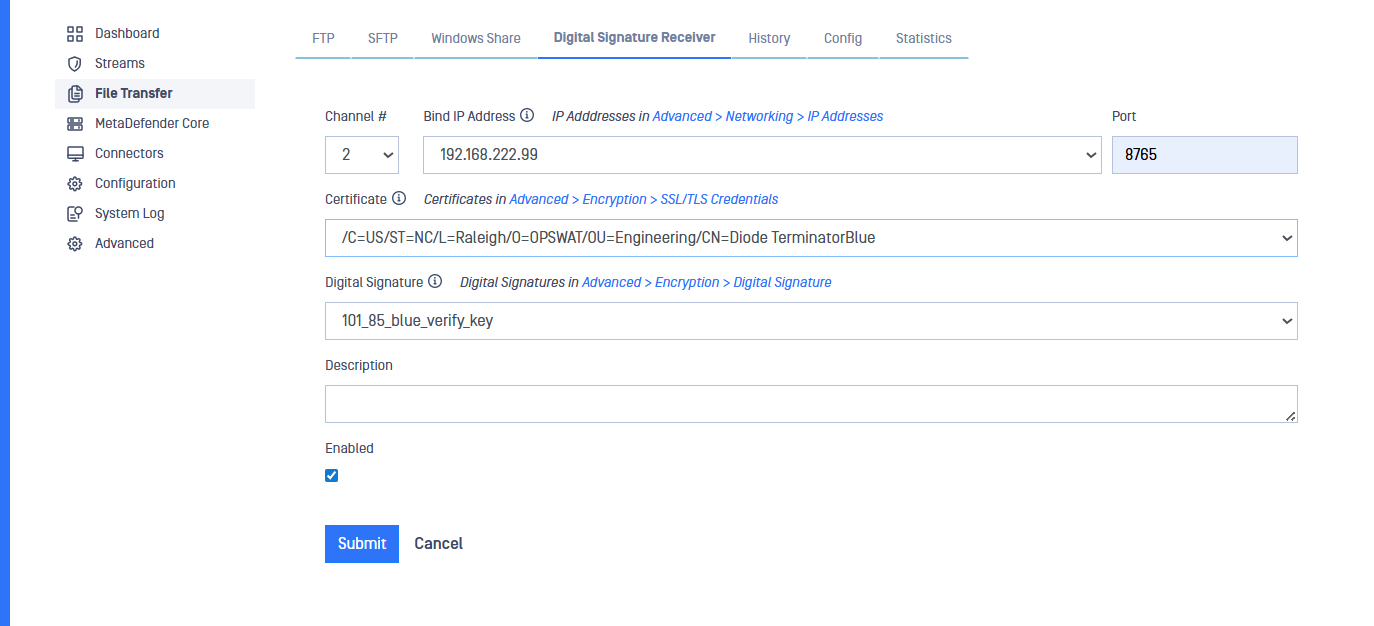
On BLUE B navigate to File Transfer>Digital Signature Receiver and select Action Item "Add Receiver" and fill in the following:
Channel: Select the assigned channel number. The assigned channel on BLUE B does not have to match the assigned channel on BLUE A AND RED A.
Bind IP Address: Select an IP Address in Advanced>Networking>IP Addresses
Port: Listening port
Certificate: Select a certificate in Advanced>Encryption>SSL/TLS Certificates
Digital Signature: Select Digital Signature in Advanced>Encryption>Digital Signature
Description: Friendly description
BLUE B - Export Credentials to RED A
Navigate to Advanced/Encryption/SSL/TLS Credentials
Select Credentials
Select Export Credentials and save to Desktop or Directory
RED A - Import BLUE B Credentials
Navigate to Advanced/Encryption/SSL/TLS Credentials
Select Action Item Import Keypair
Import BLUE 2 Credentials from Desktop or directory

Repeat Export/Import process inversely. Export RED A credentials and import to BLUE B.
RED B - Configure File Transfer
Navigate to: File Transfer and select File Transfer method (FTP, SFTP or Windows File Share).
Configure File Transfer channel as per instructions in previous FTP, SFTP or Windows File Share section.
Select Digital Signature from Digital Signatures in Advanced > Encryption > Digital Signature