This article is applied to MetaDefender Security Gateway, both USG and BSG version.
Overview
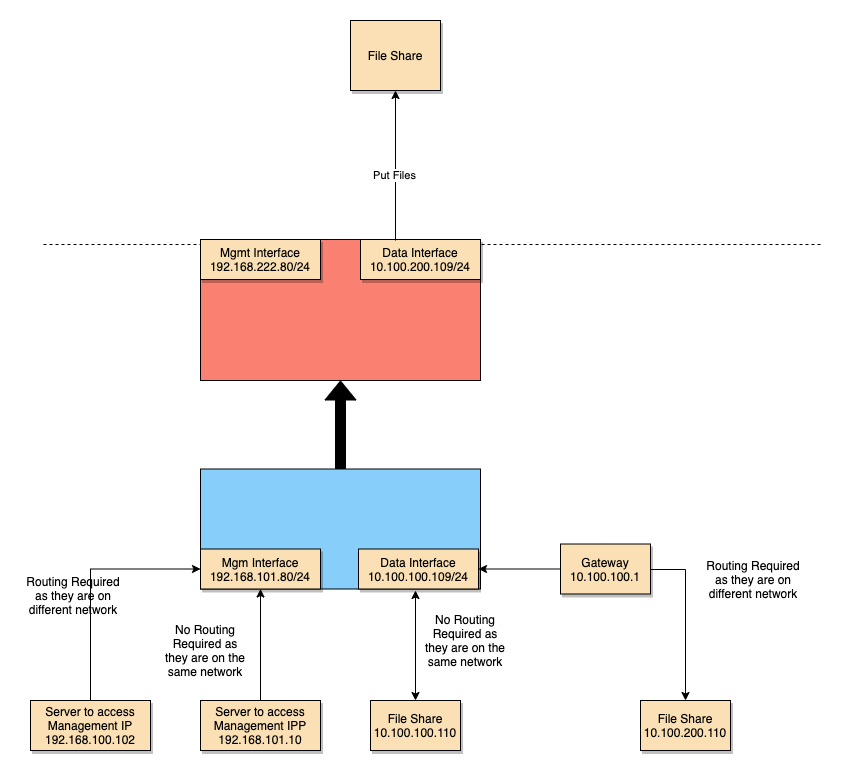
In order to use separate interfaces for Data and Management, the following information must be known and defined:
- Management Network, IP, and Gateway
- Data Network, IP, and Gateway
- Which devices/servers will communicate with the Netwall and which network they should be routed through
Example Configuration
Management Network:
- Network:
192.168.101.0/24 - Management IP:
192.168.101.80 - Gateway:
192.168.101.1
Data Network:
- Network:
10.100.100.0/24 - Data IP:
10.100.100.40 - Gateway:
10.100.100.1
Data Devices/Servers:
- File Share:
10.100.100.110(Same network as the Data interface) - File Share:
10.100.200.110(Different network — routing required)
Management Clients:
192.168.101.100(Same network as Management — no routing required)192.168.100.102(Different network — routing required)
Step-by-Step Configuration
1. Initial Setup
If we start from the initial setup, we will enter the Management IP (192.168.101.80) and the Default Gateway (192.168.101.1).
2. Add an IP for Data Interface
- Navigate to
Advanced → Networking → Interface. - Select the second interface (e.g.,
enp5s0f1).
- If connected properly to a switch, the Status column will show “Up”.

- Go to
Advanced → Networking → IP Address. - Select Add IP Address from the Actions drop-down.
- Enter the IP address and choose the correct interface (
enp5s0f1in this case).
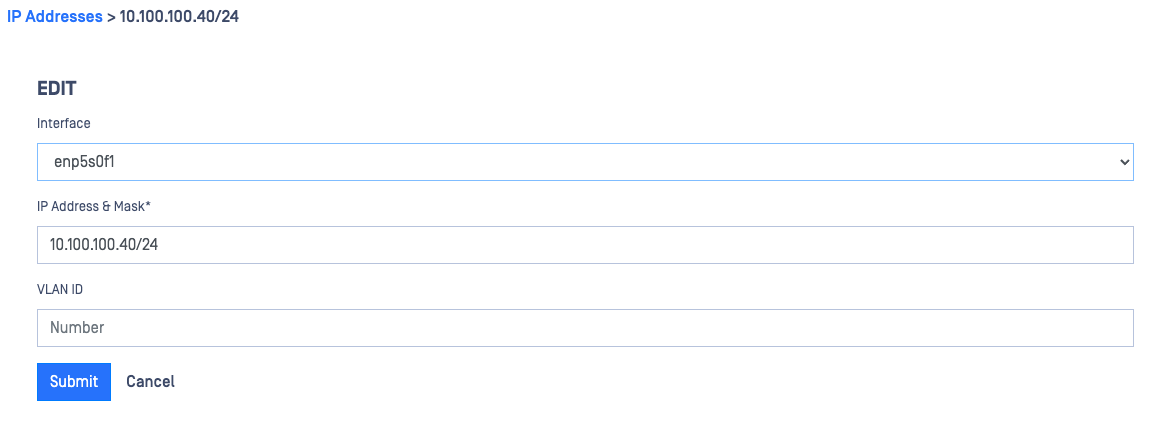
- Your interface table should now appear as follows:

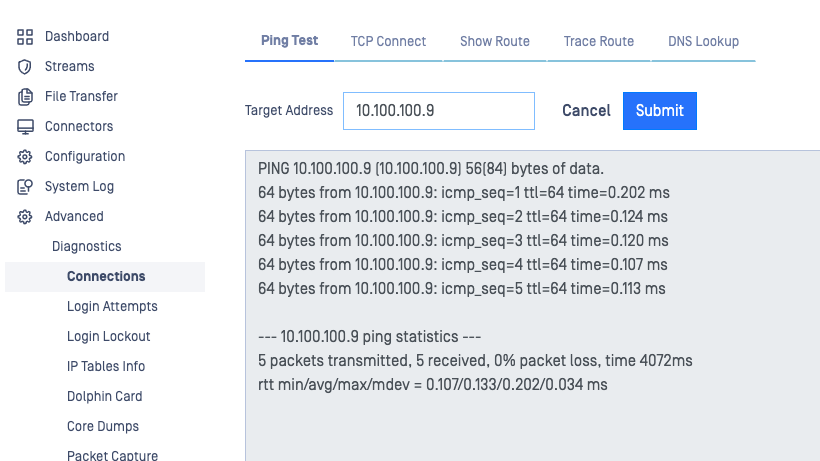
3. Verify Connectivity
To test the connectivity of the new network (e.g., 10.100.100.0/24):
- Navigate to
Advanced → Diagnostics → Connections. - Attempt to ping other servers on the new network or its gateway (
10.100.100.1) to verify cabling and reachability.
Routing Configuration
Routing depends on your specific network setup. Below are two common configurations:
Option 1: Leave Default Route on the Management Interface
Implications:
- All traffic not on a local network will route through the Management Gateway (
192.168.101.1). - Easier management access, but traffic to external data networks may fail if routing isn't configured correctly.
Scenario 1:
File Share Server: 10.100.100.100
- Part of the local network (
10.100.100.0/24) — no routing required.
Scenario 2:
File Share Server: 10.100.200.110
- Not part of the local network.
- Netwall will try to reach it via
192.168.101.1, which is incorrect.
To correct this:
- Navigate to
Advanced → Networking ��� L3 Routes. - Select Add Route from the Actions drop-down.
- Add a static route:
- Target:
10.100.200.0/24 - Gateway:
10.100.100.1
- Target:
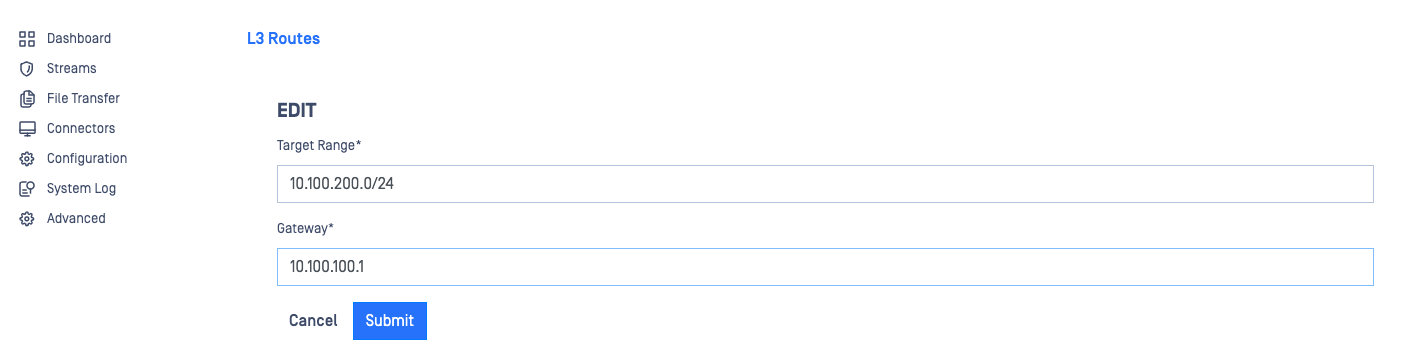
Once added, traffic to the 10.100.200.0/24 network will route through the correct gateway on enp5s0f1.
Option 2: Change the Default Route to the Data Interface
Implications:
- All traffic not on a local network will route through the Data Gateway (
10.100.100.1). - Improves data network traffic but may restrict access to the Management IP.
Before changing the default route, add static routes for any network from which you'll manage the Netwall. Changing the default route first may disconnect your access to the Management IP.
Example:
To manage the Netwall (192.168.101.80) from a different management network (192.168.100.0/24):
- Add a static route to:
- Target:
192.168.100.0/24 - Gateway:
192.168.101.1
- Target:
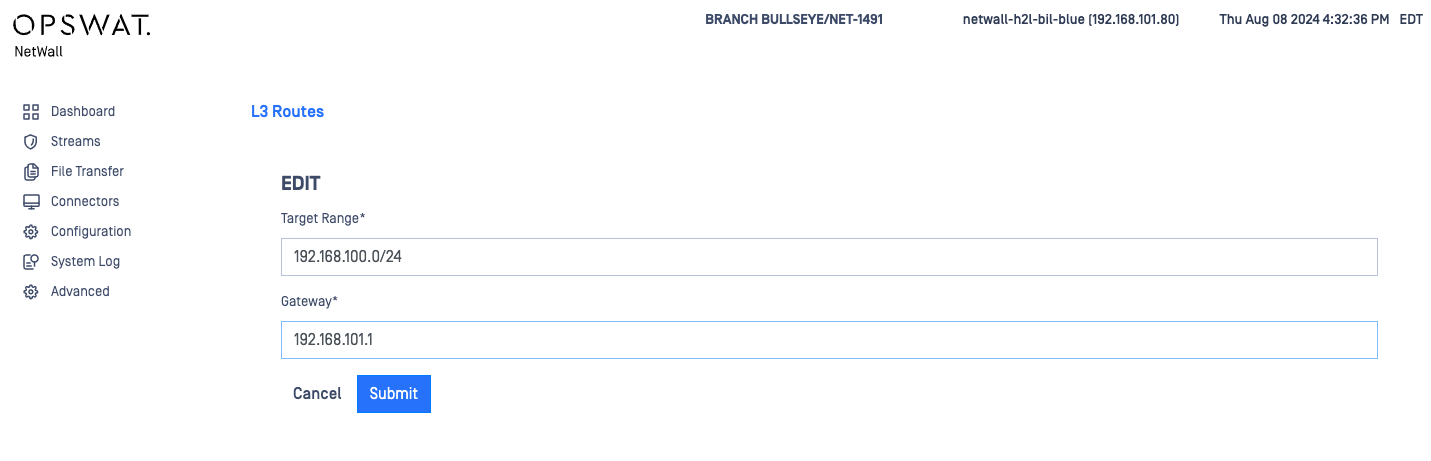
Repeat this step for each management network as needed.
If you're connecting from the same local network (e.g., 192.168.101.0/24), no extra route is required.
Change the Default Route
Changing the default gateway to a different interface will change the deployment ID and invalidate your license. You must contact OPSWAT Support to reset your license key.
To update the default route:
- Edit the route with the Target Range
0.0.0.0/0.

- Update the gateway to the Data network’s gateway:
10.100.100.1.
If you lose access to the Management IP after making routing changes:
- You can revert or change routes via the CLI.
- This requires physical access with a keyboard and monitor.
If Further Assistance is required, please proceed to log a support case or chatting with our support engineer.