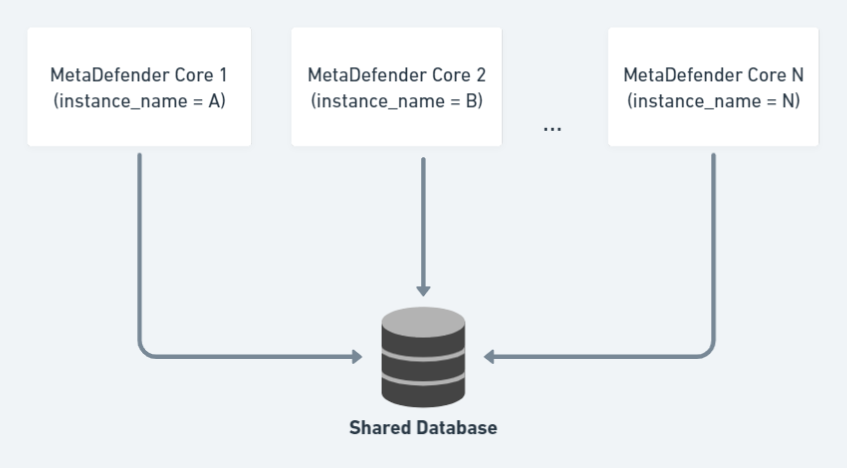
Starting with MetaDefender 4.20.0, you can use a centralized database deployment model, where all MetaDefender Core instances can share the same external database.
That helps auto-sync all product configurations (except Single-Sign-On that requires unique settings for each Core), processing history, live/on-going scan result query, audit, statistics data.
This article demonstrates how to install and setup MetaDefender Core 4.20.0 or newer with shared database mode.
Important notes & current limitations:
Currently not supported
- Does not support Central Management use-case with shared DB mode.
- Does not support different versions of MetaDefender Core in shared DB mode. All instances must run the same version when operating in this mode.
- Does not support to switch from shared database mode back to standalone database mode.
- Does not support to change instance_name of MetaDefender Core in shared database deployment model after installation.
- Does not support upgrading older MetaDefender Core from non-persistent mode to using the shared database mode.
- Does not support upgrading older MetaDefender Core from standalone mode to using the shared database mode.
- Does not support to upgrade multiple MetaDefender Core instances at once in shared database mode
- Stop all Core instances' scanning service before performing the upgrade.
- Upgrade each Core server one by one instead.
- For each Core, when the upgrade finished, then you can start using that Core for scanning without waiting for the other Core instances’ upgrade to be done.
Limitations
- To synchronize scan results and enable clients to fetch scan results of an in-progress file from any MetaDefender Core instances behind a load balancer, PostgreSQL in shared mode has to receive a large amount of data from many instances, and it may cause bottlenecks at database service. Memory usage on PostgreSQL may be high due to queuing data meanwhile resource on MetaDefender Core instances may not be effeciently utilized.
- The feature Reuse results by hash may not work smoothly.
MetaDefender Core does not support mode switching.
Requirements for shared database setup:
- Using a dedicated existing PostgreSQL database server (see detailed requirements for PostgreSQL version at Recommended System Configuration).
- Before setting up, make sure to follow steps at Open Connection On PostgreSQL Server so that all MetaDefender Core instances could connect to the central remote PostgreSQL server.
- MetaDefender Core will need to create and use dedicated PostgreSQL users for database setup, upgrade and its own operations. Those users requires certain privileges configured on PostgreSQL server, otherwise expecting failures to occur while installing and operating MetaDefender Core, details: PostgreSQL User Privilege Requirements
- All MetaDefender Core instances must be installed on the same Operating System (Windows / Linux).
- The first MetaDefender Core instance connects to the shared database must be ready first (license activated, users/groups/roles created) before setting up other MetaDefender Core instances to connect and use that shared database.
Engine update:
- If engine updates is configured to be via Folder source, all MetaDefender Core instances must be able to access to the configured update folder, and the option DELETE FILES AFTER IMPORT will be unchecked and prevented for modification.
Authentication:
Single-Sign-On (SSO) settings may be stored in the shared database and therefore visible across Core instances; however, SSO behavior depends on the login/redirect URL used to access Core.
- If users access each Core instance via a different hostname/FQDN, you must configure SSO per URL (and register each corresponding redirect URI at the Identity Provider), otherwise sign-in may fail due to redirect URI mismatch.
- If all users access Core only through a single, canonical load-balanced URL, a single SSO configuration that uses that load-balanced URL is supported, provided all nodes are consistently fronted by the same external URL (reverse-proxy headers/canonical URL handling) and authentication sessions are handled appropriately (e.g., sticky sessions if required, or shared authentication sessions where available).
Version note: MetaDefender Core v5.17.1 introduces support for multiple login/redirect URLs for SSO directories, which can reduce the need for separate per-URL SSO directory configurations in multi-domain deployments.
If an user is locked for login on a certain MetaDefender Core instance(e.g. exceeded the number of failed login times), that user is not prevented for logging in on any other instances.
If an user is locked for sign-in on a certain MetaDefender Core instance (e.g. exceeded the number of failed login times), if the admin releases lockout on that user on that MetaDefender Core instance, that user is still not able to login on other MetaDefender Core instances.
Sanitized / DLP / Quarantined location changed after MetaDefender Core install:
Windows:
Shared storage path will be stored in 3 strings under key global in registry: quarantinepath, dlppath, sanitizepath as below
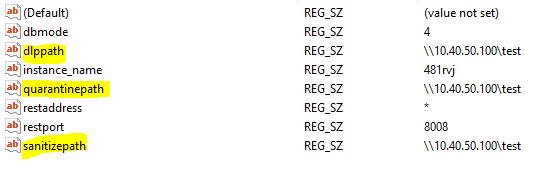
You can set either 1, 2 or 3 different paths for the 3 settings above (means that quarantined, DLP and sanitized files will be stored in same or different storages corresponding). In case shared storage is not set in installation, values of 3 settings above will be empty.
Restart MetaDefender Core service after changed.
Linux:
Open file /etc/ometascan/ometascan.conf and set shared storage path for 3 keys quarantinepath, dlppath, sanitizepath under section [global]
Restart ometascan service after changed.
Wizard Installation (Windows Only)
Only applicable to MetaDefender Core 4.20.0 or newer using wizard on Windows OS.
Clean install scenario
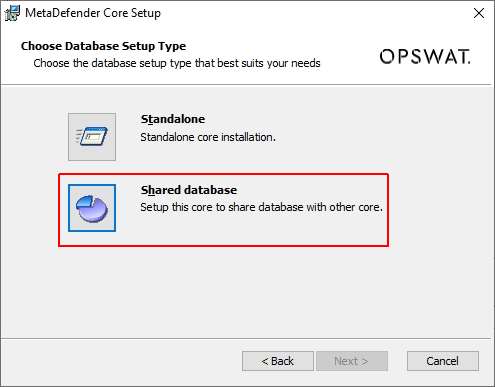
- Choose Shared database option:
- Setup database server for MetaDefender Core:
You can choose to create a native / built-in PostgreSQL server and setup the shared database on (then other MetaDefender Core instances will want to connect to that PostgreSQL server afterwards)
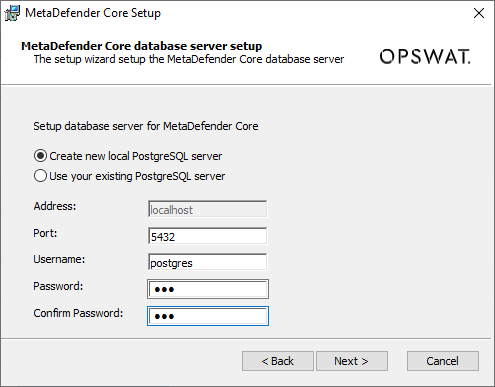
Or choose to connect to a pre-setup existing PostgreSQL server:
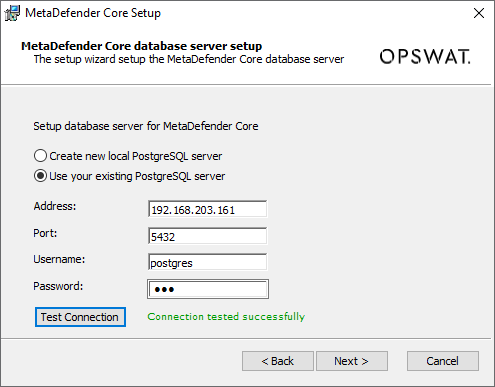
"Test Connection" button is required, to make sure the PostgreSQL is connected and authenticated successfully. Make sure to check and perform steps at Open Connection On PostgreSQL Server if you are unable to test the connection with remote PostgreSQL server.
MetaDefender Core will need to create and use dedicated PostgreSQL users for database setup, upgrade and its own operations. Those users requires certain privileges configured on PostgreSQL server, otherwise expecting failures to occur while installing and operating MetaDefender Core.
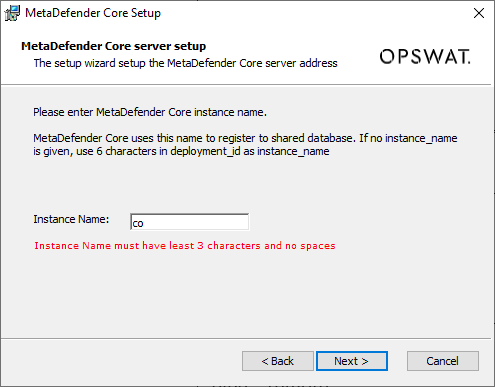
- Create an unique instance name for that MetaDefender Core (different from other MetaDefender Core instances):
Instance name must contain at least 3 characters and no white space.
If you choose to leave it blank, which means it will use the default instance name with 6 characters extracted from that MetaDefender Core deployment ID.
- Input the file storage path (sanitized, DLP, quarantined files)
In the shared database model, all MetaDefender Core instances could use the same folder path to store all their own sanitized, DLP, quarantined files after processed.
The default location is: <MetaDefender Core installation folder>\data\ {sanitized|dlp|quarantine}
If you wish to use that default location, just leave the input box blank and press Next.
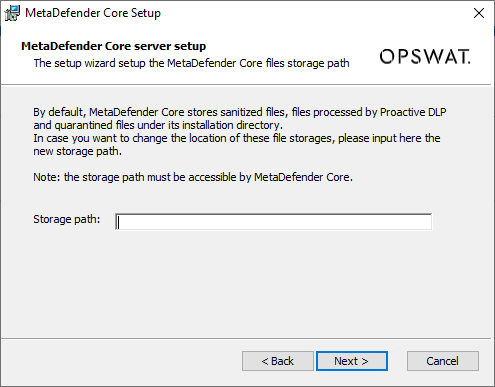
Otherwise, you can specify a different location of sanitized/dlp/quarantined files. It could be a local path on the same machine, or a shared folder located in a remote connected machine. Make sure that folder is open access (read and write) to MetaDefender Core.
For example:
- C:\new_folder
- \192.168.1.1\new_folder
Command Line Installation
For command line installation (on both Linux and Windows), it is mandatory to use MetaDefender Core ignition file to add PostgreSQL server information BEFORE installing MetaDefender Core 4.19.0 or newer.
Clean install scenario
1. Create ignition file if not existed
- Windows: C:\OPSWAT\ometascan.conf
- Linux: /etc/opswat/ometascan.conf
An example of an ignition file:
xxxxxxxxxxeula=true [global]dbmode=4instance_name=MetaDefenderCoreAstorage_path=D:\path\ [user]name=adminpassword=adminemail=admin@local [dbserver]type=remotehost=192.168.1.1port=5432user=postgrespassword=your_own_password| Field | Required | Mapping to wizard UI | Possible values |
|---|---|---|---|
| global/dbmode | optional default is 1 (standalone) | 1 - Standalone 2 - Central Hub deployment 3 - Non-persistent 4 - Shared | |
| global/instance_name | optional default is 6 characters of deployment ID | Unicode and number At least 3 characters No whitespace | |
| global/storage_path | optional default is empty | Path to storages (DLP, quarantined, sanitized files) It could be a local path on the same machine, or a shared folder located in a remote connected machine. Make sure that folder is open access (read and write) to MetaDefender Core. For example:
|
2. Run installers using the command line to install
Please refer to Command Line Installation for the installation command.