File Transfer
You need a security dongle inserted in the server which configuration you want to change, RED or BLUE.
Prerequisites
Before you configure any transfer parameters:
- Ensure a dongle is inserted in the server you want to modify.
- Ensure MetaDefender Transfer Guard BLUE and MetaDefender Transfer Guard RED network addresses are configured.
- Ensure the current license and personality are uploaded.
FTP
This should be configured in both sides BLUE and RED. Each of the sides have their own management UI.
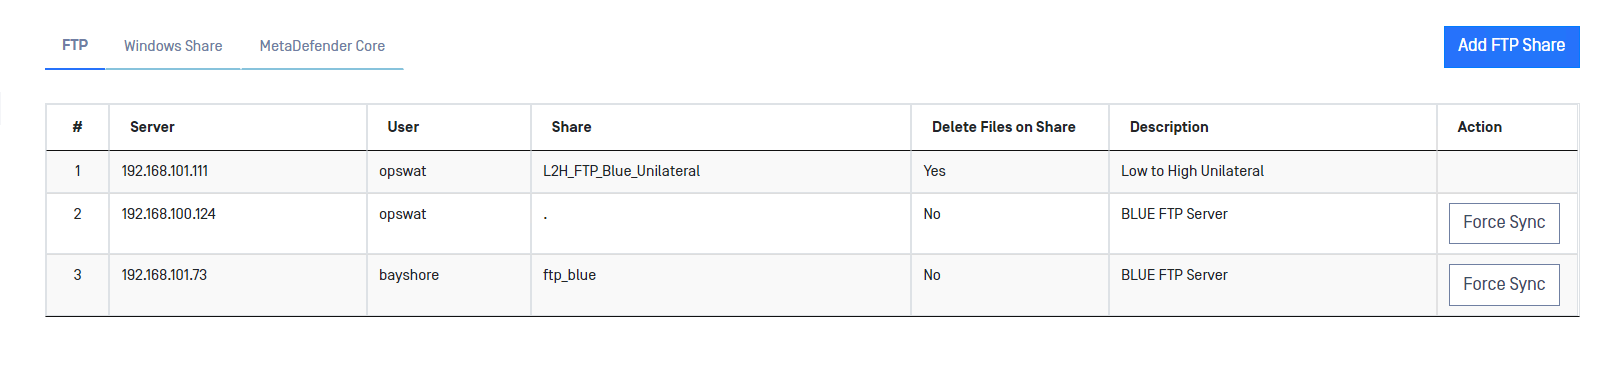
You can define several FTP servers in MetaDefender Transfer Guard UI to send files from BLUE to RED. To do so, just follow the instructions bellow.
Go to the management UI and insert user and password to login.
Click the File Transfer link, select the FTP label and then click on the Add FTP Share button.
Complete the following fields:
- FTP Channel: You have to choose one channel number.
This FTP Channel have to be the same in both sides, BLUE and RED.
User: Username for FTP file transfer server
Password: Password for the FTP server
Server: Name or IP address for the FTP server
Share Path: Folder on FTP server. The value can be a folder name or a ‘/’, depending on how you set up file sharing on the FTP server.
- MetaDefender Transfer Guard BLUE: Location on the BLUE zone server that contains the data to be transferred
- MetaDefender Transfer Guard RED: Location on the RED zone server that will receive the transferred data
Description (optional): Description of the FTP transfer.
Encryption: Select FTP for no encryption, FTPS for implicit FTPS and FTPES for explicit FTPS
Port: The default port will change selecting FTPS.
Polling Time: configure how often to poll the file share for files (default value is 10 seconds).
MetaDefender Core Workflow: Deploy the dropdown list to select a MetaDefender Core Workflow for the current channel. User can select different Workflows for every channel.
Enabled: File transfer will be enabled if this checkbox is ticked.
Delete Files on Share after transfer: If this checkbox in ticked, files will be erased from the Share folder once the file transfer have been completed. This option will be present only in the sending side.
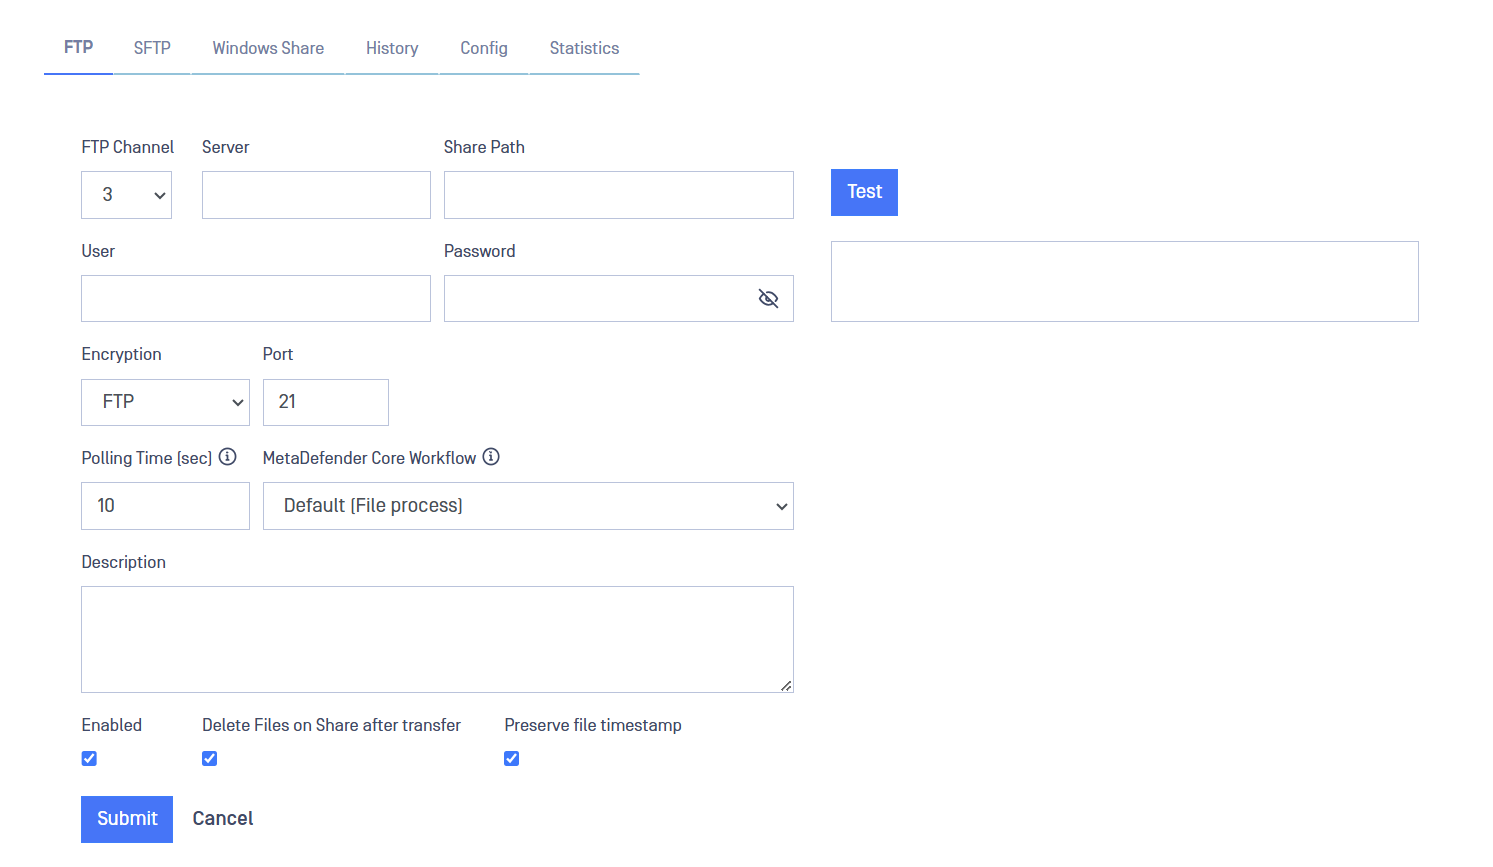
After filling in the fields, click on the Submit button to save configuration.
SFTP
This should be configured in both sides BLUE and RED. Each of the sides have their own management UI.
You can define several SFTP servers in MetaDefender Transfer Guard UI to send files from BLUE to RED. To do so, just follow the instructions bellow.
Go to the management UI and insert user and password to login.
Click the File Transfer link, select the SFTP label and then click on the Add SFTP Share button.

Complete the following fields:
- SFTP Channel: You have to choose one channel number.
This SFTP Channel have to be the same in both sides, BLUE and RED.
User: Username for SFTP file transfer server.
Auth: Select between password or Private Key depending on what is the preferred authentication method.
Password/Private Key: insert here the password or Private Key depending on the authentication method selected.
Server: Name or IP address for the SFTP server.
Port: Default port for SFTP file transfer is 22 but it can be changed by the user.
Share Path: Folder on SFTP server. The value can be a folder name or a ‘/’, depending on how you set up file sharing on the SFTP server.
- MetaDefender Transfer Guard BLUE: Location on the BLUE zone server that contains the data to be transferred.
- MetaDefender Transfer Guard RED: Location on the RED zone server that will receive the transferred data.
Polling Time: configure how often to poll the file share for files (default value is 10 seconds).
MetaDefender Core Workflow: Deploy the dropdown list to select a MetaDefender Core Workflow for the current channel. User can select different Workflows for every channel.
Description (optional): Description of the SFTP transfer.
Enabled: File transfer will be enabled if this checkbox is ticked.
Delete Files on Share after transfer: If this checkbox in ticked, files will be erased from the Share folder once the file transfer have been completed. This option will be present only in the sending side.
Connection can be tested to check the configuration pressing Test button.
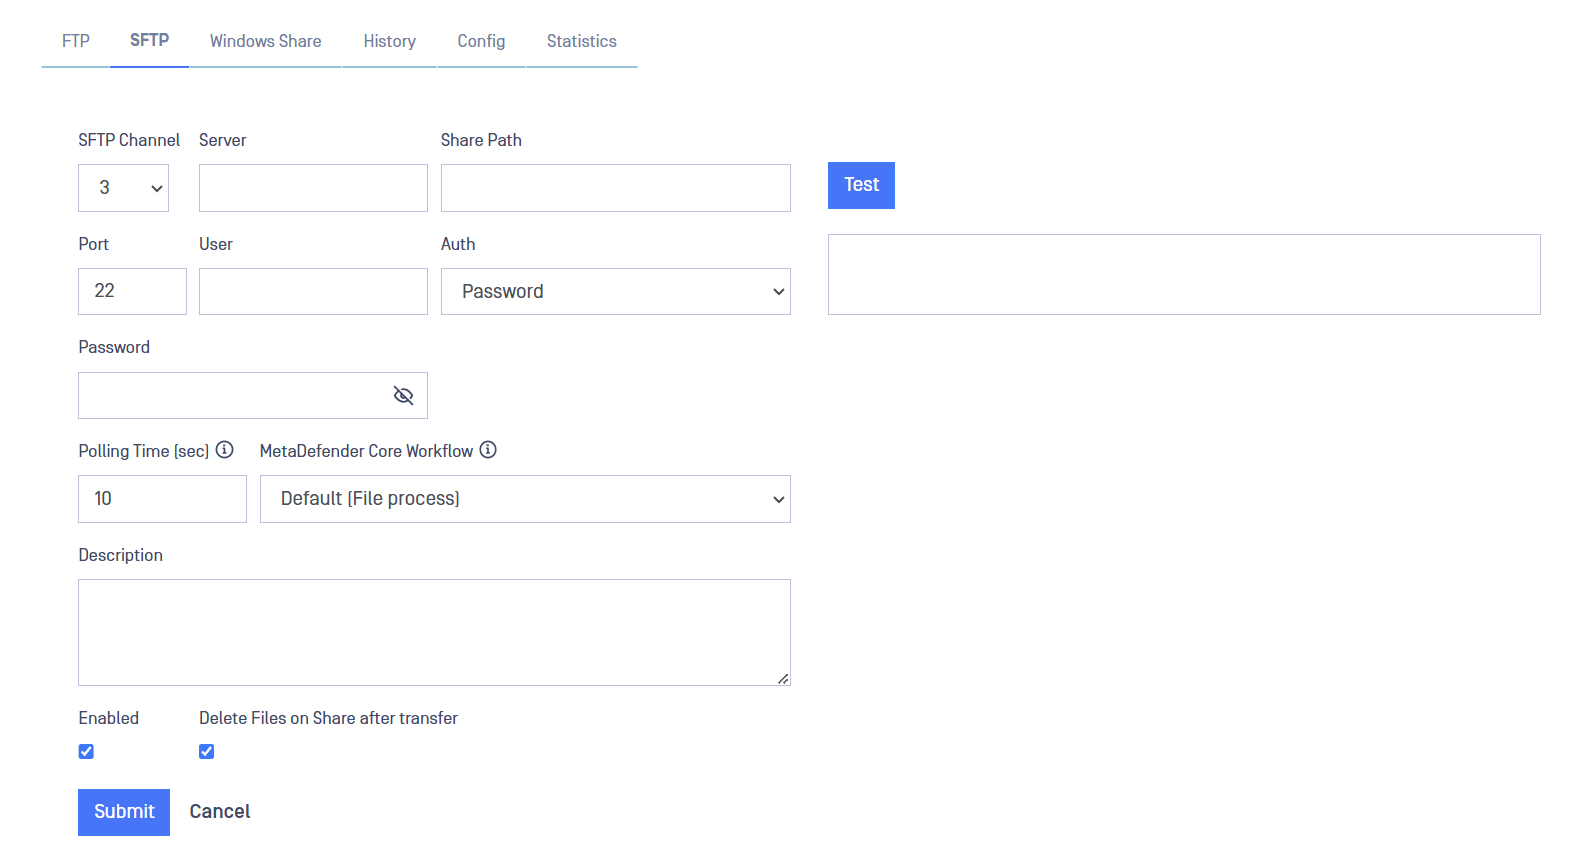
After filling in the fields, click on the Submit button to save configuration.
Windows File Share
This should be configured in both sides BLUE and RED. Each of the sides have their own management UI.
Go to the management UI and insert user and password to login.
Click the File Transfer select the Windows Share label and then click on the Add Windows Share button.
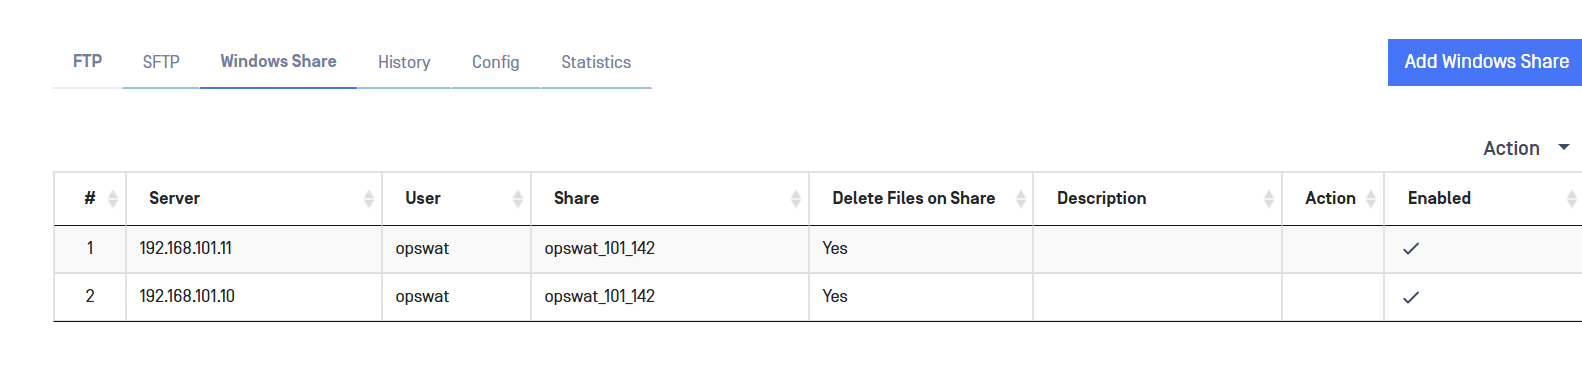
Complete the following:
- Channel: You have to choose one channel number.
This Channel have to be the same in both sides, BLUE and RED.
User: Username for the Windows File Sharing server
Password/Re-enter: Password for the Windows server
Server: Name or IP address for the Windows server
Share: Folder on Windows File Sharing. This value must be a folder name
- MetaDefender Transfer Guard BLUE: Location on the BLUE zone server that contains the data to be transferred
- MetaDefender Transfer Guard RED: Location on the RED zone server that will receive the transferred data
Polling Time: configure how often to poll the file share for files (default value is 10 seconds).
MetaDefender Core Workflow: Deploy the dropdown list to select a MetaDefender Core Workflow for the current channel. User can select different Workflows for every channel.
Description (optional): Description of the Windows Share transfer.
Enabled: File transfer will be enabled if this checkbox is ticked
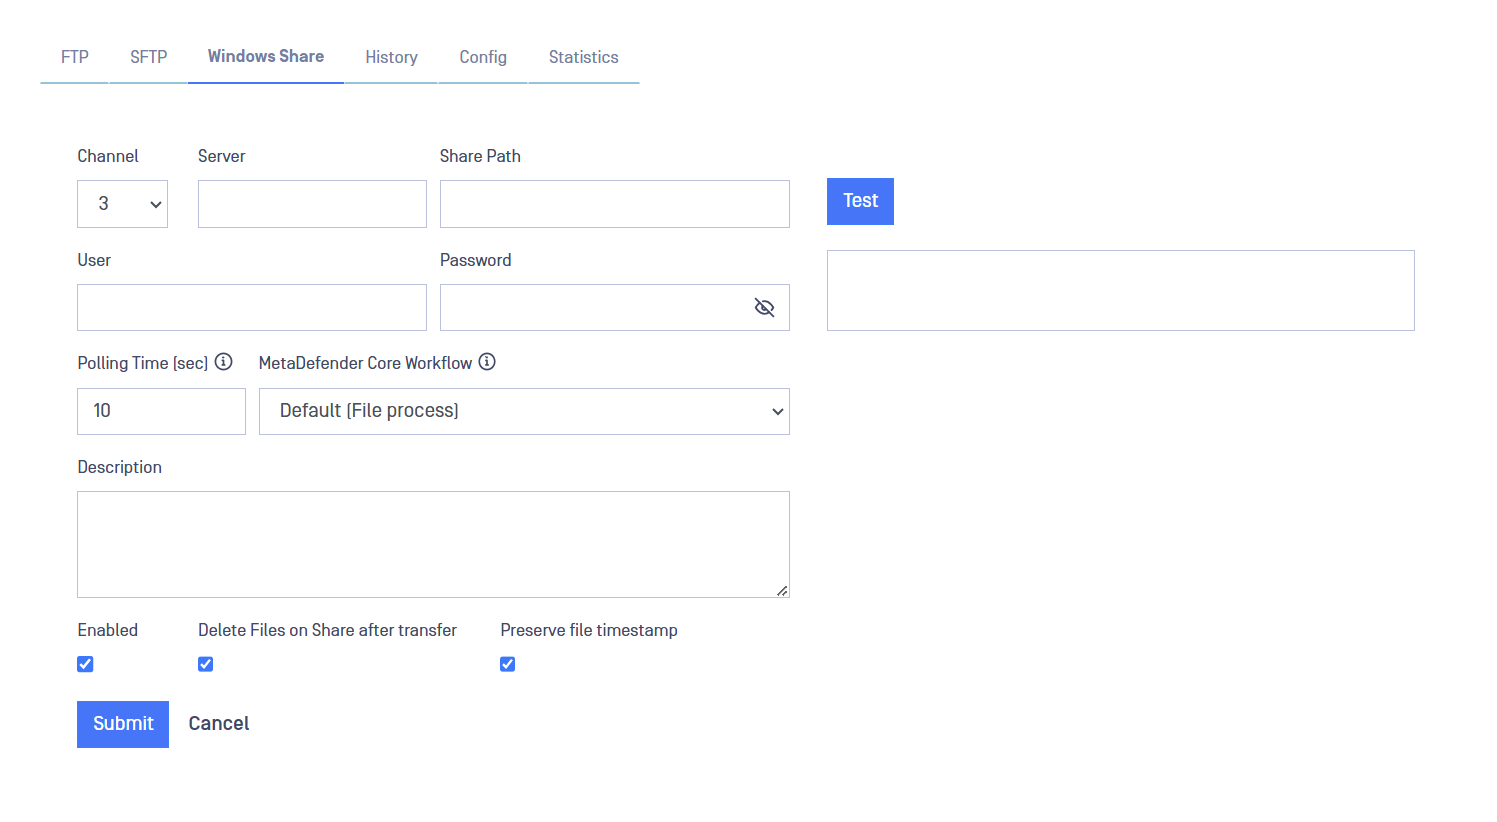
After filling in the fields, click on the Submit button to save configuration.
Historical Data
MetaDefender Transfer Guard will keep record of the files transferred from BLUE to RED. To consult the Historical data just click on the History tab within File Transfer section.
Please, notice that File Transfer Historical Data is not stored in backups. Check (Backups) for more information about that feature.
Once the data is loaded it can be filtered in several ways.
- Undelivered: Only shows undelivered transfers. File haven't been received by RED side.
- Time filters: Daily, weekly and monthly filters can be applied. A date range can also be defined.
- Search box can be used to search for specific files by typing text.
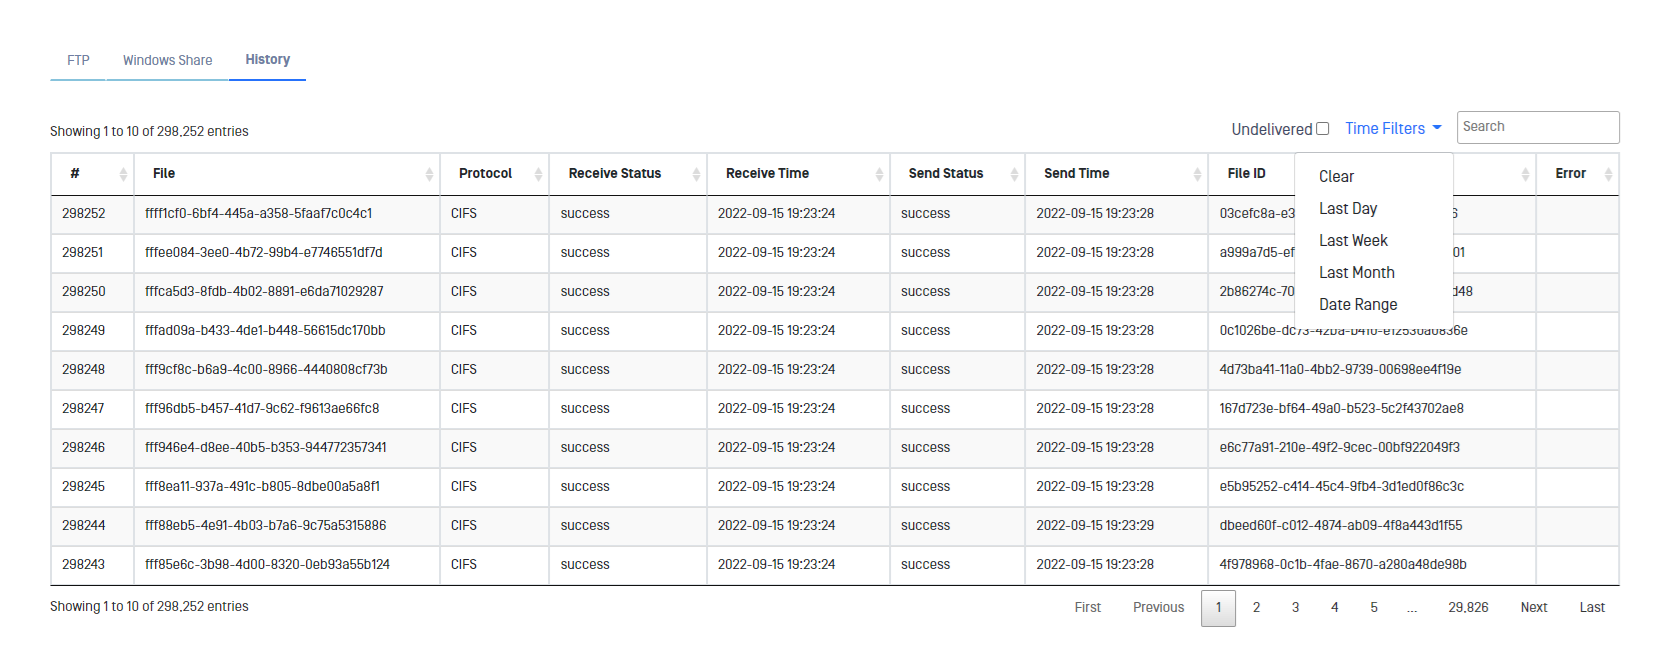
Please, notice that this information can be checked in both sides BLUE and RED.
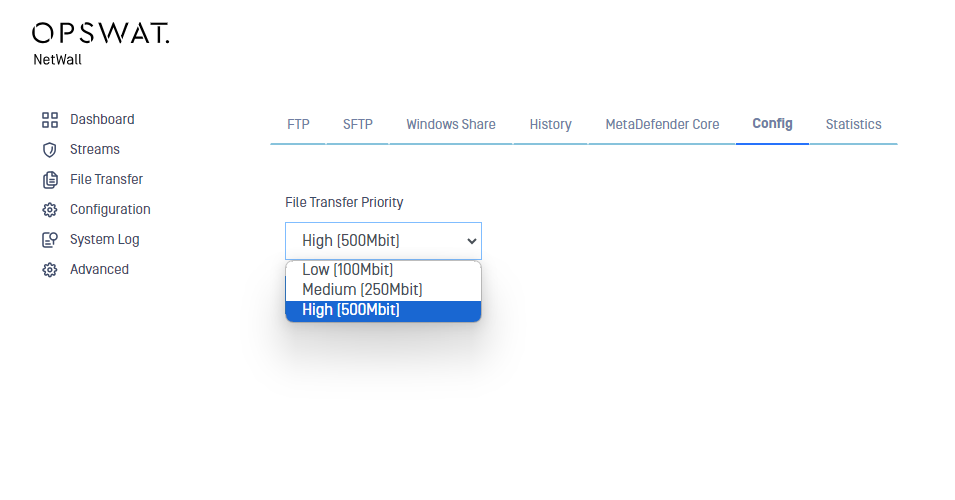
File Transfer Priority Configuration
OPSWAT MetaDefender Transfer Guard can be configured for transferring files from BLUE to RED. If OPSWAT MetaDefender Transfer Guard system is doing a lot of File transfers, the file transfers can consume bandwidth and other resources to the point that it encroaches on TCP Stream performance.
OPSWAT MetaDefender Transfer Guard provides a priority mechanism (High, Medium, Low) designed to limit the resources consumed by File Transfer. This throttling mechanism can lower the impact of large volume file transfers as well as compensate for a RED destination File Server that operates slower than the BLUE source File Server.