
Management consists of configuring the global configuration, workflow settings, and viewing health / license status of multiple Kiosk instances. This guide outlines how to add a Kiosk instance to Central Management, please refer to Central Management documentation for further product details.
Adding a Kiosk instance
Access the Central Management Console at
http(s)://<ip or dns>:9000On the left hand panel navigate to
Inventory→MetaDefender KioskClick
Add New Instancein the right hand cornerClick
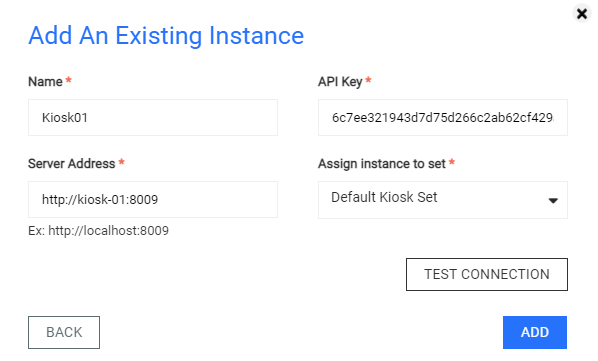
Add an existing Instancein the pop up panelFill in the required fields
Name,Server Address,API Key,Assign instance to set, and clickAdd
The value for the API Key field is the generated API key of an administrator user of MetaDefender Kiosk. Refer to management console user information on how to generate it.
By default, a Kiosk instance registers with its Windows hostname as its Name in Central Management, making it easier to identify specific devices. If you rename the underlying Windows machine later, Central Management picks up the new name automatically after the change takes effect on the device — you don't need to update it manually or re-enroll the instance.
Device Details in Central Management Reports
Once a Kiosk instance is enrolled, Central Management automatically receives device details for that instance, including:
Hostname
Hardware manufacturer, model, and serial number
BIOS version
Kiosk and MetaDefender Core versions
Operating system information
Network adapter details (adapter name, MAC address, IP address)
You can use these details to sort and filter your Kiosk device reports in Central Management — for example, to find every device on a particular hardware model or BIOS version.
These details refresh automatically if they change (for example, after a hostname change or a BIOS update), typically within about 10 minutes, and immediately after the Kiosk device restarts.