Settings
[Global Setting > Device Setting > Settings]
Settings are the information and configurations that help other networks or devices communicate with your appliance.
System Tab

Change password: update the current account password.
Port Configuration: Set the mode for each interface.
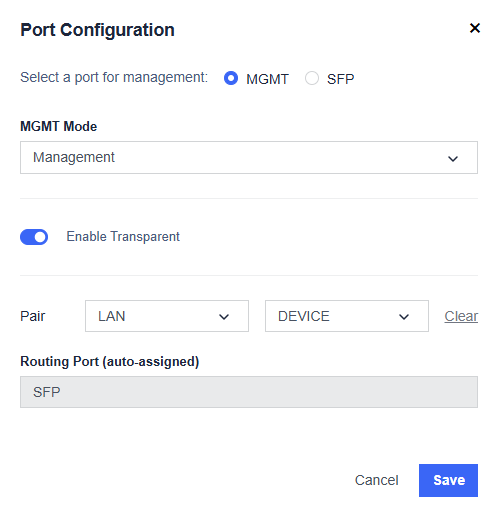
Management Port: The Management Port is used for administrative access. It can also forward network traffic when set to Routing mode.
Other Ports: All non-management ports can be individually configured as either:
- Routing Mode: operates as a Layer-3 routed interface
- Transparent Mode: operates as a Layer-2 inline interface
Transparent Pairing: Transparent mode supports pairing between any Ethernet port and the SFP port, allowing the firewall to operate inline without changing the existing network IP structure.
User Accounts: Manage accounts for web and CLI access management.

This page allows administrators to view, create, and manage user accounts that can access the Industrial Firewall. Each account defines access permissions, CLI privileges, and user roles to control administrative and operational actions.
Index: Display the sequential number of the user in the list.
Status: Indicates whether the account is active (green dot) or inactive (red dot).
Username: Show the login name of the user account.
Description: Provide a short description or purpose of the account (e.g., Admin Account, Maintenance User).
Access CLI: Display whether the user has permission to access the Command Line Interface (Yes or No).
Role: Define the privilege level of the user:
- Super Admin – Full administrative access, including firmware upgrade, factory reset, configuration, monitoring, and account management.
- User – Limited operational access. A User cannot perform system-critical actions such as updating firmware, performing a factory reset or creating a user.
Action: Provide the following actions for each account:
- Reset Password – Reset the user’s password.
- Edit – Modify user information, such as role or CLI access.
- Delete – Remove the user account.
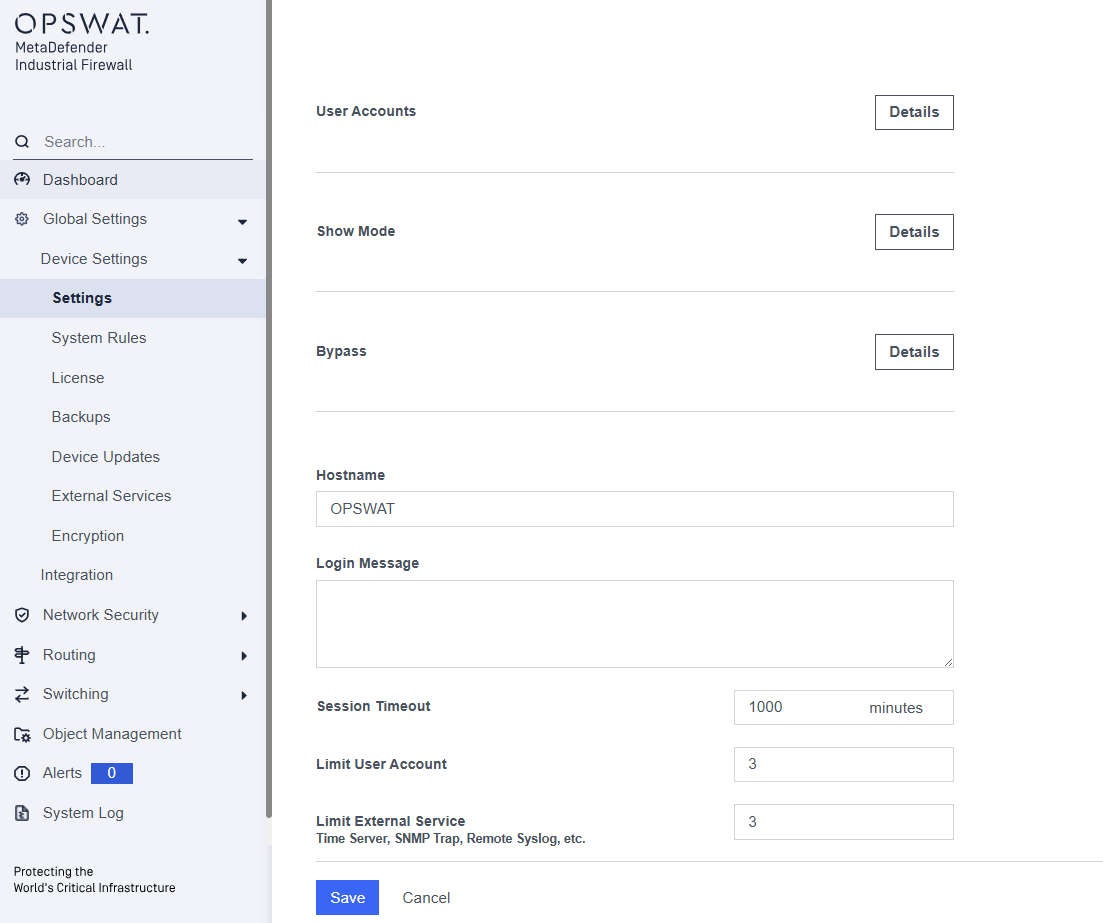
Hostname: Label specified for the device. This name is used in events and logs.
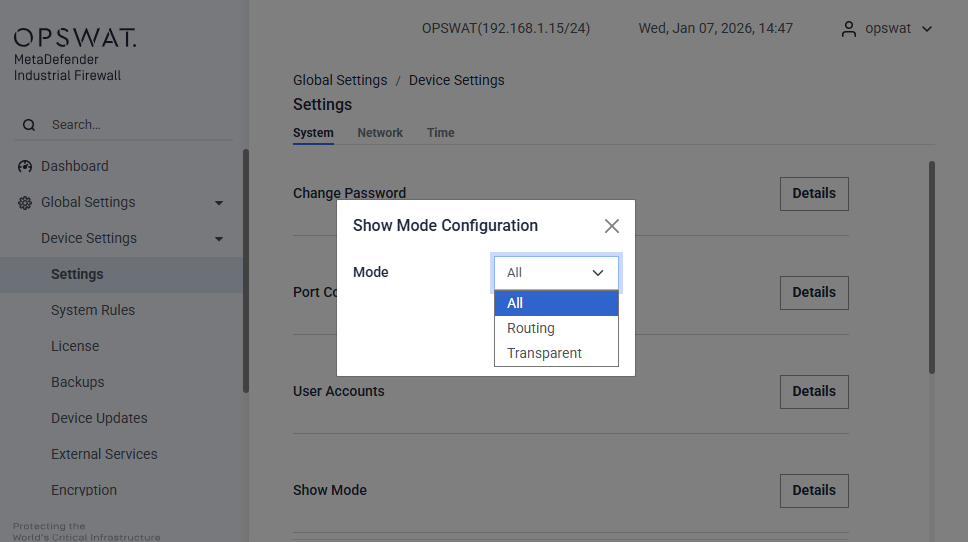
Show Mode: Show or hide the rule page for Transparent or Routing mode.
Bypass: When turned on, this setting enables a physical bypass relay that allows traffic to continue to flow through the firewall in the event the firewall loses power. Firewall rules will continue to be applied as long as the firewall is functional.
Login Message: Text that shows after a user logs on the appliance
Session Timeout: Number of minutes a session can stay open
Limit User Account: Defines the maximum number of user accounts that can be created on the system.
Limit External Service: Defines the maximum number of external services (such as NTP Time Server, Remote Syslog,...) that can be added.
The purpose of these limits is to prevent configuration mistakes and maintain system stability.
Network tab
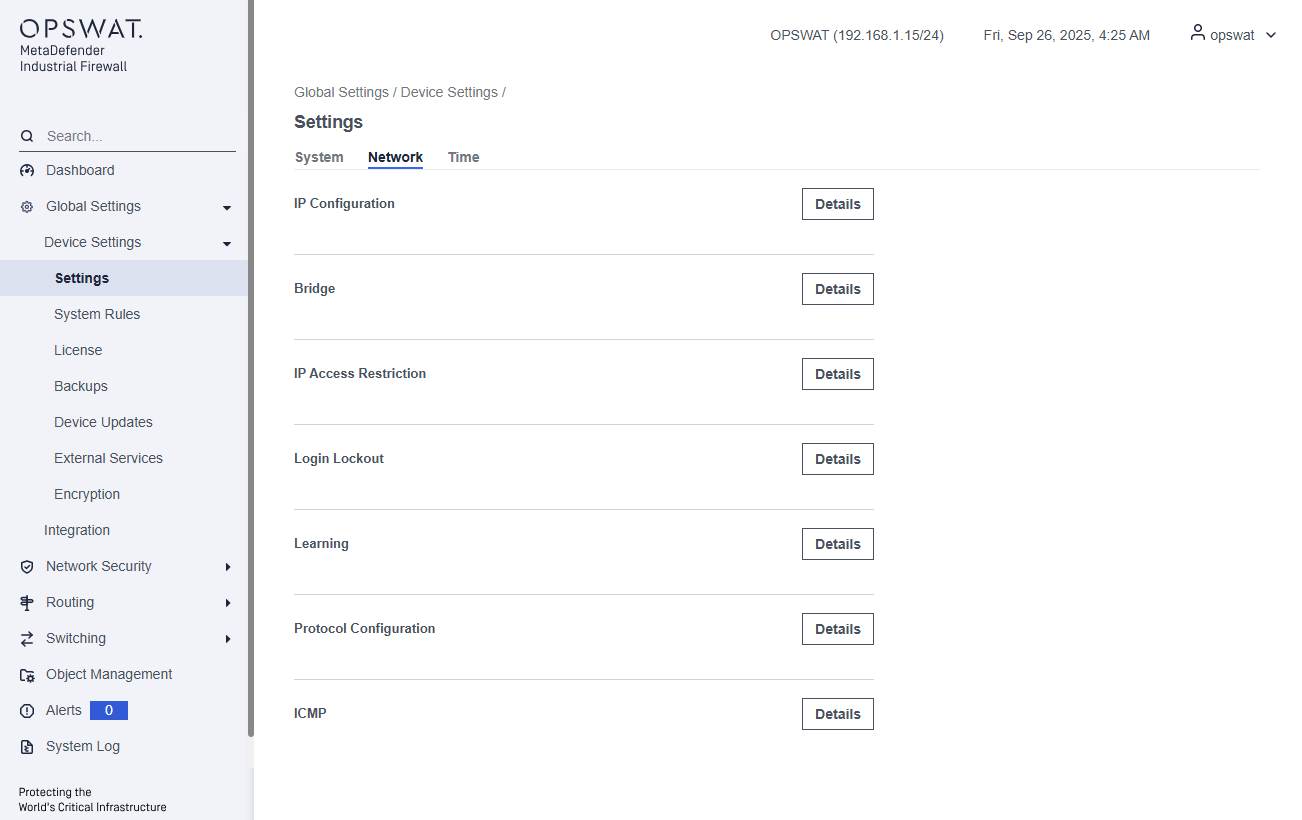
IP Configuration: Configure the mode (Routing or Transparent) for interfaces, and set the interface's IP addresses.
Virtual IPs: Add or delete a virtual IP.
Bridge: Create or delete a bridge network.
Learning UDP Protocol: Enable or disable learning UDP traffic in the Learn state.
IP Access Restriction: Manage IP addresses that can access web management.
Login Lockout:
CIMPLICITY Maximum Writes: Set a limit on the number of write commands per interval. This option is only available if you have purchased the license that supports GE protocol.
IFIX Maximum Writes: Set a limit on the number of write commands per interval. This option is only available if you have purchased the GE protocol.
GESDI Port: Configure the port settings for GESDI (version 6e and 6).
Default SLMP port: Set the default port for SLMP communication.
Default DICOM port: Set the default port for DICOM communications.
Learning Protocol Port 102: This port can be configured for S7COMM or MMS protocols.
Network > IP Configuration
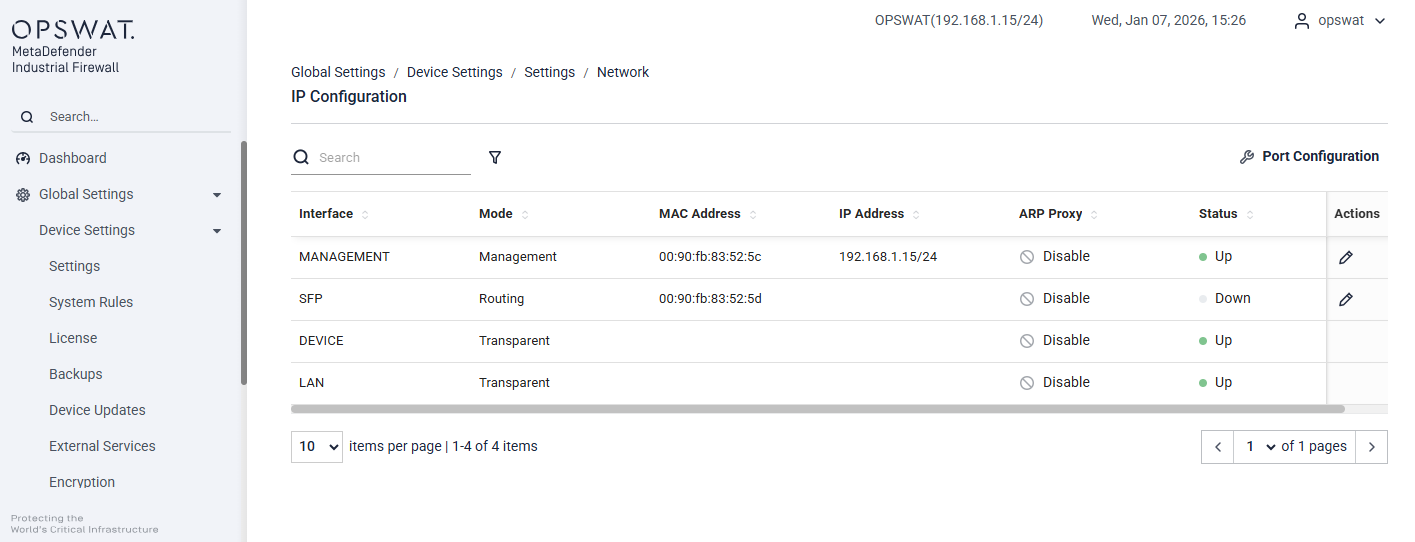
Port Configuration: Configure the operating mode for each interface. By default, both LAN and DEVICE interfaces operate in Transparent mode, as described in the System tab.
Edit icon: Click this icon to configure the IP address for the interface.

Network > Bridge
The page allows you to create and manage Layer 2 bridges by grouping multiple network interfaces into a single logical interface. Bridging enables traffic to pass transparently between interfaces while allowing the firewall to inspect and enforce security policies.
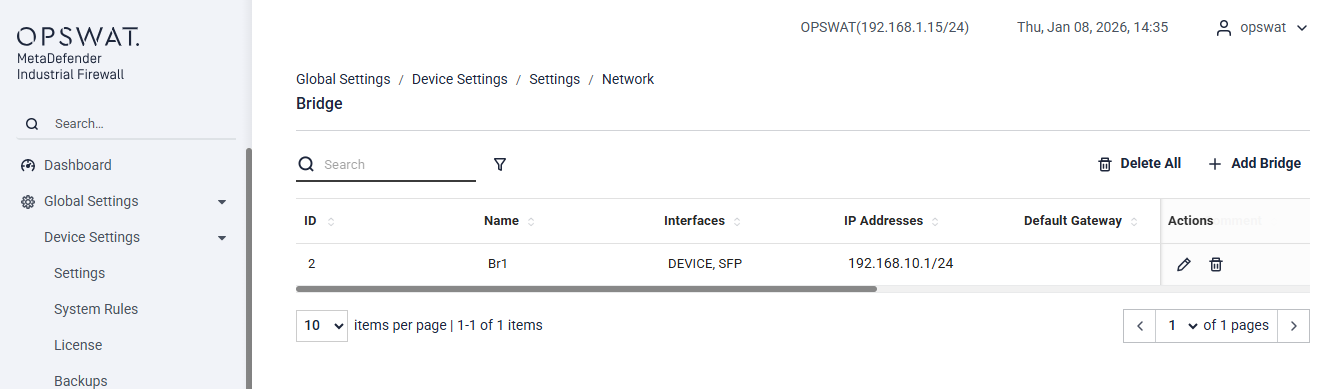
ID: Unique identifier for the bridge.
Name: User-defined bridge name.
Interfaces: Physical interfaces included in the bridge.
IP Addresses: IP address assigned to the bridge (if configured).
Default Gateway: Default gateway associated with the bridge (if configured).
Actions: Edit or delete the bridge.
Adding a Bridge: Allow to create a Layer 2 bridge by combining multiple interfaces into a single logical bridge.
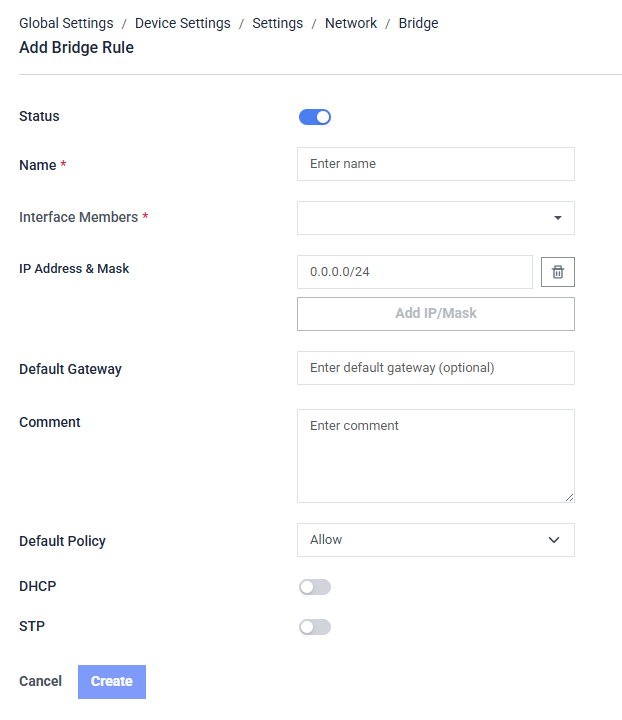
- Status: Enables or disables the bridge after it is created.
- Name: A unique name used to identify the bridge.
- Interface Members: Select the physical interfaces that will be grouped into this bridge.
- IP Address & Mask: Assign an IP address to the bridge for routing purpose.
- Default Gateway: Specify the gateway used by the bridge IP (optional).
- Comment: Optional notes to describe the purpose of the bridge.
- Default Policy: Defines whether traffic is allowed or denied by default on this bridge.
- DHCP: Enables or disables DHCP service on the bridge.
- STP: Enables or disables Spanning Tree Protocol to prevent Layer 2 loops.
- Create: Saves the bridge configuration.
- Cancel: Discards changes and returns to the previous page.
Network > Virtual IPs

Network > IP Access Restriction
This page allows you to restrict management access to the firewall by permitting only specified IP addresses or networks. When enabled, only the configured IP addresses or ranges can access the firewall management interface.
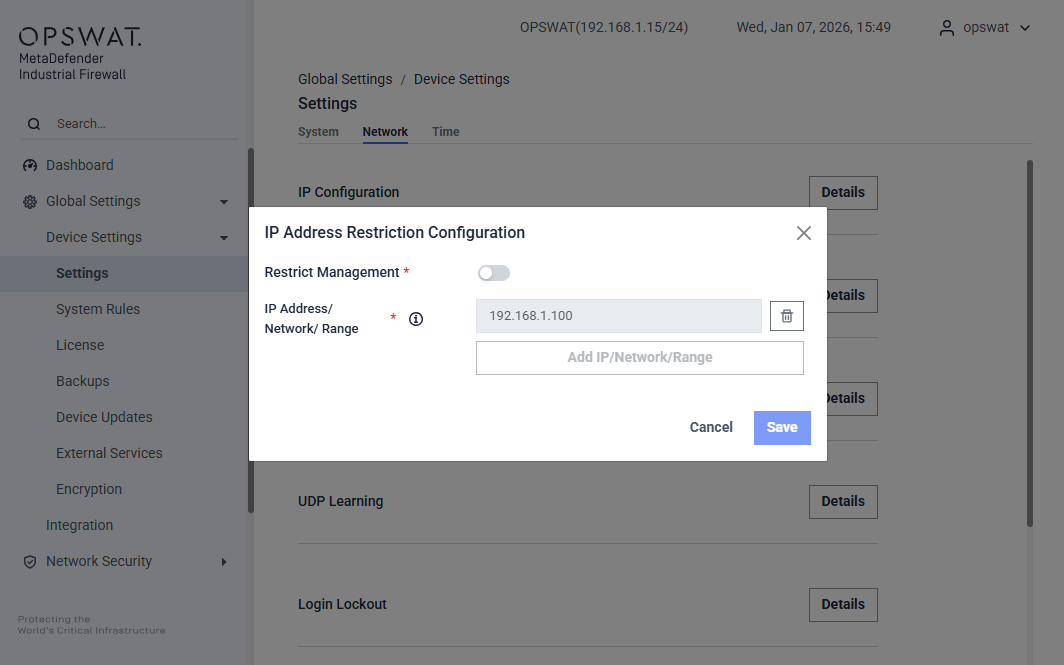
Restrict Management:
- Disabled: Management access is allowed from any IP address.
- Enabled: Management access is restricted to the IP addresses or networks listed below.
IP Address / Network / Range: Specify the IP addresses that are allowed to access the management interface. Supported formats:
- Single IP address: Example:
192.168.1.100 - Network (CIDR notation): Example:
192.168.1.0/24 - IP range: Example:
192.168.1.100–192.168.1.120
⚠️ Important: Ensure your current management IP is included before enabling this option to avoid being locked out
Network > Login Lockout > Setting
This page allows administrators to configure security settings for protected services within the MetaDefender Industrial Firewall.

Protected Services: Specify which services should be monitored and protected against unauthorized access attempts. The available options include:
- SSH: When enabled, the system will automatically block the IP address of a machine after it reaches the maximum number of failed SSH login attempts.
- Web IP: When enabled, the system will block the IP address of a machine after it reaches the maximum number of failed login attempts to the web interface.
- Web Account: When enabled, the system will lock the specific web account after it reaches the maximum number of failed login attempts to the web interface.
- Max Failed Attempts:* Defines the maximum number of failed login attempts allowed before the system initiates a lockout for the selected services.
Locked Duration: Specifies how long the service will remain locked after exceeding the maximum number of failed attempts.
Inspection Interval: Indicates the time interval during which failed attempts are counted. After this interval, the count resets.
Network > Login Lockout > Login Attempts
View the following information about locked-out users and unlock a user account (times shown are the appliance system time):
- Name: All users locked out of the appliance.
- IP: IP address that attempted to connect to the appliance
- Failed Attempts: Number of times the user tried to log on
- Last Failed: Last time the user tried to log on
- Locked: Time the system locked the user out
- Action: Procedures you can perform for this user
Select the user, open the Action menu, and click Clear to unlock the account for that user.
Network > Learning
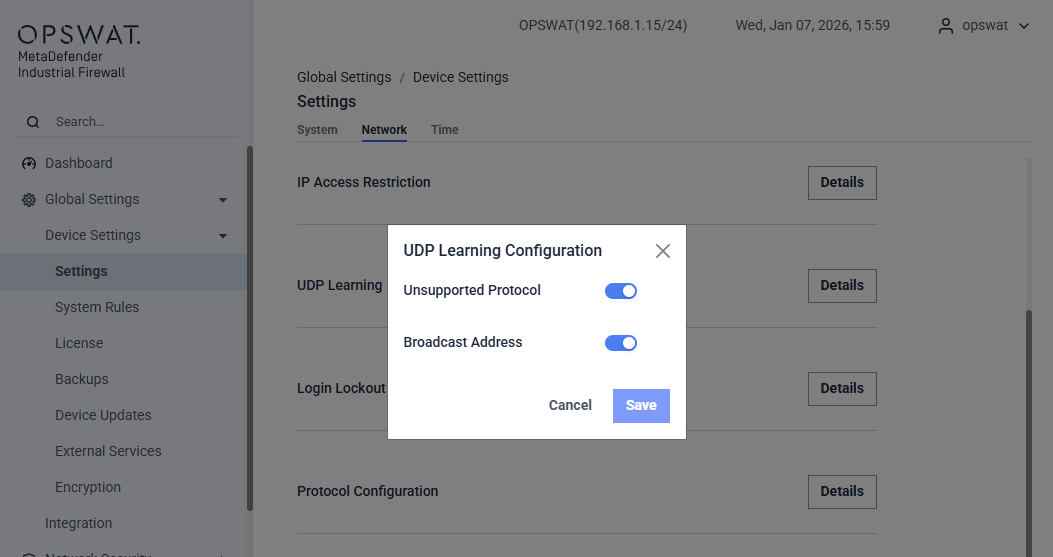
This section allows administrators to configure how the system learns and handles UDP traffic patterns. The available options include:
- Unsupported Protocol: When enabled, the system will learn traffic from unsupported UDP protocols. Please note that UDP source ports are often randomly assigned, which may result in duplicated learning traffic.
- Broadcast Address: When enabled, the system will learn broadcast UDP traffic.
Time tab

Time (NTP) Servers: Configure Network Time Protocol (NTP) servers to synchronize the system clock with accurate time sources.
Date Time: Set the current date and time for the system.
Timezone: Select the appropriate time zone to ensure the system clock reflects the correct local time.
Management Access
[Global Setting > Management Access]
The System Rules page displays firewall rules that are required for system operation, management access, and enabled services, as well as user-created rules. These rules control essential traffic such as management access, system services, and routing protocols.
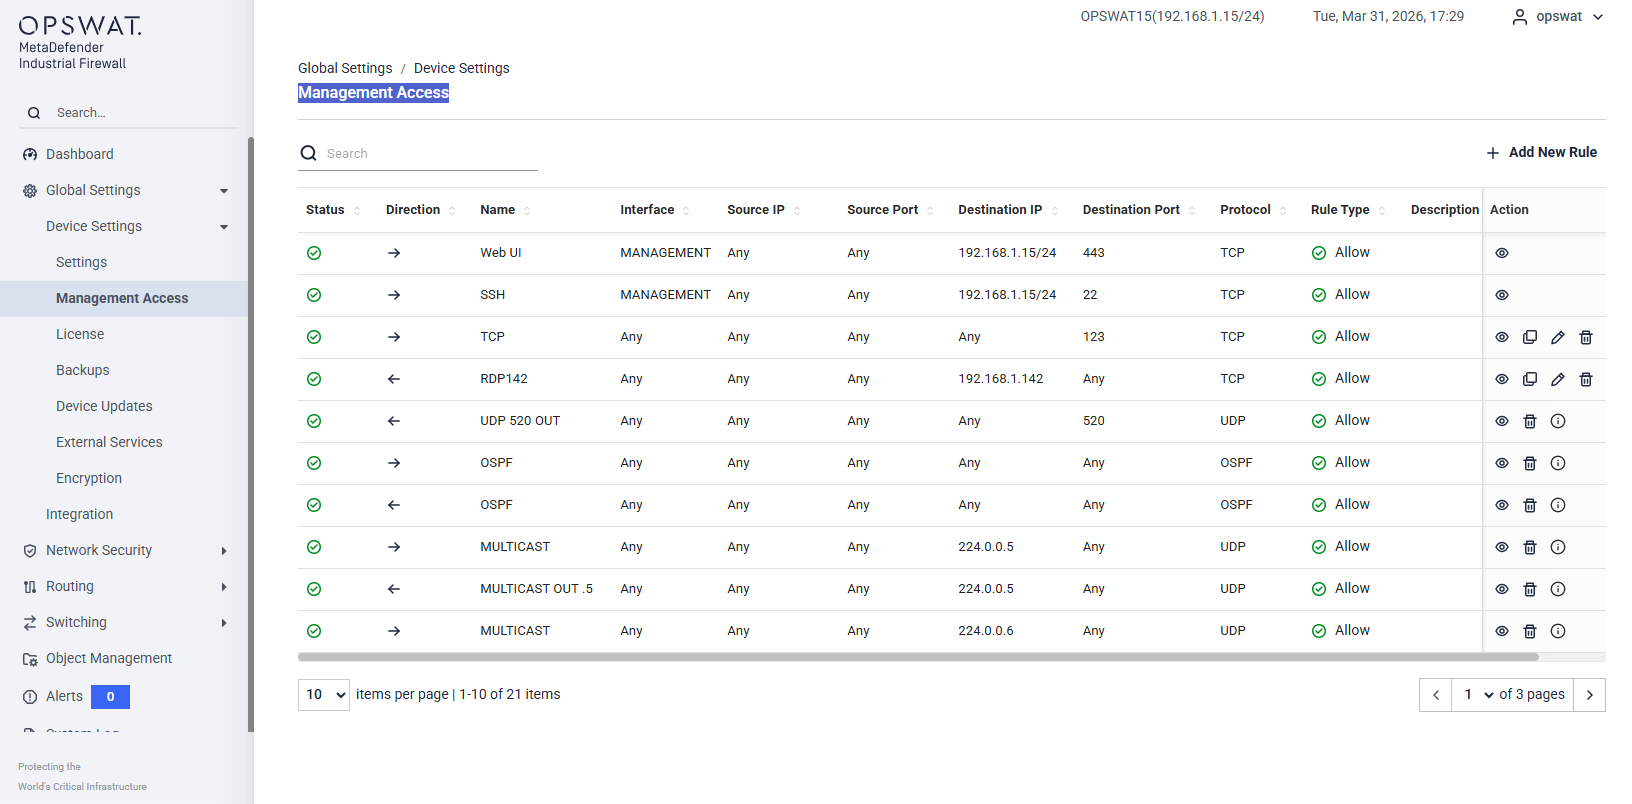
Each rule includes the following information:
- Status: Indicates whether the rule is enabled
- Direction: Traffic direction (Inbound / Outbound)
- Name: Rule name
- Interface: Interface to which the rule applies
- Source IP / Port: Traffic source
- Destination IP / Port: Traffic destination
- Protocol: Network protocol
- Rule Type: Allow or Deny action
- Description: Additional information about the rule
- Actions: Available operations for the rule
Types of Rules
Management Access Rules (Read-Only)
These rules are mandatory for firewall management access, such as:
- Web UI (HTTPS)
- SSH
Characteristics:
- Automatically created by the system
- Cannot be edited or deleted
- Ensure continuous access to the firewall management interface
These rules are protected to prevent accidental lockout of management access.
Service-Dependent Access Rules (Auto-Managed)
These rules are automatically created when certain services are enabled, including: DNS, Remote Syslog, Dynamic Routing protocols (RIP, OSPF), other system services.
Characteristics:
- Created automatically when a service is enabled
- Automatically removed when the service is disabled
- Cannot be cloned
These rules reflect the current service configuration and are managed automatically by the system. Please remove this type of rule manually only if it still exists after the related service has been disabled.
User-Created System Rules
These rules are created manually by the user to meet specific security or connectivity requirements.
Characteristics:
- Fully configurable
- Can be edited, cloned, or deleted
Install license
[Global Setting > Device Setting > License]
OPSWAT will supply license files to you. Contact Support for a new or renewal production license, or an extension on evaluation licenses. Include the serial number of your appliance.
- Save the new license to a location on the MetaDefender Industrial Firewall network.
- Double-click the appliance in the MetaDefender Industrial Firewall Nodes (Configured) box to open the web interface.
Open the Configuration menu and click License. The License pane displays.

Open the Action menu and click Update License. The Upload pane displays.

In the Local License File box, click Browse to navigate to the file. Select the file.
Click the Upload License button to start the upload. The Progress Bar shows when the upload is completed.
Click the End User License Agreement (EULA) link and read it. Then, click the check box to show that you accept the terms. A green banner at the top of the page tells you the procedure succeeded. The License page opens with the new information.
Backups
[Global Setting > Device Setting > Backups > System]

System Backup
A backup or snapshot is a copy of your device configurations and data. The appliance creates a backup automatically before all configuration changes are made. You can also make a backup on demand.
You will perform all backup tasks from the Backup Configs pane. Open the Configuration menu and click Backups to access this pane, which displays the following information for the current backups:
- Description: The appliance describes automatic backup that includes the date and time of the backup. For manual backups, the description comes from the Comment box.
- Created: Timestamp in the format of Weekday:MM:DD: HH:MM:SS YYYY
- Name: The system supplies the name. You cannot change it.
Create a backup
Open the Action menu and click Snapshot Running Config. A popup displays, “Snapshot (backup) the current config?”
Enter a comment that includes the cause for the backup. This text becomes the description on the Backup Configs pane. Click the Submit button to save the backup. A green banner at the top of the page tells you the procedure succeeded.
Click the Submit button to save the backup. A green banner at the top of the page tells you the procedure succeeded.
Export a backup
Double-click the backup you want to export. A detail page displays.
Open the Action menu and click Export. The Backup Config Export pane displays.
Enter the Password for this backup. Enter the password again in the Confirm Password box. Record the password in a safe place.
Click the Submit button. A popup page displays. Open the file or Save it. If you save it, the file goes to your local Downloads location. The default location for Windows systems is C:\Users<your user name>\Downloads.
Record the date and time you save it because this will be part of the .bin file name. You cannot edit the file name before it is saved.
Restore a backup
If a new configuration does not operate correctly, you can return an older configuration (rebuild). You can select a backup of this appliance or upload a configuration from a different appliance.
To use a backup from a different appliance, save the backup to a location on this MetaDefender Industrial Firewall network:
- To upload the software to the appliance, open the Action menu and click Upload. The Upload pane displays.
- Click Browse in the Local Filename of config box to navigate to the file. Record the name.
- Enter a Password for this backup.
- Click the Upload Config button to start the upload. The Progress Bar shows when the upload completes.
- This backup shows in the Backup Configs table.
Find the backup name in the Backup Configs table. You can click a column header to filter the table contents.
Delete a backup
Find the backup in the Backup Configs table. You can click a column header to filter the table contents.
Click the backup row to open a detail page.
Open the Action menu and click Delete. Click the Submit button to confirm your action. A green banner at the top of the page tells you that the procedure succeeded.
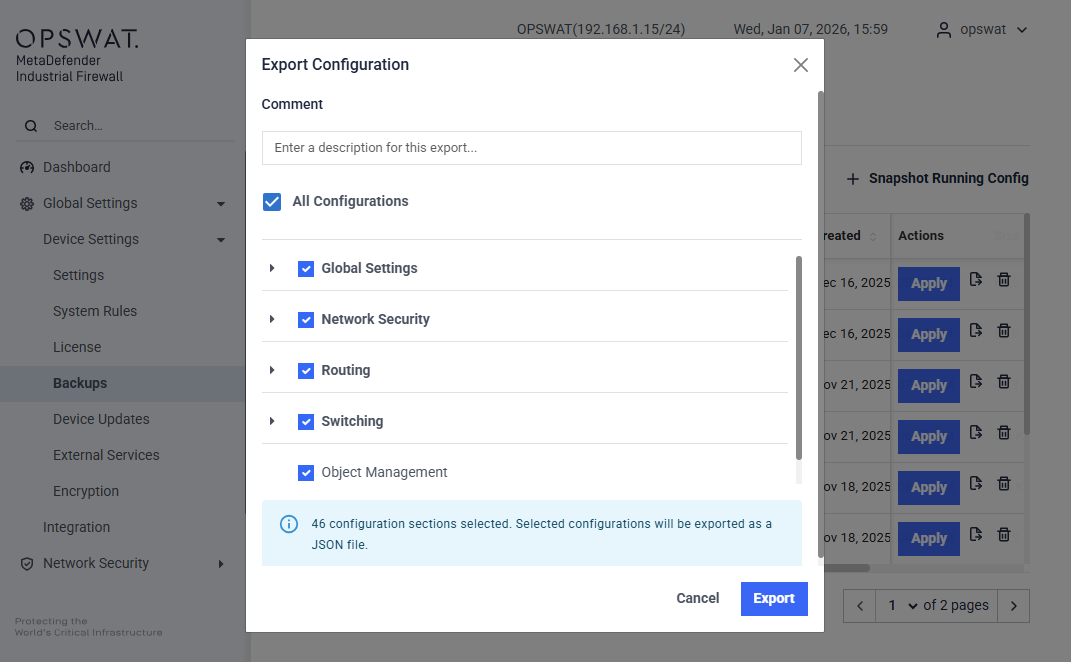
Configuration Backup
[Global Setting > Device Setting > Backups > Configuration]

A backup or snapshot is a copy of your device configurations. Unlike a system backup, it includes both configuration settings and some data as a binary file. The configuration backup is a JSON text file that contains only the device configuration.
Create a backup
Open the header menu and click Snapshot Running Config. A popup will appear, allowing you to:
- Choose all configurations to export.
- Select specific parts of the full configuration.
Export a backup
On the Action items of the each line, we can click on the export icon to export the configuration text file.
Restore a backup
On the Action items of the each line, we can click on the Apply button to apply the backup configuration.
Device Update
[Global Setting > Device Setting > Device Updates]
The software was installed on the appliance before it was shipped to you. As part of installation, you need to update the software to the latest release. You will also use this procedure to update new personalities (versions) of the appliance software.
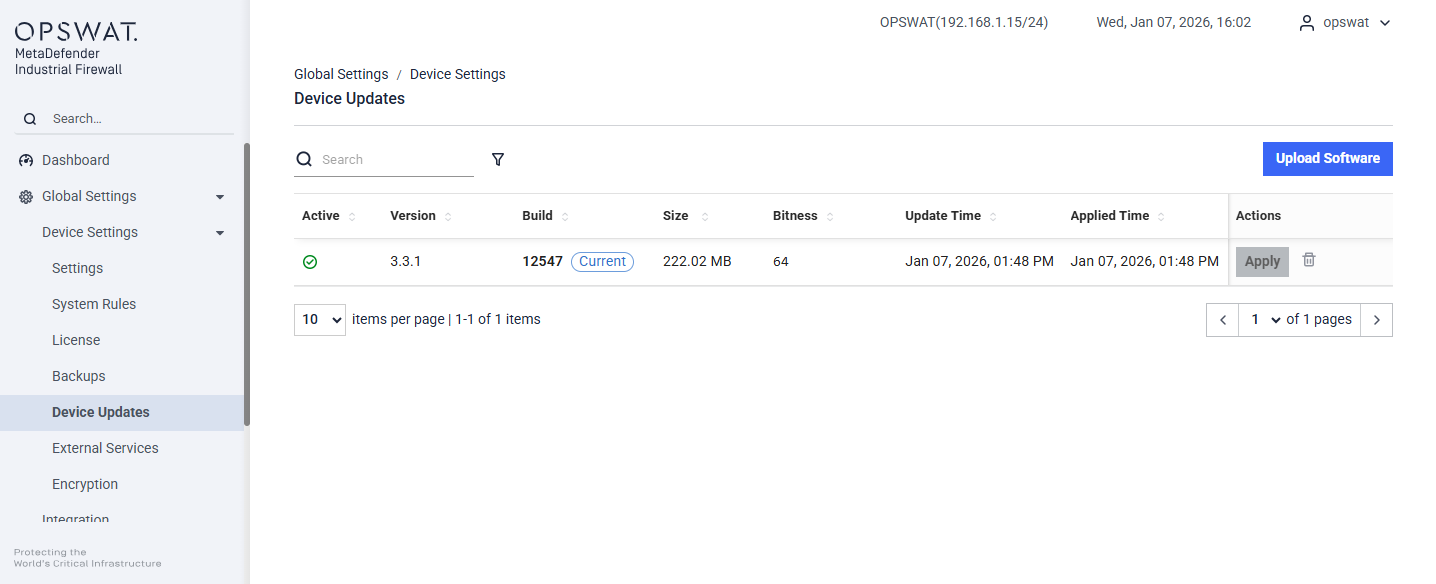
Click Upload Software. The Upload pane displays.
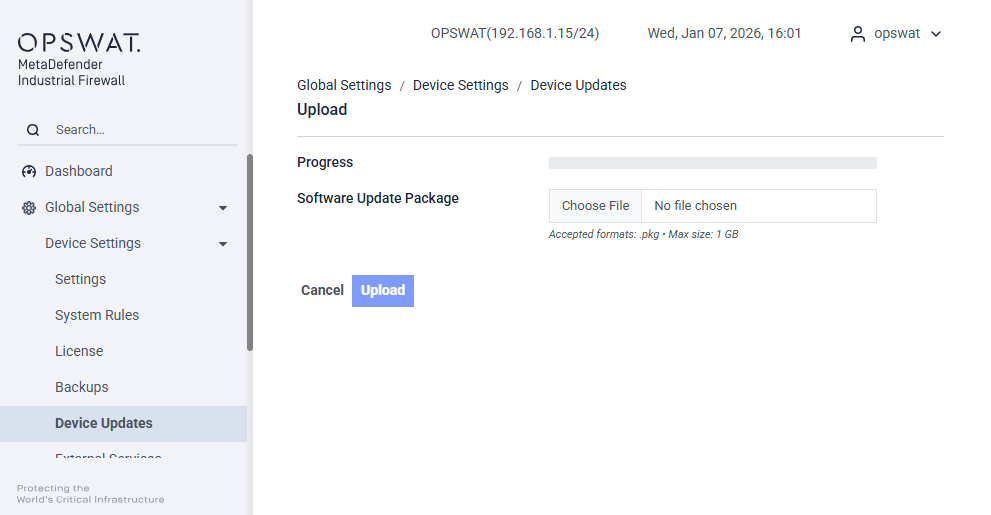
In the Local Filename of update package box, click Browse to navigate to the file for the appliance software.
Click the Upload Package button. The Progress Bar shows when the upload completes.
Click Apply in the Action column of the Software pane to apply the update. The new software version will show in the Version column with the Active column checked
External Services
Use the External Services options to view information about servers associated with the appliance, including:
- DNS servers
- SNMP servers and trap recipients
- RADIUS servers
- Remote syslog
- Time (NTP) servers
When you click on one of these options, an associated pane displays. Use the Action menu on the pane to add, edit, or delete these servers.
Encryption
Use the Encryption options to view and update SSL/TLS credentials and X509 certificates associated with the appliance.
SSL/TLS Credentials
Click the SSL/TLS Credentials option. The SSL/TLS Credentials pane displays. Use the Action menu to perform one of the following:
- Create a local keypair
- Import a keypair
- Set an SSL key
You can update an existing credential by selecting it, then using the Action menu on the resulting detail pane to:
- Add, edit, export or delete an individual certificate
- Delete all associated certificates
X509 Certificates
Click the x509 Certificates option. The X509 Certificates pane displays. Use the Action menu to import an X509 certificate.
Certificates
[Global Setting > Device Setting > External Services > Certificates]

This section allows you to manage certificates used for secure communication between the Industrial Firewall and other systems. You can create, import, and view details of various certificate types to establish trust and encryption across network entities.
Certificate Types:
- Local CA Certificate: A certificate authority (CA) certificate generated by the firewall for signing local certificates.
- Local Certificate: Certificate issued to this firewall, usually signed by the local or trusted CA.
- Remote CA Certificate: Certificate from a remote party (e.g., peer firewall) used to verify identity.
Actions available:
- Create Certificate: Generate a new certificate signed by the Local CA. Or import from an external CA.
- Import Remote CA: Upload a CA certificate from a remote device or external source.
- Import Remote Certificate: Upload an individual certificate (e.g., remote VPN peer certificate).
- Use Trusted CA for secure VPN or remote access.
- Local CA should be used to generate internal certificates if no external CA is involved.
- Regularly review expiration dates to avoid service disruption.
- Avoid using Untrusted CA unless for inspection or debugging purposes.
Integration
OT Access
[Global Setting > Integration > OT Access]
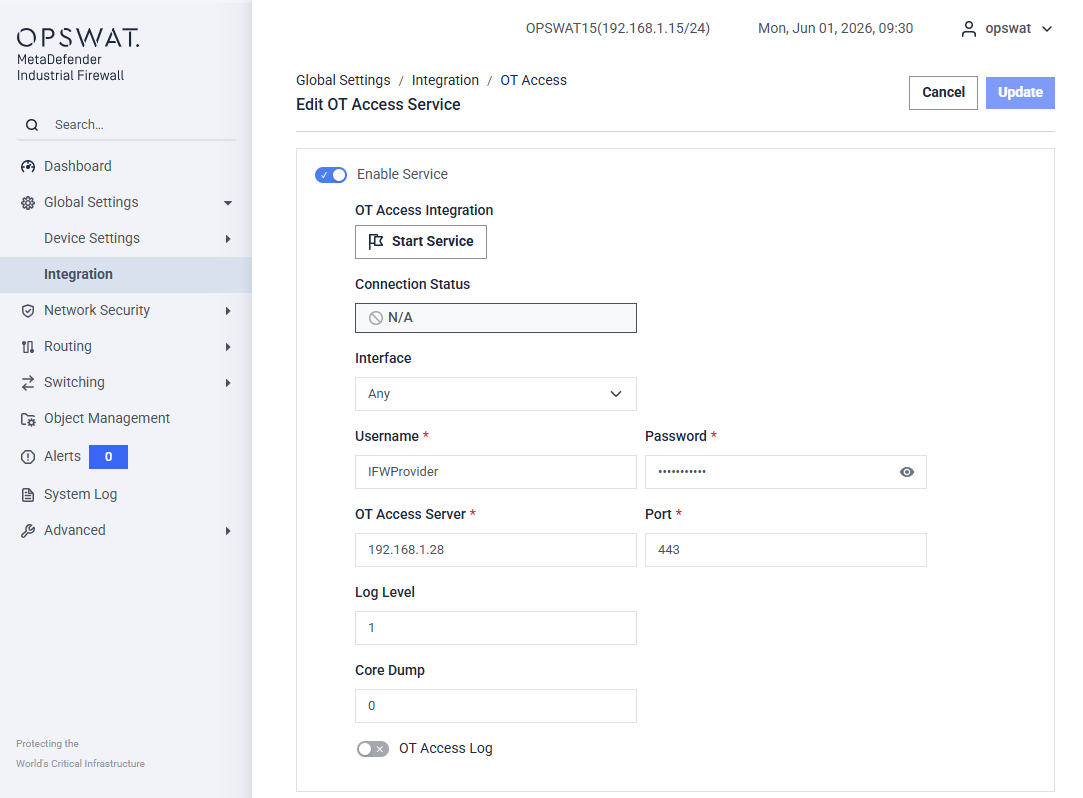
The OT Access Edit page allows administrators to configure the MetaDefender Industrial Firewall to operate as an OTA Gateway. A single IFW can register with and maintain connections to multiple OT Access servers at the same time. From this page you can create a new OT Access service or modify an existing one, control the service runtime state (Start / Stop), verify connectivity to the OT Access server, and tune logging and diagnostic options.
Enable Service: Activates or deactivates the OT Access Integration service.
Start Service: Starts or stops the OTA Gateway runtime.
Connection Status: Indicates that the firewall has successfully connected to the OT Access server.
Authentication: Specifies the authentication user used for OT access.
Password: Used to authenticate access to the OT Access server.
OT Access Server: Defines the Service IP address of the OT Access server.
Port: It is always 443.
Log Level: [0, 1, 2] Controls the verbosity of logs generated by the OTA Gateway
Core Dump: Indicates whether core dumps are enabled. 0 is disable and 1 is enable.
OT Access Log: Enables logging for OTA Gateway activities.
Detailed information on OTA and IFW integration can be found on this page (OT Access Integration).
MyOPSWAT
[Global Setting > Integration > MyOPSWAT]
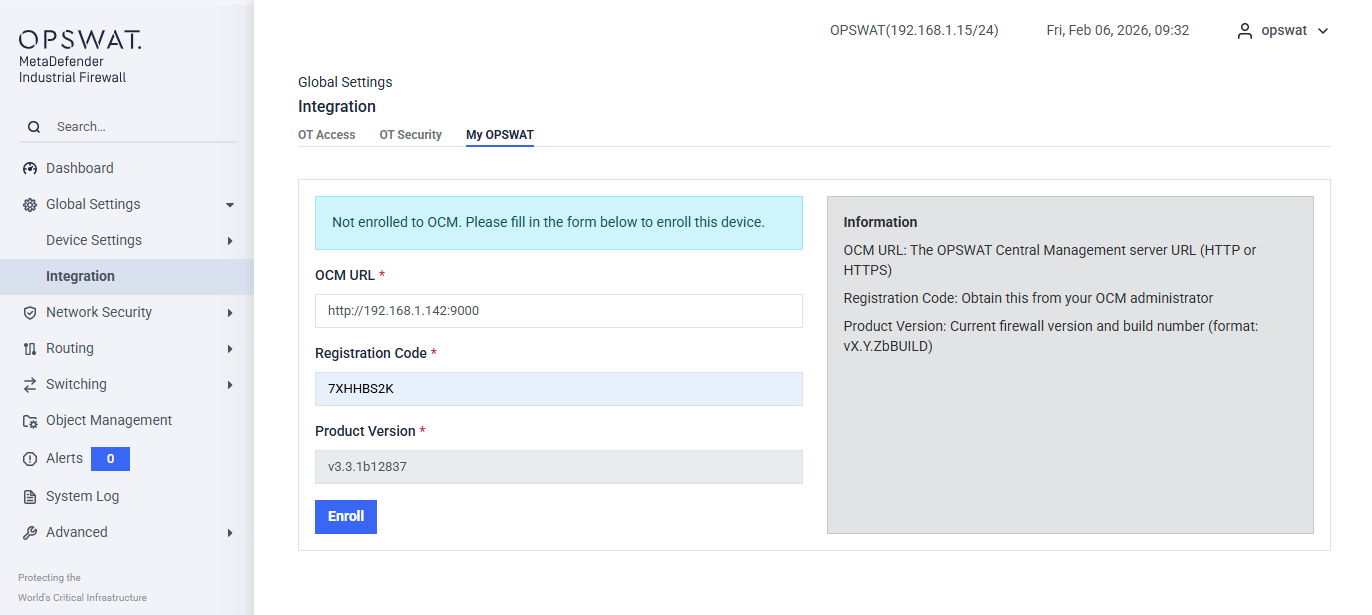
OCM URL: The OPSWAT Central Management server URL (HTTP or HTTPS).
Registration Code: A code obtained from MyOPSWAT.