Recommended TLS versions and cipher suites
MetaDefender ICAP Server supports TLS 1.3 or below.
Security level of TLS versions and cipher suites may change when new vulnerabilities are discovered.
The range of applied TLS versions and cipher suites may depend on the clients' compatibility at a certain deployment.
Because of this, OPSWAT recommends following frequently updated best practices from 3rd parties like https://github.com/ssllabs/research/wiki/SSL-and-TLS-Deployment-Best-Practices or https://wiki.mozilla.org/Security/Server_Side_TLS.
Prerequisites
To configure TLS for the Web Management Console and the ICAP interface, a certificate inventory object must be defined under Inventory > Certificates. Perform the following steps:
Go to Inventory >Certificates and click ADD NEW CERTIFICATE
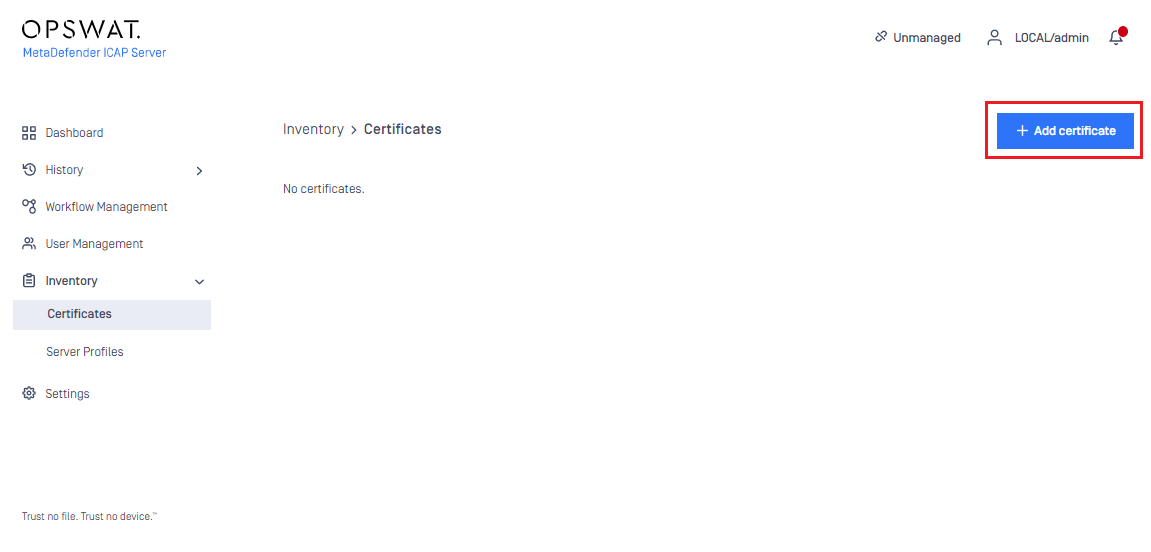
Specify the NAME, the CERTIFICATE PATH and the PRIVATE KEY PATH values

Click ADD to save the certificate inventory object

Important notes
When choosing location for certificate and key files, make sure that these files are in a location which is readable to the service user.
Certificate and key files should be obtained and saved by the user in a convenient location, adjust the paths accordingly.
The files under the CERTIFICATE PATH and the PRIVATE KEY PATH must be the certificate and the belonging private key in Privacy-Enhanced Mail (PEM) format. For further detais please see https://en.wikipedia.org/wiki/Privacy-Enhanced_Mail.
For instructions how to convert a certificate to PEM format please see https://knowledge.digicert.com/solution/SO26449.html.
For the TLS connection to work correctly, the certificate must be trusted on the client operating system (the browser in case of the Web Management Console, or the ICAP client (e.g. proxy, storage) in case of the ICAP interface).
To have trust to a certificate, it must be signed by a certificate authority trusted by the client, or the certificate itself must be a trusted root certificate on the client.
Web Management Console
MetaDefender ICAP Server supports accessing Web Management Console via HTTPS. This feature is, however, not enabled by default. To enable the TLS/HTTPS for the Web Management Console, perform following steps:
Create a certificate inventory object as instructed in section Prerequisites for the Web Management Console interface
Go to Settings > Security > HTTPS connection > Details

For the CERTIFICATE field select the certificate created in step 1
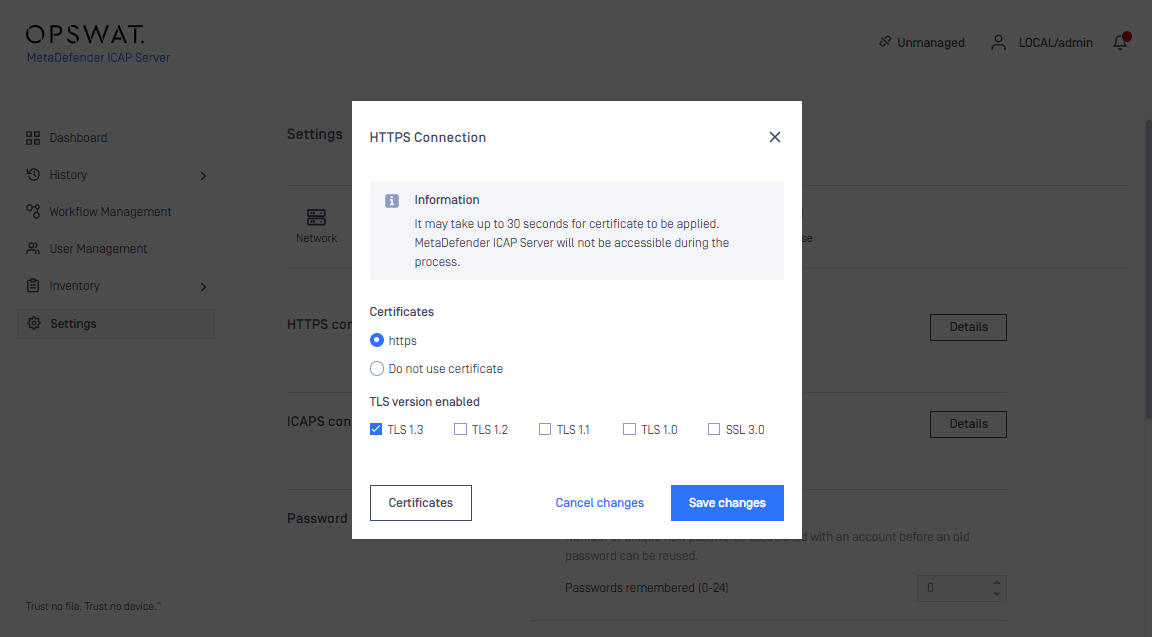
Click SAVE changes to apply the configuration
Service restart
For the modifications to take effect, the ICAP Server service must be restarted and rerouted to HTTPS. The Web Management Console can do all this automatically but the service will be unavailable for a couple of seconds.
To access the Web Management Console while TLS is enabled, the https schema must be specified for the URI.
For example, if the ICAP Server URL is normally:
http://localhost:8048``
then it must be changed to:
https://localhost:8048``
Cipher suite configuration
Cipher suite configuration for the Web Management Console can be done using configuration files. Perform the following steps:
Create a configuration file under the Nginx configuration directory of your system (by default /etc/mdicapsrv/nginx.d/ in Linux and C:\Program Files\OPSWAT\Metadefender ICAP Server\nginx in Windows)
The extension of the additional TLS configuration file must be .conf in order to be interpreted correctly by the product.
Add the necessary configuration to the configuration file
The configuration file must follow the Nginx syntax. For details see http://nginx.org/en/docs/http/ngx_http_ssl_module.html#ssl_ciphers.
For cipher suite recommendations see the section Recommended cipher suites.
The ICAP Server service must be restarted for the configuration to take effect.
Troubleshooting
If the Web Management Console renders inaccessible after enabling TLS, the connection can be manually downgraded to the cleartext HTTP protocol. For details see 5.6 Manually downgrade HTTPS to HTTP.
ICAP interface
Starting with ICAP Server version 4.8.0, the 3rd party stunnel application is no longer necessary to enable TLS for the ICAP interface.
ICAP Server ICAP-over-TLS listens on the port configured by the icaps_port configuration option. For details see 3.1.2 MetaDefender ICAP Server configuration file.
MetaDefender ICAP Server supports TLS portocol on the ICAP interface out of the box. This feature is, however, not enabled by default. To enable the TLS/ICAPS for the ICAP interface, perform following steps:
Create a certificate inventory object as instructed in section Prerequisites for the Web Management Console interface
Go to Settings > Security > ICAPS configuration > Details
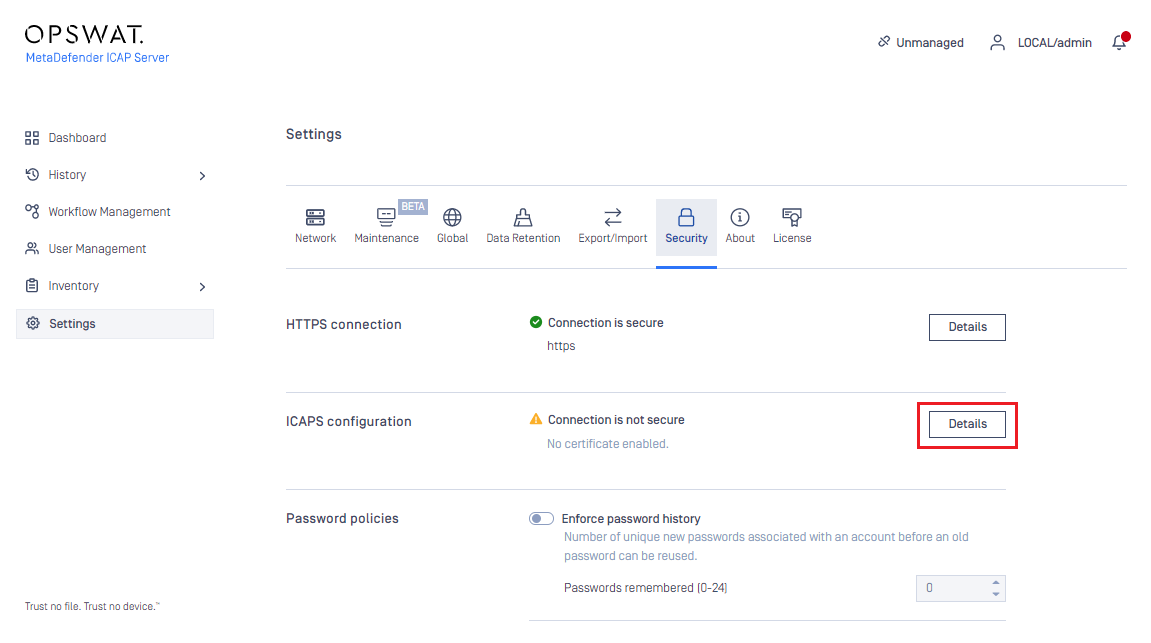
For the CERTIFICATE field select the certificate created in step 1

Click SAVE SETTINGS to apply the configuration
For the modifications to take effect, the ICAP Server service must be restarted. The Web Management Console can do all this automatically but the service will be unavailable for a couple of seconds.
To access the ICAP interface while TLS is enabled, the icaps schema must be specified for the URI.
For example, if the ICAP interface URI is normally
icap://localhost:1344``
then it must be changed to
icaps://localhost:11344``
Please note that the ICAPS interface listens on a dedicated port (by default 11344). For details see the icaps_port entry in 3.1.2 MetaDefender ICAP Server configuration file.
Default proxy_timeout 10 minutes then the ICAPS connection will be closed if file is scanned in MD Core longer than 10 minutes
to change this timeout value, please create custom.conf.icaps file and set the expectation timeout value to proxy_timeout
e.g:
The timeout is set to 24hours (expect there is no file can be scanned longer than 24h in case ICAPS
proxy_timeout 24h;
The timeout is set to 60 minutes
proxy_timeout 60m;
refer to Advance ICAPS configuration
Advance ICAPS configuration
Create a *.conf.icaps file (e.g: custom.conf.icaps) (by default /var/run/mdicapsrv/ in Linux and C:\Program Files\OPSWAT\Metadefender ICAP Server\nginx in Windows)
Add SSL-options to *.conf.icaps file (For more SSL-options please consult Nginx documentation)
Restart the ICAP Server service to take effect
Cipher suite configuration
Cipher suite configuration for the ICAP interface can be done using configuration files. Perform the following steps:
Create a configuration file under the Nginx configuration directory of your system (by default /var/run/mdicapsrv/ in Linux and C:\Program Files\OPSWAT\Metadefender ICAP Server\nginx in Windows)
The extension of the additional TLS configuration file must be .conf.icaps in order to be interpreted correctly by the product.
Add the necessary configuration to the configuration file
The configuration file must follow the Nginx syntax. For details see http://nginx.org/en/docs/http/ngx_http_ssl_module.html#ssl_ciphers.
For cipher suite recommendations see the section Recommended cipher suites.
The ICAP Server service must be restarted for the configuration to take effect.