What is Large File Support and why is the integration required
Large File Support is a feature designed to surpass Salesforce's limitations for processing files larger than 10 MB, caused by Total heap size, 12 MB. This functionality enables the uploading and processing of files larger than 10 MB. The integration of this feature is crucial because it allows these larger files to be securely scanned through the MetaDefender for Salesforce (MDFS), ensuring compliance and security for significant date uploads.
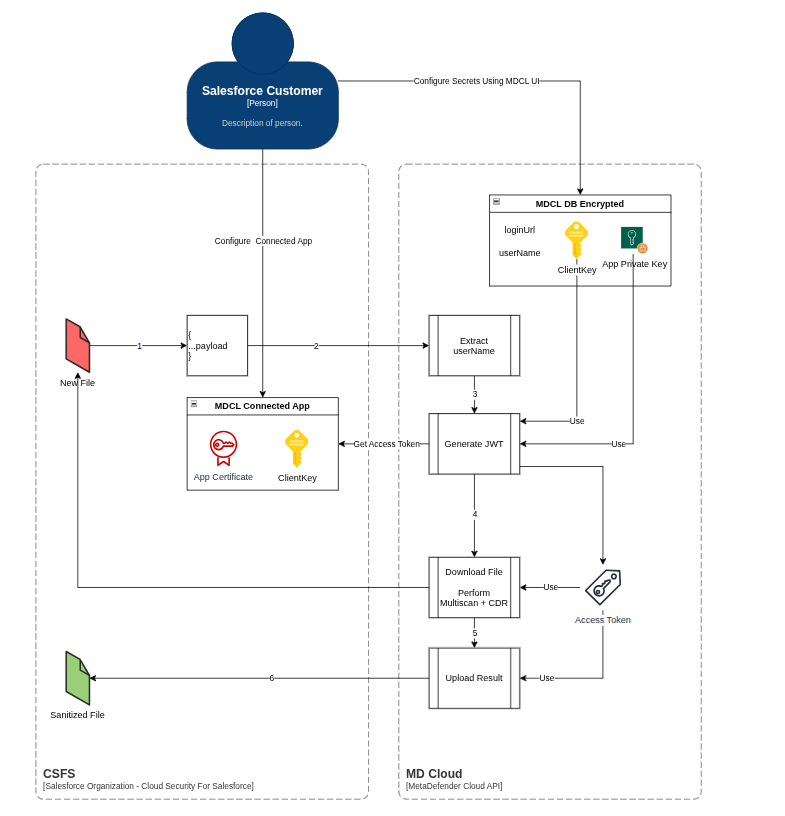
The file processing workflow
After configuring MDFS from the OPSWAT Settings page (e.g., Account Settings and Policy Settings), successfully uploading a file on the Files page will generate a MetaDefender Log within the OPSWAT - MetaDefender Logs page. This log contains details about the file scan through MetaDefender Cloud (MD Cloud). Based on the configuration, the file will be processed, and any infected, malicious, or non-sanitized files will be blocked.
The Large File Support workflow offers a key advantage: MetaDefender Cloud will now pull the file upon scan request and push the sanitized file to MDFS. This is in contrast to the small files workflow, where MDFS is responsible for pushing the file and pulling the sanitized version.
How to configure MDFS and Salesforce Organization
Generate a certificate: A certificate is needed to secure the connection between MD Cloud and MDFS. You will need the private key in the next section "How to configure MD Cloud."
Open a terminal (for Linux or macOS) or a command prompt (for Windows). Please note to execute the following commands with sudo (Linux&macOS) or run cmd as administrator (Windows).
Generate a private key and save it to a file named, for example,
private.key.openssl genpkey -out private.key -algorithm RSA -pkeyopt rsa_keygen_bits:2048openssl genrsa -out private.key 2048
Generate a certificate signing request using the
private.keyfile and save it to a file namedprivate.csr.openssl req -new -key private.key -out private.csr
Generate a self-signed digital certificate using the
private.keyandprivate.csrfiles, and save it to a file namedprivate.crt.openssl x509 -req -sha256 -days 365 -in private.csr -signkey private.key -out private.crt
Configure the connected app in your Salesforce organization: The connected app will be used by MD Cloud to connect your Salesforce organization.
Navigate to Setup → Home.
Go to Apps → External Client Apps → Settings.
Turn on Connected Apps option
Click on “New Connected App”, top-right side of the screen
Fill in the mandatory fields
Connected App Name: use “MetaDefender Connect” or customize
API Name: use default or customize
Contact Email: use a valid email address
Check “Enable OAuth Settings”
Set "Callback URL”
- For production organizations: https://login.salesforce.com/services/oauth2/callback
- For sandbox organizations: https://test.salesforce.com/services/oauth2/callback
Uncheck “Require Proof Key for Code Exchange (PKCE) Extension for Supported Authorization Flows”
Select OAuth scopes "Manage user data via APIs (api)" and "Perform requests at any time (refresh_token, offline_access)," then save.
Uncheck “Require Secret for Web Server Flow”
Uncheck “Require Secret for Refresh Token Flow”
Save
Configure the connected app in your Salesforce Organization: The connected app will allow you to identify calls from MD Cloud to your Salesforce organization.
- Navigate to Setup → Home.
- Go to App Manager.
- Find the installed connected app (MetaDefender Connect).
- Click on "Manage" → "Edit Policies" and select "Admin approved users are pre-authorized" from "Permitted Users."
- Save
- Go to App Manager and find the connected app.
- Click on "Edit" in the right-side button menu.
- Enable “Use digital signatures” and upload the certificate
private.crtgenerated at step 1 - Select OAuth scopes "Manage user data via APIs (api)" and "Perform requests at any time (refresh_token, offline_access)," then save.
Configure the user: Create or use a Salesforce User to identify the connections between MD Cloud and your Salesforce organization. You will need the user name in the next section "How to configure MD Cloud".
- Navigate to Setup → Home.
- Go to Permission Sets.
- Click on "New" and fill in the name in the Label section. Use “MetaDefender Connect”
- For the "License" add the license type of the user to be assigned (e.g. "Salesforce").
- Save
- Navigate to MetaDefender Connect and click on "System Permissions" then click on "Edit" and enable "View All Data" and "Modify All Data".
- Save
- Navigate to MetaDefender Connect and click on "Assigned Connected Apps" then click on "Edit" and add your connected app from “Installed Connected Apps” to “Enabled Connected Apps”
- Save
- Select "Manage Assignments."
- Assign the necessary user by clicking "Add Assignment."
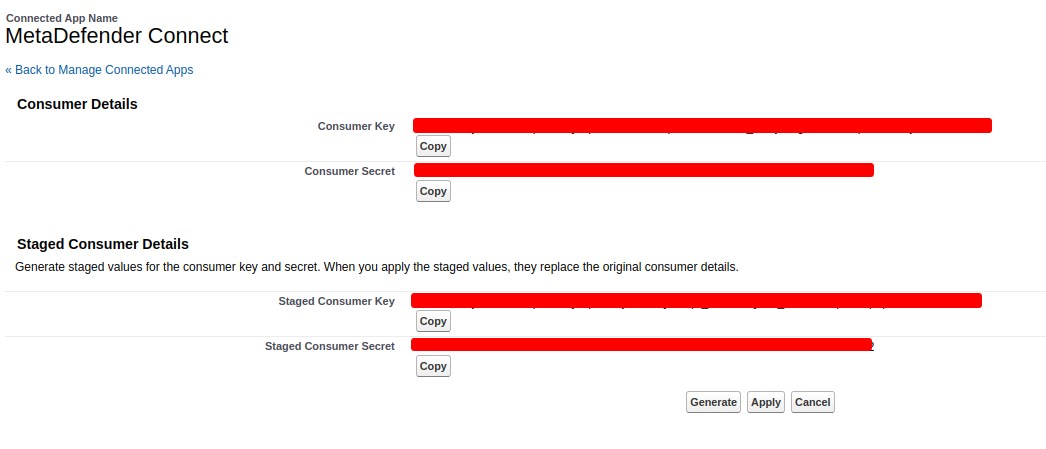
Configure MDFS (client key): You will need this key in the next section "How to configure MD Cloud".
- Navigate to Setup → Home.
- Go to App Manager.
- Find the installed connected app (MetaDefender Connect).
- Click on "View" in the right-side button menu.
- Select "Manage Consumer Details."
- Note the generated Consumer Key.
How to enable scan for Large File Support
- Go to “App Launcher”
- Search “OPSWAT”
- Select “OPSWAT Settings”
- To enable Large File Support, select scan option “Scan. It will consume Salesforce API requests.“ from “Process files bigger than 10MB” in the Policy Settings section.

Please note that large file scans will consume Salesforce API requests from your organization when files are retrieved or sanitized files are uploaded by MD Cloud.
Salesforce API requests are reset daily. If needed, the total number of API requests can be increased.
How to configure MD Cloud
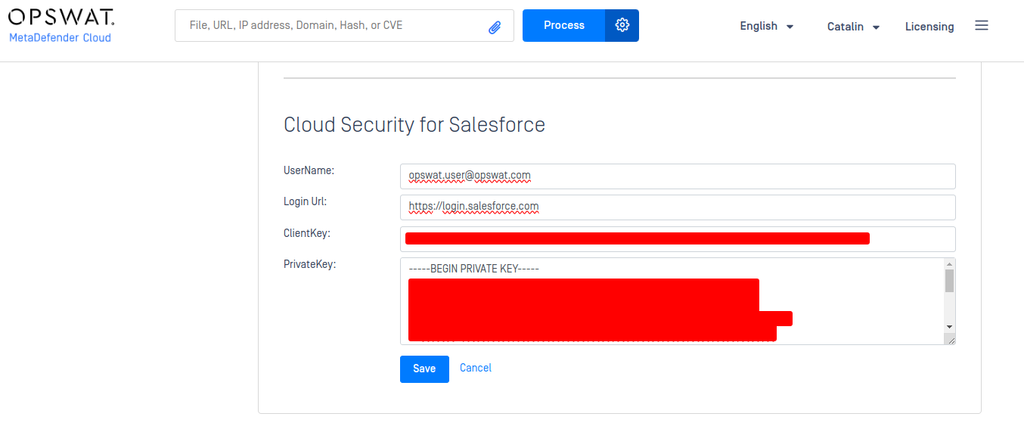
How to configure the connection to your Salesforce organization using the UI
- Login to MD Cloud: Use the account associated with the API Key configured in MDFS https://metadefender.opswat.com
- Visit the security page:https://metadefender.opswat.com/account/security Find "MetaDefender for Salesforce” section.
- Configure connection user: Utilize the UserName of the user assigned/configured in the MDFS configuration section.
- Configure the authentication URL: Utilize the Login URL of the organization (https://login.salesforce.com for production organizations, or https://test.salesforce.com if the integration is made with a sandbox organization).
- Configure client key: Utilize the ClientKey generated in the MDFS configuration section.
- Configure private key: Utilize the PrivateKey generated during the MDFS configuration section. Once saved, the private key will appear in the format of five asterisks ( *). This is a security measure to ensure that the private key is not visible in the UI.
Please do not overwrite or modify this masked format, overwriting the format will trigger an update on the private key with the new value or remove the private key if the filed is empty.
How to test the integration
Once scan is enabled and confirmed for Large File Support, you can upload files larger than 10 MB. MetaDefender Cloud will then retrieve the file for scanning upon request, and return it along with its expected results according to MDFS configuration.