This article applies to the current MetaDefender IT-OT Access Console, MetaDefender Cloud, supported versions of the MetaDefender Core API, and all MetaDefender Endpoint releases deployed on Windows, macOS, Linux, Android and iOS systems.
Threat Detection is powered by MetaDefender Technologies, and is only available to OPSWAT customers who have:
A MetaDefender Endpoint license that includes Module 1 for Advanced Endpoint Protection, or access to MetaDefender Cloud. To learn more, Read This.
Existing MetaDefender Core servers deployed (one or more), that can be added as scan sources for MetaDefender IT-OT Access. To learn more, Read This.
Threat Detection can only be enabled once you have added one of the above MetaDefender servers as a scan source under policy. This article will cover setup and configuration of MetaDefender IT-OT Access’s threat detection feature, including selection of your scan source.
Via Threat Detection, MetaDefender IT-OT Access enables administrators to schedule and run full or custom multi-engine scans not only on all managed Client devices, but on removable media drives, CDs, DVDs and mobile devices connected to those endpoints too.
MetaDefender IT-OT Access’s threat detection offers organizations state-of-the-art, advanced cybersecurity threat prevention, allowing administrators to define automatic and manual actions on devices and device groups in response to threats reported by up to 30+ of the world’s leading anti-malware engines.
Configuring Threat Detection
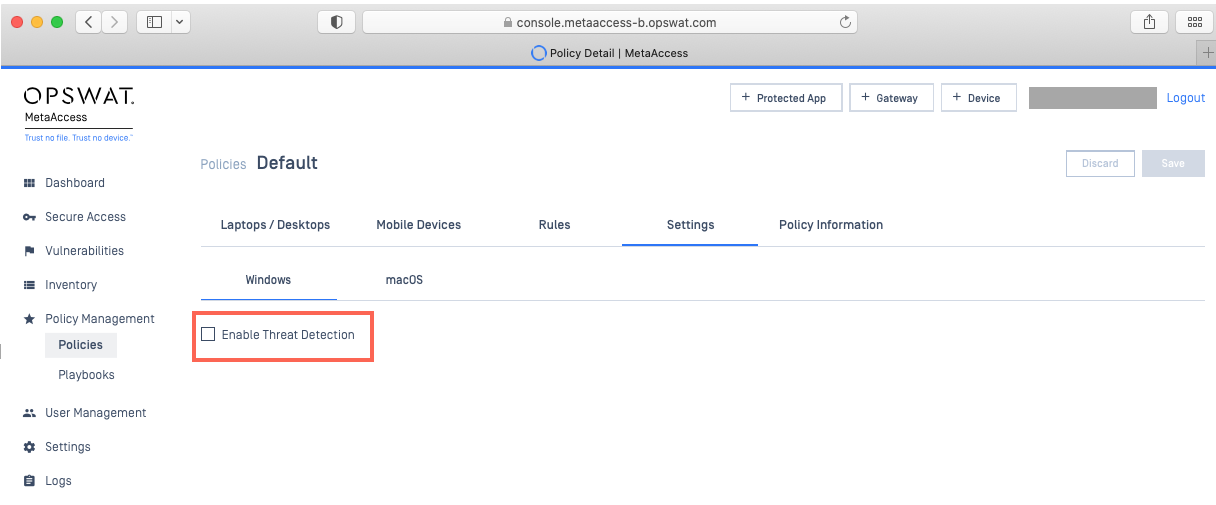
Most threat detection settings are accessible via MetaDefender IT-OT Access Console>Policy Management>Policies>Relevant Policy>Settings>Enable Threat Detection, as pictured below.
To expand the settings, check the selection box alongside Enable Threat Detection.
Scan Source
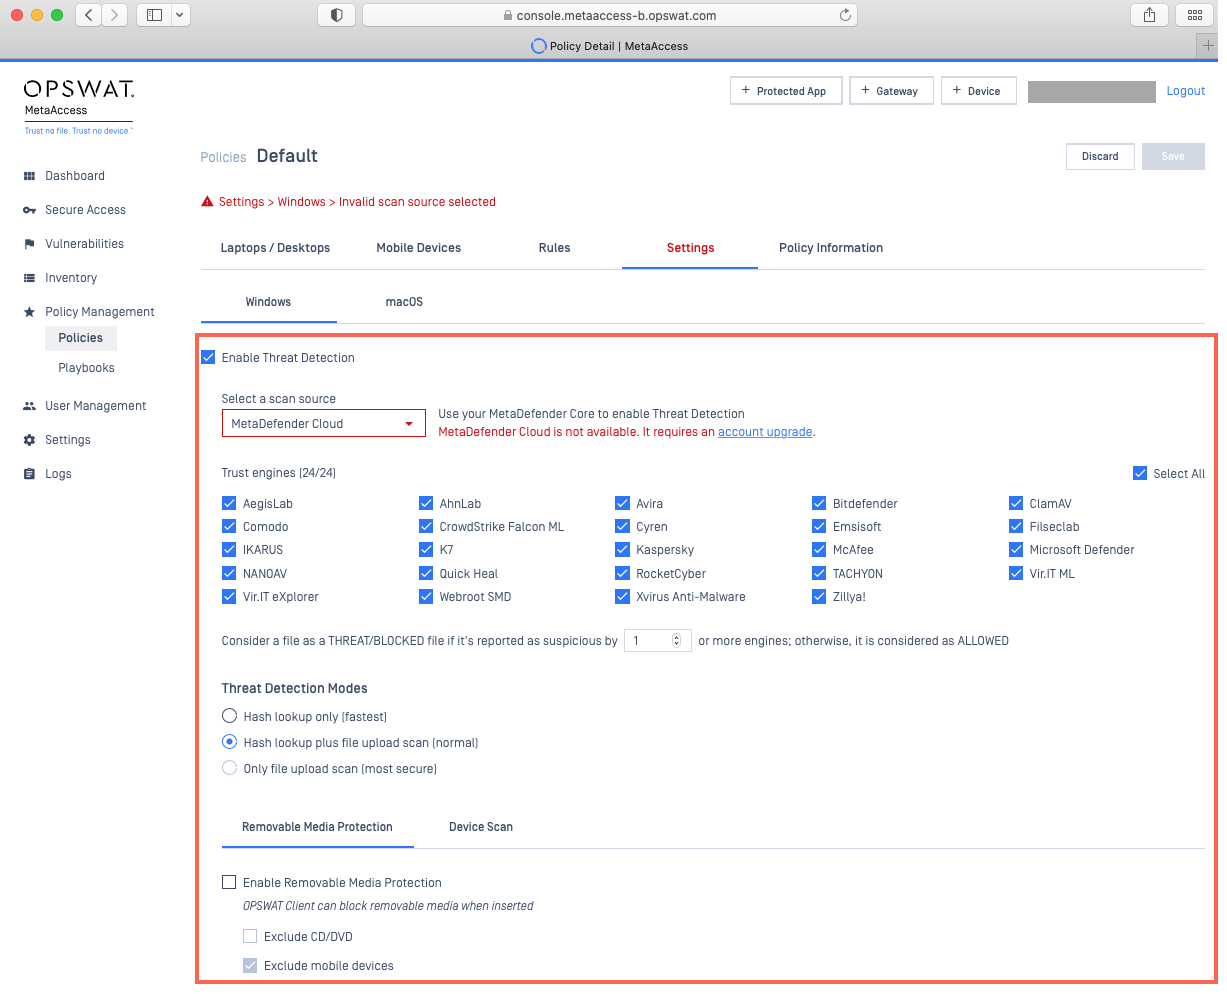
First, you will need to select a Scan Source as, without one, you will be unable to save or implement most of the other settings under this tab.
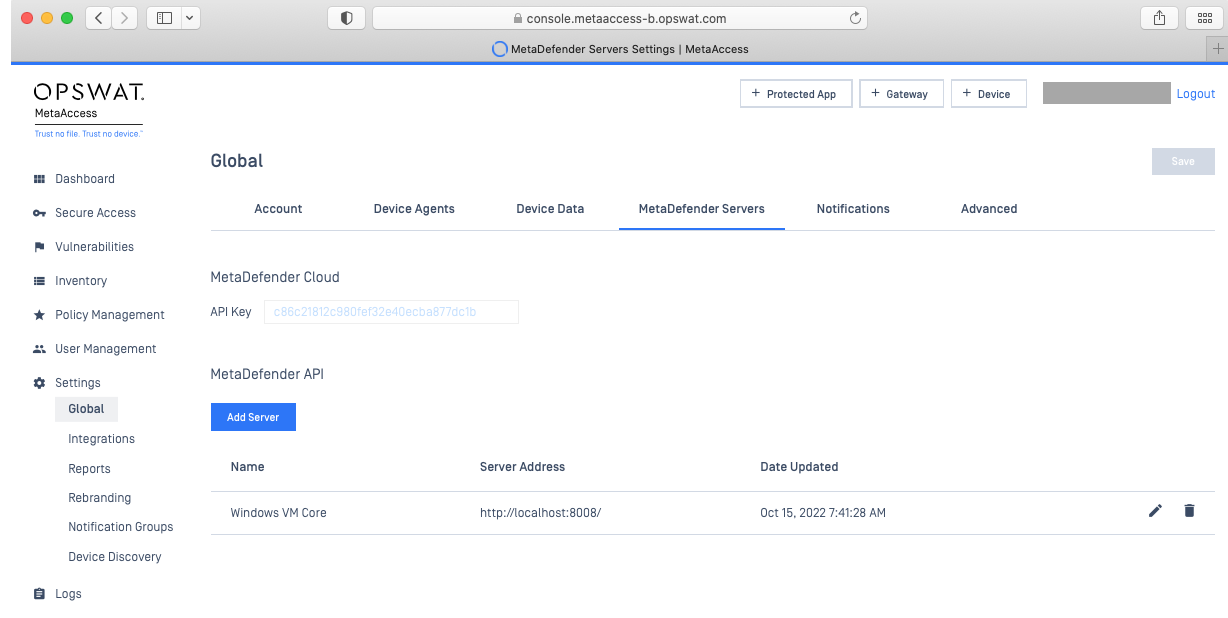
Scan Source refers to the MetaDefender server that you would like to associate with this policy for the purpose of running multi-engine scans and utilizing other threat detection features. Before you can select a scan source here, you will need to add one under MetaDefender IT-OT Access Console>Settings>Global>MetaDefender Servers.
For detailed instructions on how to add a scan source, please Read This.
Supported scan sources include:
MetaDefender Cloud: a cloud-based threat detection and prevention platform, powered by MetaDefender technologies, utilizing up to 30+ industry leading AV engines for comprehensive multi-scanning. For this option, trusted engines are configurable so that, if you so choose, you can select or unselect any of the engines available via your service option here, under the Policy Settings>Enable Threat Detection tab.

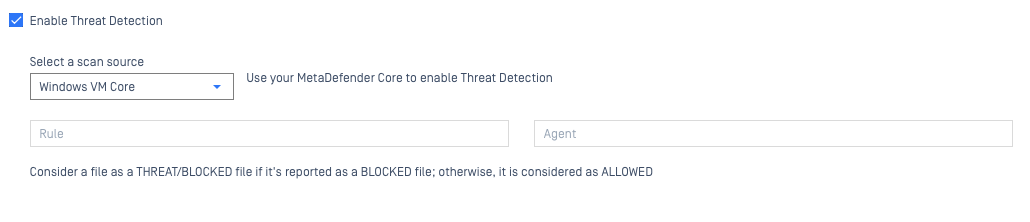
MetaDefender Core: a highly customizable threat detection and prevention platform, powered by MetaDefender technologies, utilizing up to 30+ industry leading AV engines for comprehensive multi-scanning. For this option, you can use your own MetaDefender Core server to scan files on devices assigned to this policy, according to your specified Workflow Rule or Agent, which can be configured here, under the Policy Settings>Enable Threat Detection tab.
Threat Detection Mode
Now you can configure the method you prefer to use for threat detection. Options include:
Hash lookup only (fastest): here, the MetaDefender Endpoint checks the file hash against records of files scanned previously by the server.
If the file is unknown, ie. no record of previous scans of that file are found, the Client will see it as skipped.
This method is the fastest but the least comprehensive, and can leave potential threats undetected.
Hash lookup plus file upload scan (normal): here, the MetaDefender Endpoint first completes the hash lookup process, detailed above.
If the file is unknown, the Client will upload it to the server for threat analysis.
This method is fast in the case of known files, but for unknowns, scan time will depend on the workload of the scan server, the device network, file size, file type, number of files to be scanned, etc.
Only file upload scan (most secure): Here, the MetaDefender Endpoint will always submit files to the server for threat analysis.
While this method is the most comprehensive and secure, scan time will depend on the workload of the scan server, the device network, file size, file type, number of files to be scanned, etc.

Removable Media Protection
This feature is only available for Windows.
Windows users have the option to enable and configure remove media protection here, under the Policy Settings>Enable Threat Detection tab, by checking the selection box alongside Enable Removable Media Protection, as shown below.
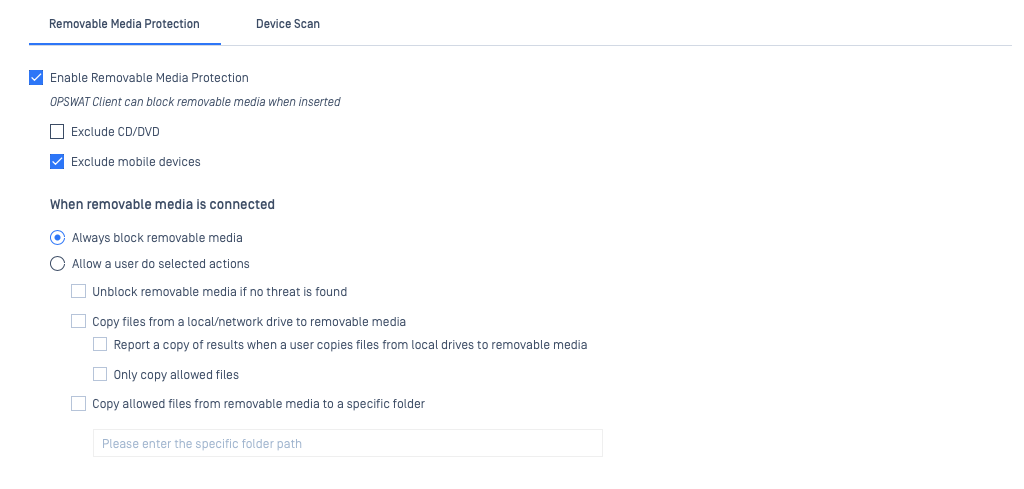
When this feature is enabled, MetaDefender Endpoint will auto-block any removable media being inserted into the Client device, issuing a notification to the user immediately.
The administrator can select the option to Always block removable media, or to Allow a user to do selected actions as shown below.
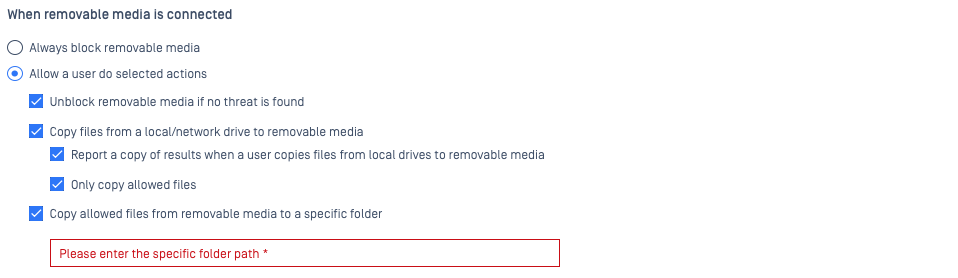
When configured to allow certain user actions, on insertion of the media, the MetaDefender Endpoint will issue a pop-up dialog to the user, listing the allowed actions. From there, the user can select an allowed action in order to unblock their media.
These allowed actions can include:
Unblock media if no threat is found: the media will be scanned and, if no threat is found (according to the threat detection settings configured under this policy), the media will be unblocked.
Copy files from a local/network drive to removable media: this allows the user to copy files from a local/network drive to the removable media without any scanning being done. This is an exit-only process, so the removable media will remain blocked against transfer of material to the Client side.
Here, the system can also be configured to:
Report a copy of results when a user copies files from local drives to removable media, or to - Only copy allowed files.
Copy allowed files from removable media to a specific folder: here, users can copy allowed files (allowlisted according to the threat detection settings configured under this policy) from the removable media to a path that should be specified in the provided field.
Only files with no threats detected will be copied, and the drive will remain in a blocked state.
Should the end user opt not to select and perform an allowed action immediately, they can close the pop-up dialogue and reopen it later, by right-clicking the MetaDefender Endpoint tray icon and selecting the media drive letter.
Removable Media Protection: Deep Content Disarm and Reconstruction
This feature is only available for Windows, when Removable Media Protection>Allowed Actions have been enabled, and when Deep CDR is enabled in a corresponding security rule in the MetaDefender server that is configured under this policy.
Here, you can configure which files should be copied to your specified path (local drive) or to MetaDefender Vault (to be configured in the next step).
Your options include:
Use sanitized files if available: here, the MetaDefender Endpoint will copy sanitized files, instead of the original files, to the specified/local drive.
This will only be done if the Deep CDR process, enabled under your corresponding MetaDefender Core security rule, was successful in sanitizing the files, otherwise, originals will be copied to the local/specified drive.
Alternatively, the MetaDefender Endpoint will upload sanitized files to a configured MetaDefender Vault for Allowed files, while original and infected files will be uploaded to a configured MetaDefender Vault for Blocked files.
Use sanitized files if available and Use only sanitized files, do not copy original files: the MetaDefender Endpoint will copy sanitized files, instead of the original files, to the specified/local drive if the Deep CDR process, enabled under your corresponding MetaDefender Core security rule, was successful in sanitizing the files.
However, if the Deep CDR process, enabled under your corresponding MetaDefender Core security rule, was unsuccessful in sanitizing a file, or if the file type was not supported for sanitization, the file will not be copied to the local/specified drive.
Alternatively, the MetaDefender Endpoint will upload sanitized files to a configured MetaDefender Vault for Allowed files, while original and infected files will be uploaded to a configured MetaDefender Vault for Blocked files.

Removable Media Protection: Actions when a scan has failed
This feature is only available for Windows, when Removable Media Protection>Allowed Actions have been enabled.
There are various reasons why the MetaDefender Endpoint may not always be able to scan files for threats via the configured MetaDefender server, including problems with the scan server, network issues and more.
Here, you have the option to define what action the MetaDefender Endpoint should take in this scenario.
Your options include:
Unblock the removable media: the MetaDefender Endpoint will unblock the drive, even though the scan has failed.
Copy files from the removable media: the MetaDefender Endpoint will copy files to the specified/local drive, even though the scan has failed.

Removable Media Protection: Media Manifest
This feature is only available for Windows, when Removable Media Protection>Allowed Actions have been enabled and if your organization has one or more MetaDefender Kiosks deployed. For more about MetaDefender Kiosk, Read This.
If your organization has one or more MetaDefender Kiosks deployed, and a user has already scanned the removable media drive with one of them, you can save time by enabling this feature.
MetaDefender Kiosk generates a Media Manifest file and saves it to media drives following scanning, this file contains the hashes of all clean and approved files that were processed by the Kiosk.
When this setting is enabled, the MetaDefender Endpoint will find and refer to the Media Manifest, saving time by not scanning the files on the drive that are listed as scanned in the media manifest.
If the Media Manifest reports a file as Allowed by MetaDefender Kiosk, the MetaDefender Endpoint will treat it as no threat. Should a file be Blocked by Kiosk on the Media Manifest, the file will be treated as infected.
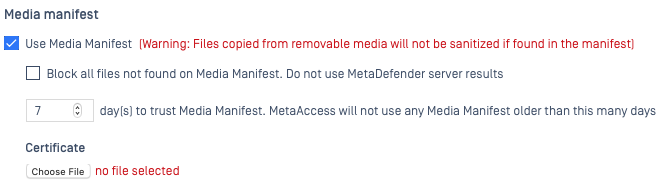
This feature includes an option to Block all files not found on the Media Manifest. Do not use MetaDefender server results, which can be checked if CDR is not enabled, or if you do not have a trusted MetaDefender server assigned to scan files that are not found on the manifest.
Files from the removable media will not be scanned if found on the manifest.
Unless the Block all files not found on the Media Manifest. Do not use the MetaDefender server results option is checked, files that are not found on the media manifest will only be sanitized when CDR is enabled, and when Deep CDR is enabled in a corresponding security rule in the MetaDefender server that is configured under this policy.
Here, you can adjust the setting X day(s) to trust Media Manifest. MetaAccess will not use any Media Manifest older than this many days to your preference.
Finally, you will need to upload your signed Certificate (the same certificate that is used by the Kiosk) to be sent to the MetaDefender Endpoint for authorization purposes.
Removable Media Protection: MetaDefender MFT
This feature is only available for Windows, when Removable Media Protection>Allowed Actions have been enabled, and when you or your organization has one or more MetaDefender Vault’s deployed for the containment and monitoring of threats from removable media.
For more about MetaDefender Vault, Read This.
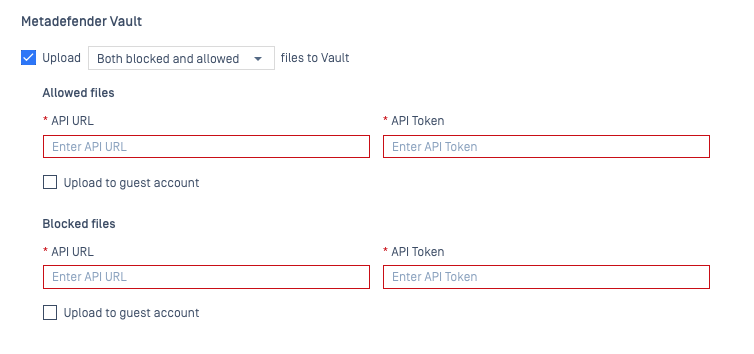
If you have one or more MetaDefender Vault’s deployed, you can enable this feature to upload either Allowed, Blocked, or Allowed and Blocked files from an unblocked removable media drive, or copied from a removable media drive, to one or more of your Vaults.
You can enable the option to Upload X files to Vault, clicking the drop-down menu to select from options including:
Both blocked and allowed
Allowed
Blocked
You will also need to specify the MetaDefender Vault API URL and API Token for the Vaults to which you wish to upload both Allowed and Blocked files, and whether you wish to upload the files to a Guest Account.
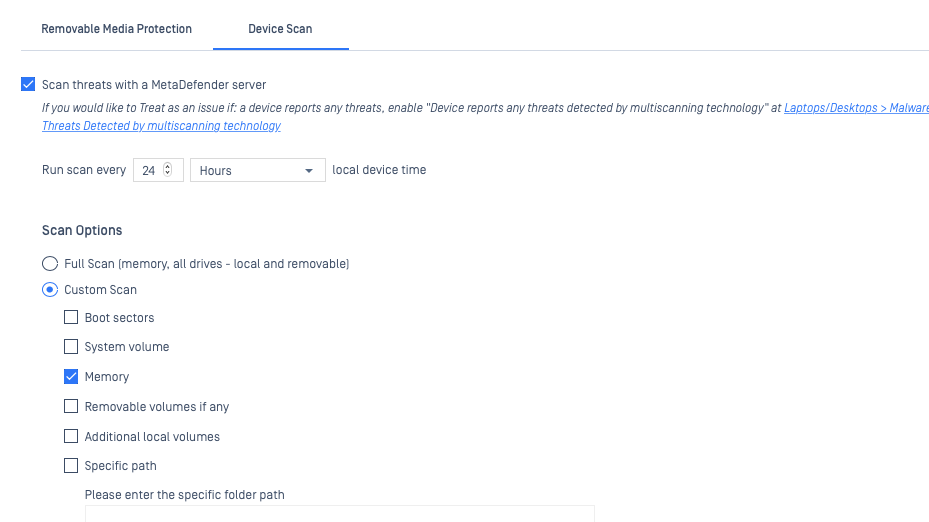
Device Scan
This setting allows you to detect new and advanced threats on all managed devices assigned to this policy by scheduling regular multi-scans, to be initiated by the MetaDefender Endpoint and run via the assigned MetaDefender server (scan source).
Once the setting is enabled, you can select the frequency of your scans to either the Hour, Day, Week or Month via the adjustment box and the drop-down menu.
You should then select your Scan Options, which include:
Full Scan (memory, all drives - local and removable)
Custom Scan (selecting one or more of the following: boot sectors, system volume, memory, removable volumes if any, additional local volumes, specific path)
The following threat detection settings relate to on-demand threat scanning, and are accessible via the MetaDefender IT-OT Access Console>Inventory>Devices page, or via the device details view at MetaDefender IT-OT Access>Inventory>Devices>Relevant Device.
On-Demand Threat Scan
Should you wish to run additional scans between scheduled scans, or should you choose not to schedule regular scans, you have the option to trigger an on-demand scan for a specific device via either the device inventory or device details page.
This setting is only applicable to managed devices running MetaDefender Endpoint releases subsequent to V7.6.222.0 + for Windows and V10.4.214.0 + for macOS.
From MetaDefender IT-OT Access Console>Inventory>Devices
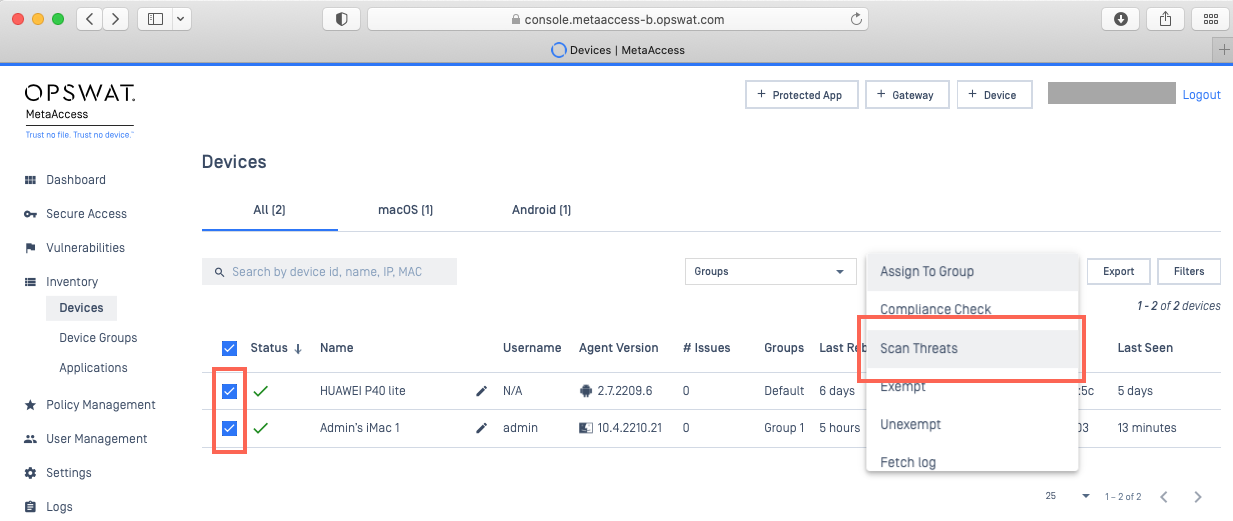
Navigate to MetaDefender IT-OT Access Console>Inventory>Devices, then check the selection boxes alongside the devices for which you wish to perform an on-demand scan.
From the Action drop-down menu in the upper right-hand corner of the screen, select the Scan Threats option, as illustrated below.
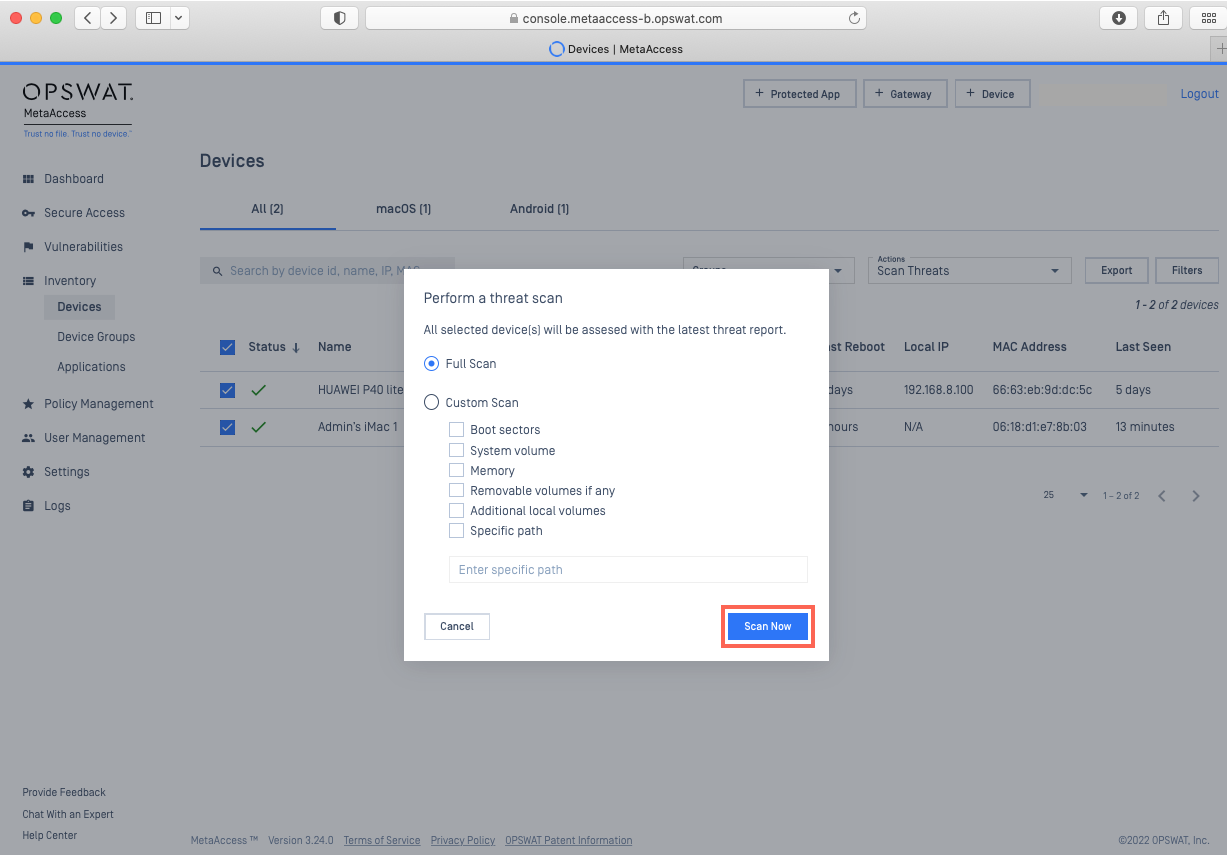
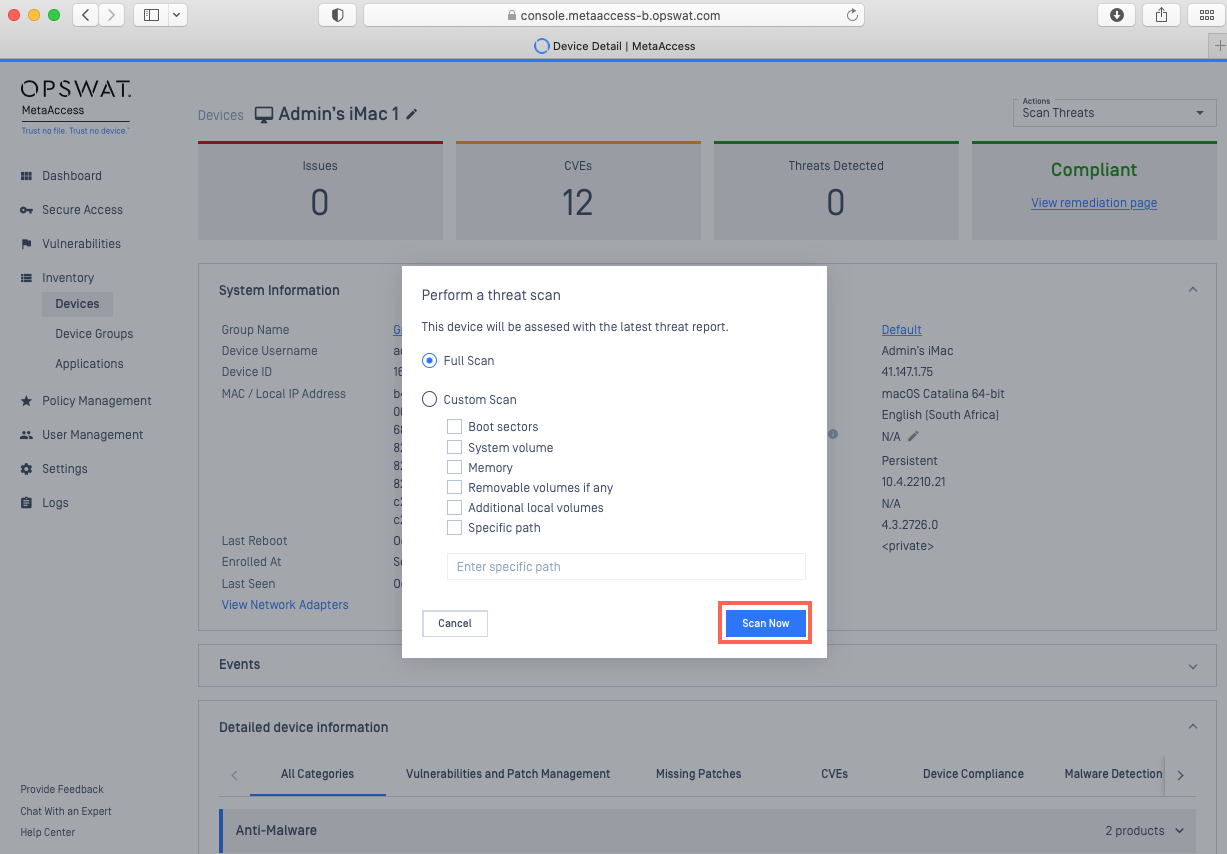
From the pop-up box, select the type of scan you would like to perform, then select Scan Now, as illustrated below.
Enter your PIN to confirm, as prompted.
The system will now send a scan command to the MetaDefender Endpoint on each selected device. The results will be accessible as soon as each scan is complete, via the MetaDefender IT-OT Access Console>Inventory>Devices>Relevant Device>Events>Action Logs tab.
From MetaDefender IT-OT Access Console>Inventory>Devices>Relevant Device
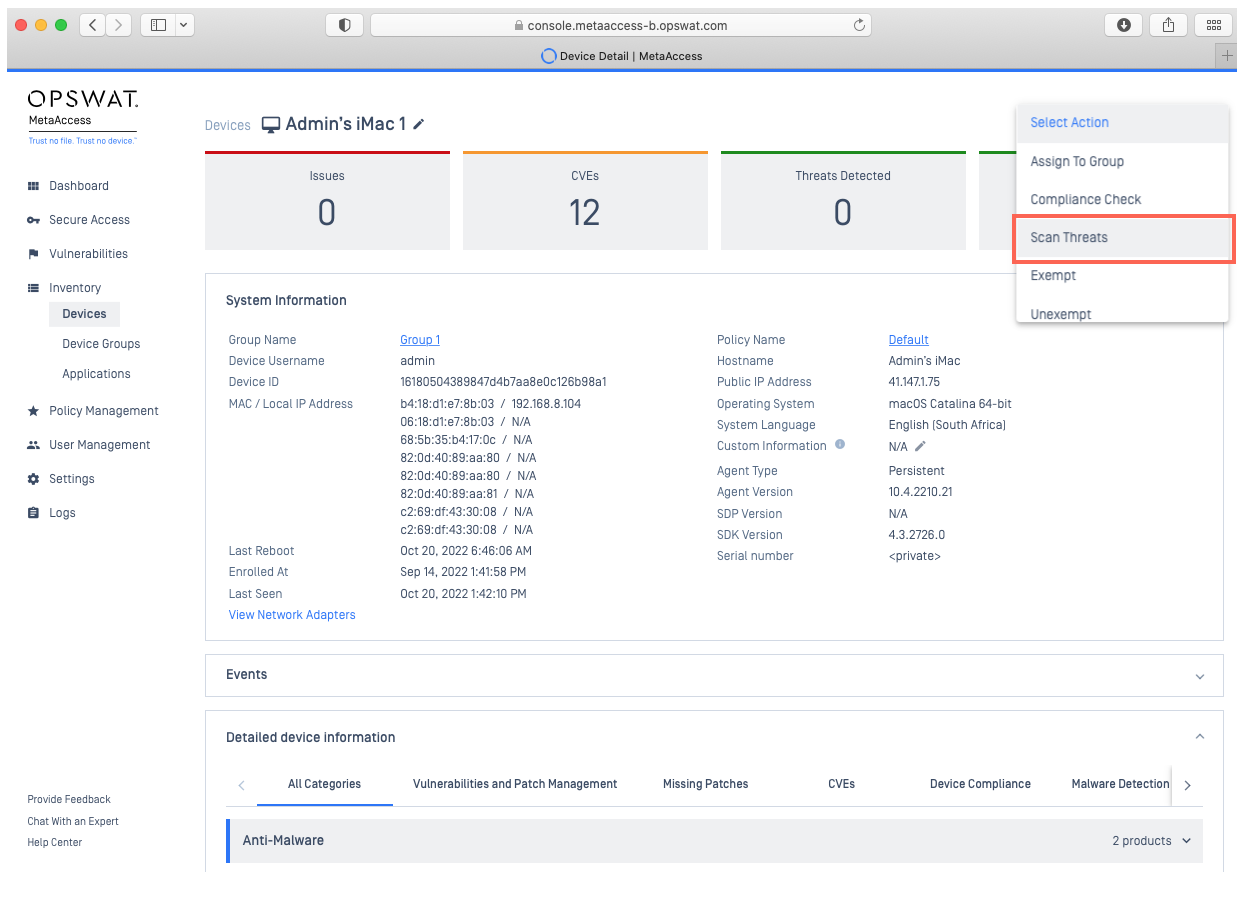
Navigate to MetaDefender IT-OT Access Console>Inventory>Devices and locate the device on which you’d like to perform a scan.
Click on the device to open the Device Details view.
From the Action drop-down menu in the upper right-hand corner of the screen, select the Scan Threats option, as illustrated below.
From the pop-up box, select the type of scan you would like to perform, then select Scan Now, as illustrated below.
Enter your PIN to confirm, as prompted.
The system will now send a scan command to the MetaDefender Endpoint on the selected device. The results will be accessible as soon as each scan is complete, via the MetaDefender IT-OT Access Console>Inventory>Devices>Relevant Device>Events>Action Logs tab.
Scan Reports
All scan reports are accessible via the device details view.
On-Demand Scans: scan reports are accessible via the MetaDefender IT-OT Access Console>Inventory>Devices>Relevant Device>Events>Action Logs tab.
Scheduled Scans: the latest scan report is accessible under the MetaDefender IT-OT Access Console>Inventory>Devices>Relevant Device>Detailed Device Information>Malware Detection tab. The system will only show the first 200 threats, if there are more than that, administrators can click the Get Full Report button. The report will be retrieved from the Client device by MetaDefender IT-OT Access, and will be downloadable under the MetaDefender IT-OT Access Console>Inventory>Devices>Relevant Device>Events>Action Logs tab.
The status of specific actions in the log may be any of the following:
Queued: when the command is registered and will be sent to an MetaDefender Endpoint.
In Progress: when the command has been sent to an MetaDefender Endpoint.
Completed: when the command was successful and theMetaDefender Endpoint reported data. In this case, the system will show you a link to download a scan report and a summary scan result.
Failed: when the MetaDefender Endpoint, for some reason, failed to perform the action. In this case, a detailed error will be shown.
For further queries, concerns or issues regarding MetaDefender IT-OT Access Threat Detection Via MetaDefender Cloud or MetaDefender Core, please open a Support Case with the OPSWAT team via phone, online chat or form, or feel free to ask the community on our OPSWAT Expert Forum.