Setting up My OPSWAT Central Management On-Premises
My OPSWAT Central Management version 10.3.2512.2391 (and above) offers the latest air-gapped patch management support.
To begin setting up air-gapped patch management, two things need to be done first:
When endpoints are enrolled and communicating with My OPSWAT Central Management, they will begin to report their missing patches.
There are 2 places where missing patches can be viewed:
- For a singular device
- Inventory > Devices > selected device > OS Patches
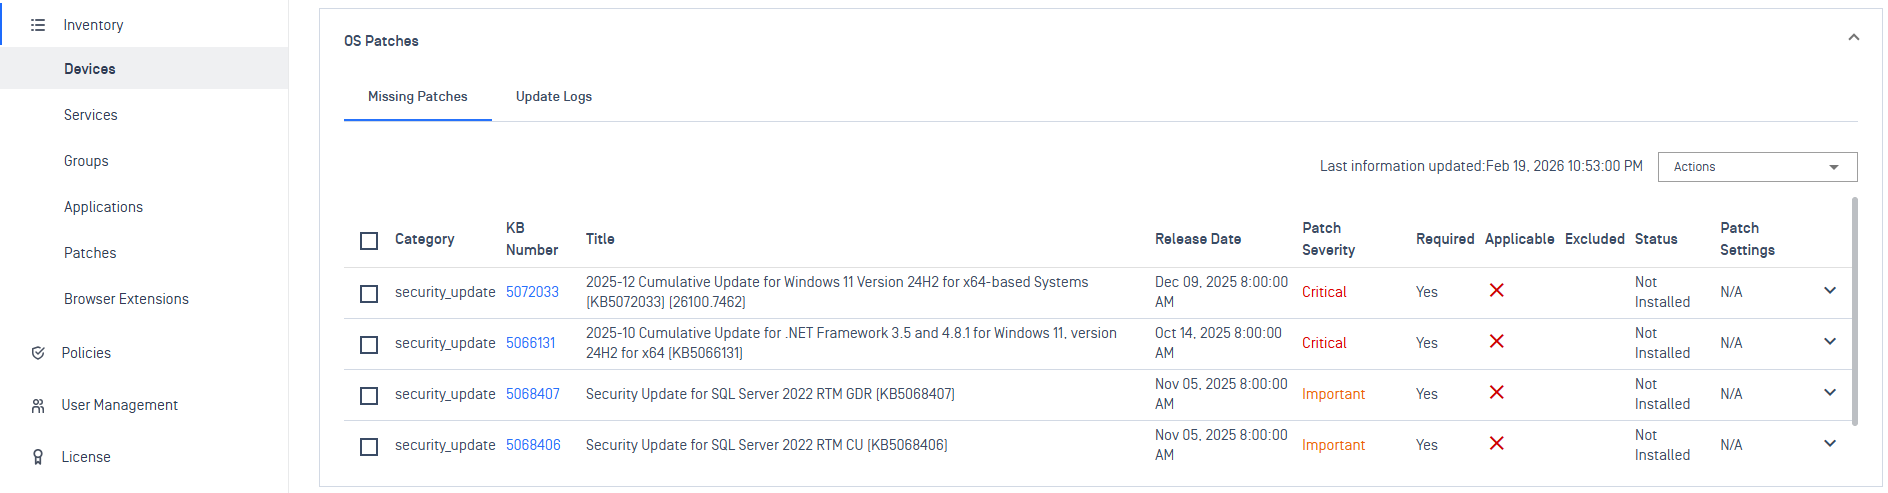
Device OS Patches
- All missing patches aggregated among all devices
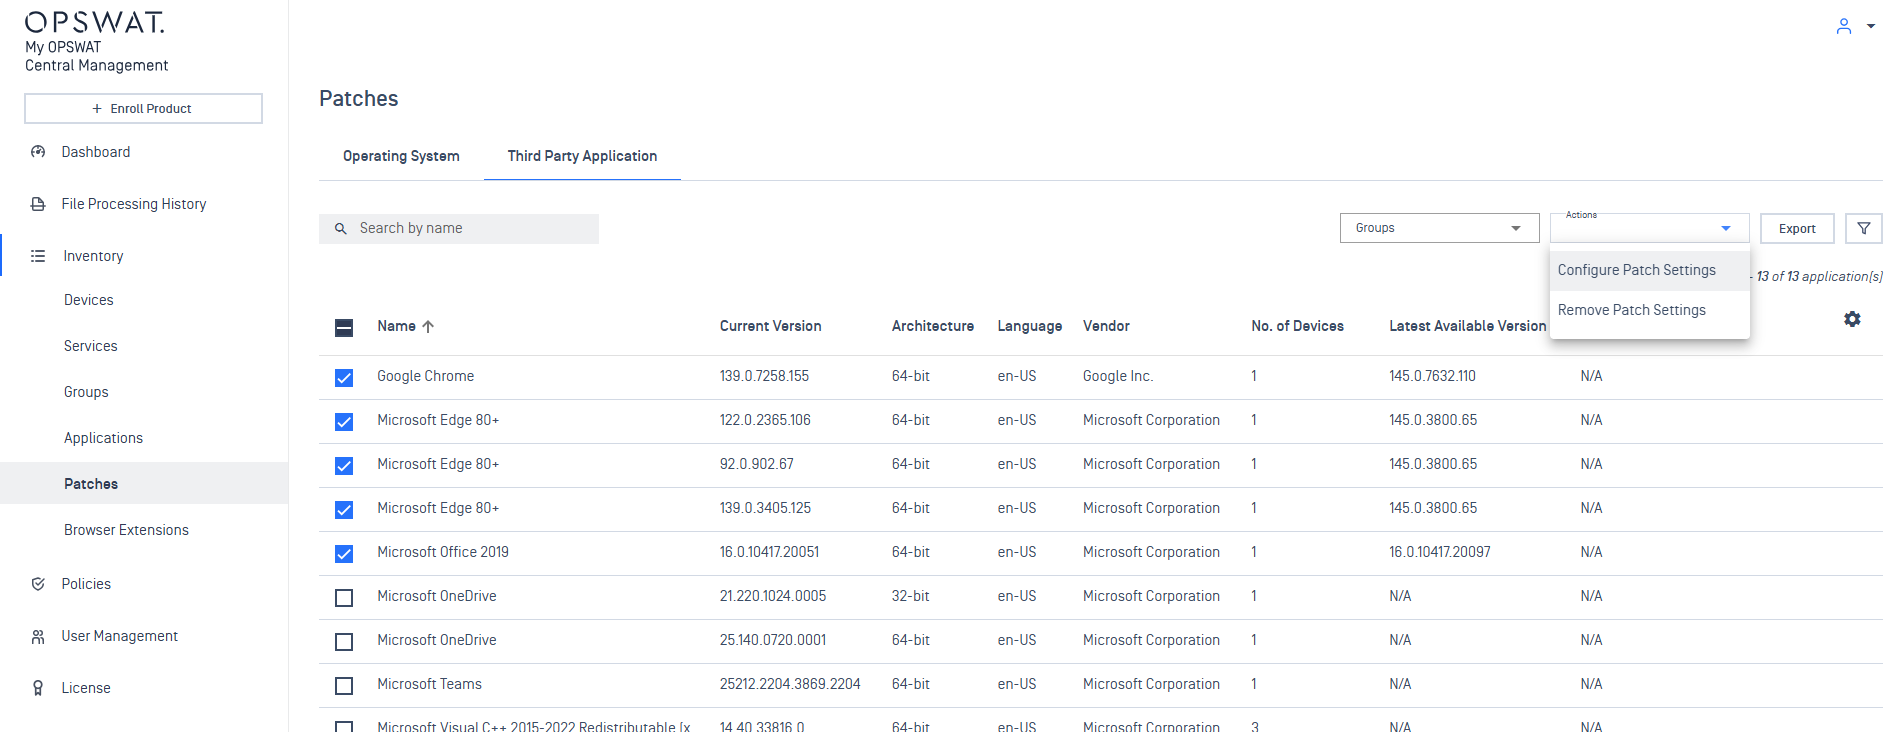
- Inventory > Patches > Operating System / Third Party Application tabs
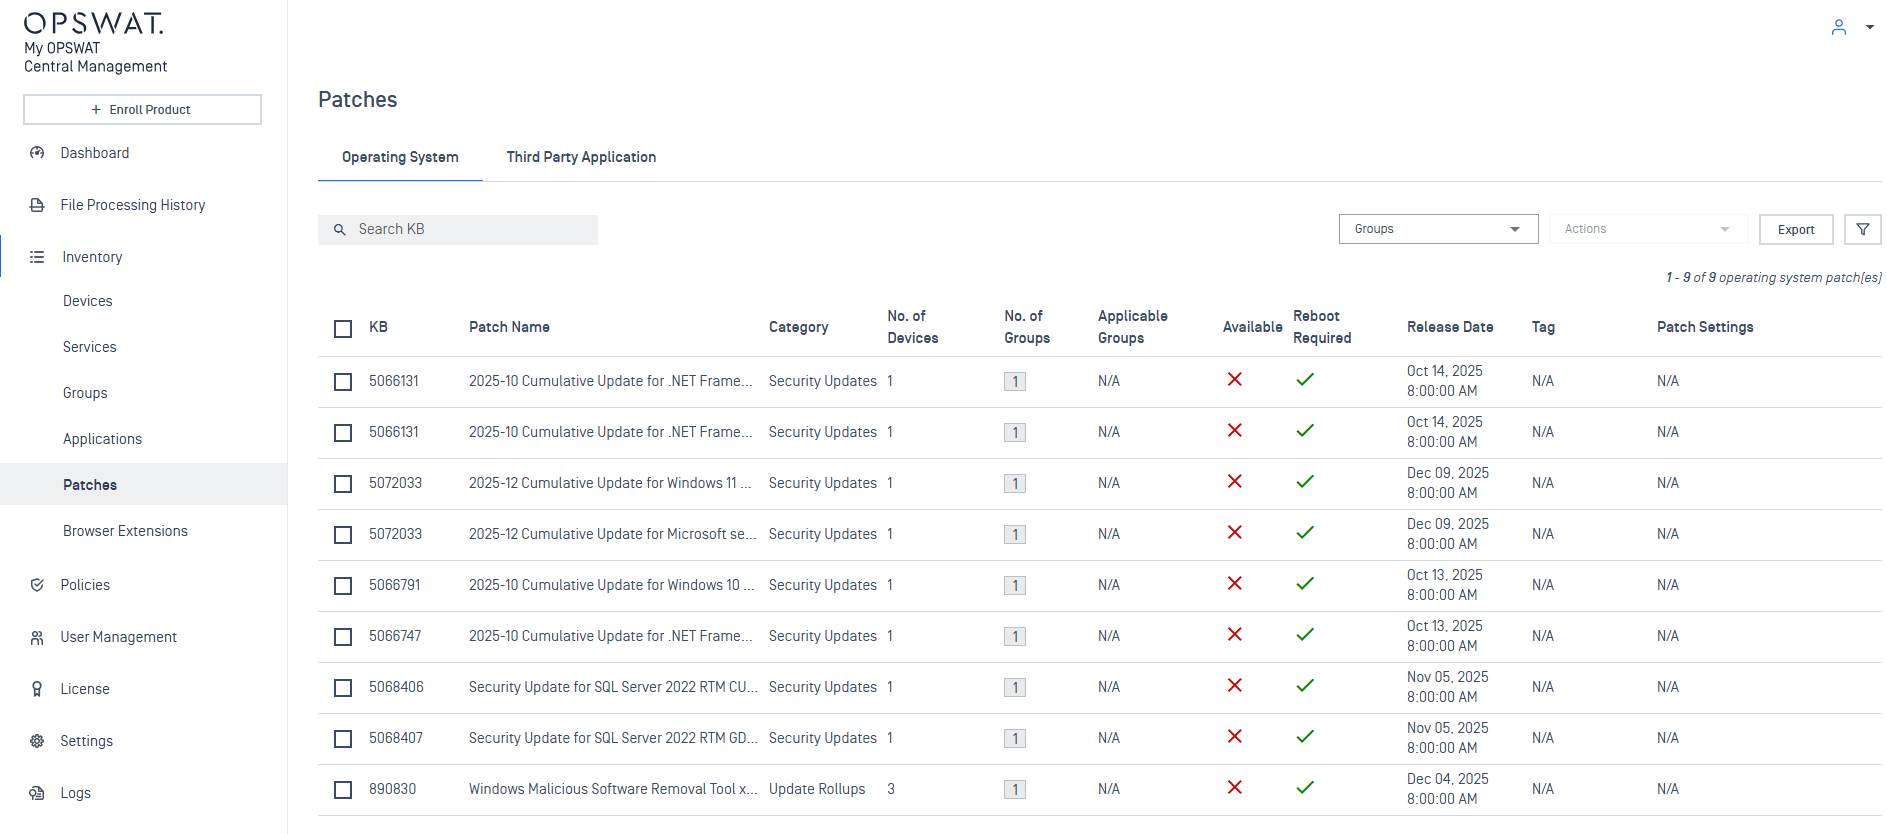
OS Patches
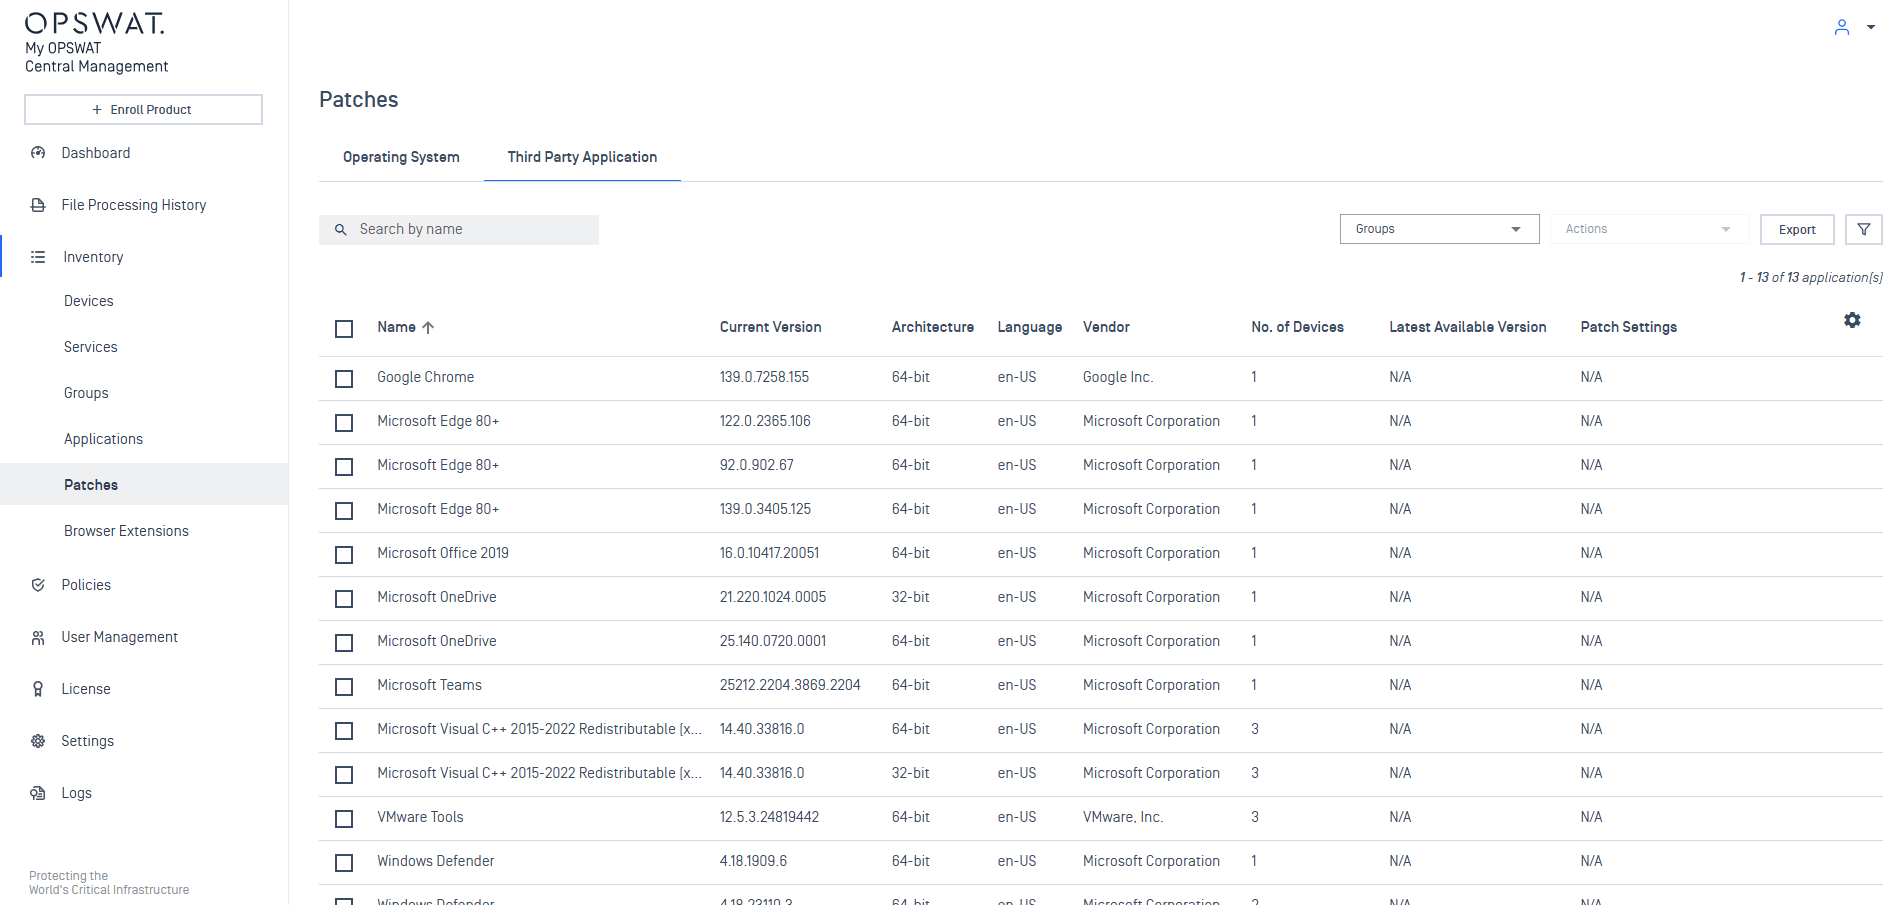
Third Party Application Patches
Enable air-gapped patching
To enable Endpoints to retrieve patches from My OPSWAT Central Management:
- Log in to My OPSWAT Central Management
- Navigate to Settings > Update Package > Patches > Operating System / Third Party Application
- Check "Enable Local Patch Repository"
- Click the Save button to apply
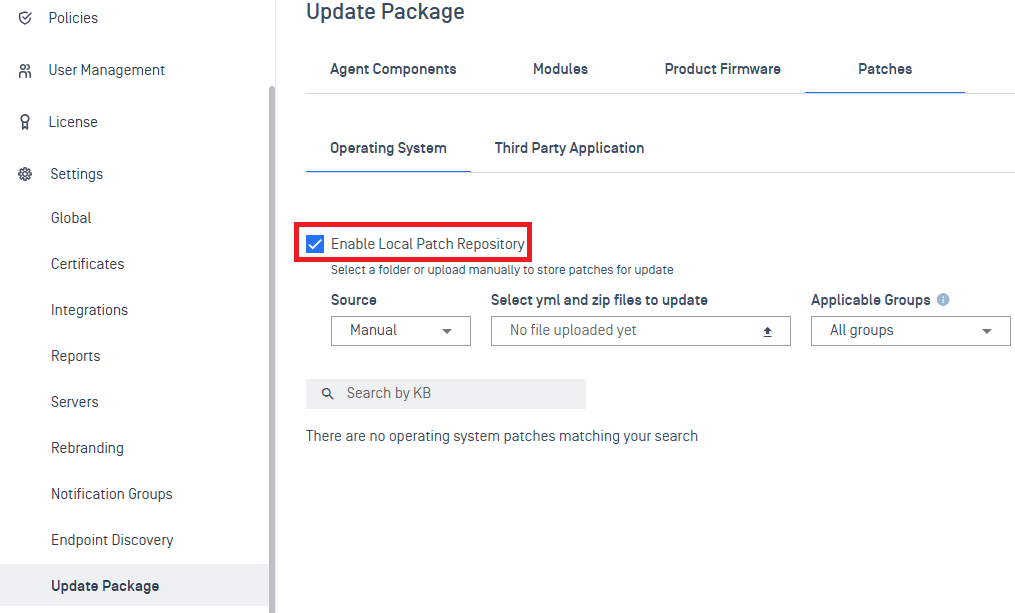
Enable local patch repository
Your vendor, in partnership with OPSWAT, will provide the capability to download patch packages to upload & distribute via My OPSWAT Central Management to MD Endpoints.
Contact your vendor for further information on how to obtain patch packages.
If you are an ICS vendor looking to provide patch packages for your customers, please contact OPSWAT directly to enable the operation.
Upload patches to distribute
Patch packages are delivered in two pieces:
- .zip package containing the patch content
- .yml descriptor file for validating the .zip package
There are 2 modes for providing patches:
- Manual
- Folder
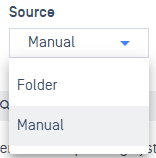
Manual

When selected, additional boxes are displayed for the upload:
Select yml and zip files to update
- click the upload icon to browse for the yml (descriptor) and zip (package) file to upload
Applicable Groups
- set the specific groups the patches being uploaded will be applicable for
- this setting informs if a patch setting configuration is valid, if the deployment includes a disallowed group or devices that are within a disallowed group
- default setting: All groups
As patch packages are uploaded, My OPSWAT Central Management will validate the package with the descriptor file.
All uploaded patches will be listed out after upload:
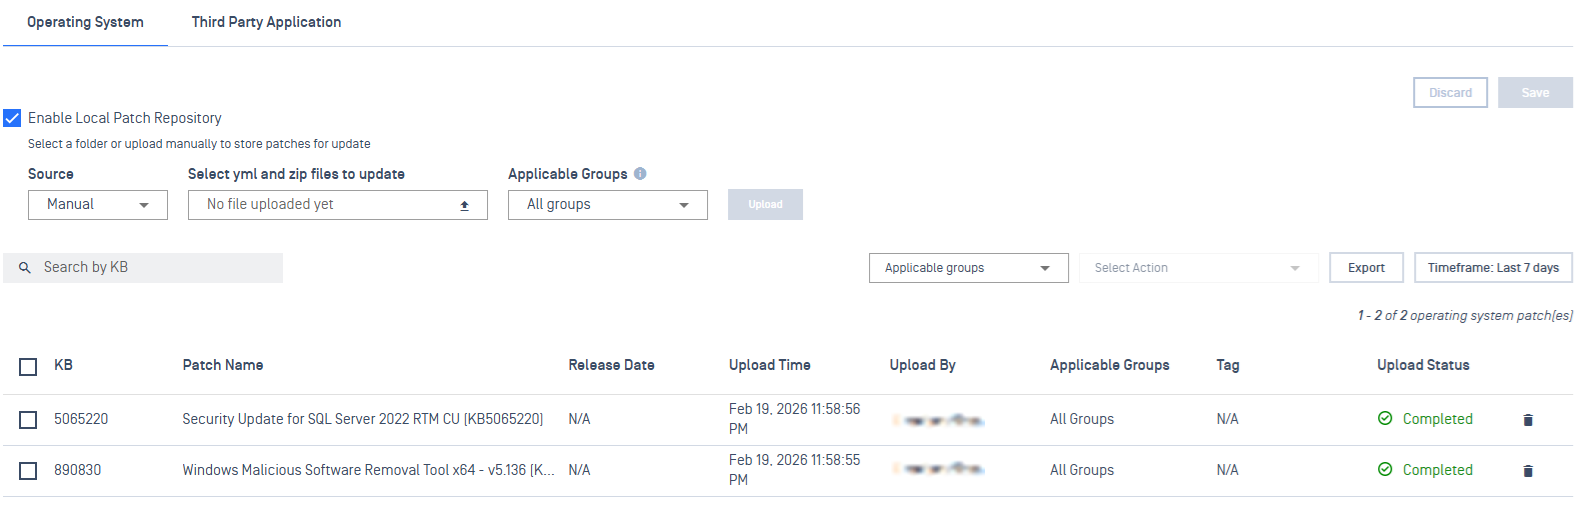
All patches will remain and must be manually cleaned up if the patch is no longer needed.
Simply click the trash icon next to a patch to delete it and reclaim the disk space back.
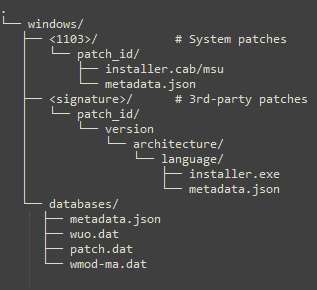
Folder

Patch Repository Location
When selected, a Patch Repository Location is displayed. The path is local to the system My OPSWAT Central Management is installed on.
All patches are expected to be stored in this directory, under a distinct structure outlined below.
Simply copy and paste the patches to the location configured.
The following directory structure must be maintained in the specified format for My OPSWAT Central Management to correctly identify patches:
Configure Patch Settings
Once patches are uploaded, they must be configured to be deployed to endpoints.
This is done by configuring patch settings.
Operating System Patches
From the Patches inventory, available patches can be selected and configured:
Select the KB patches to configure.
From the Actions dropdown menu, select Configure Patch Settings.
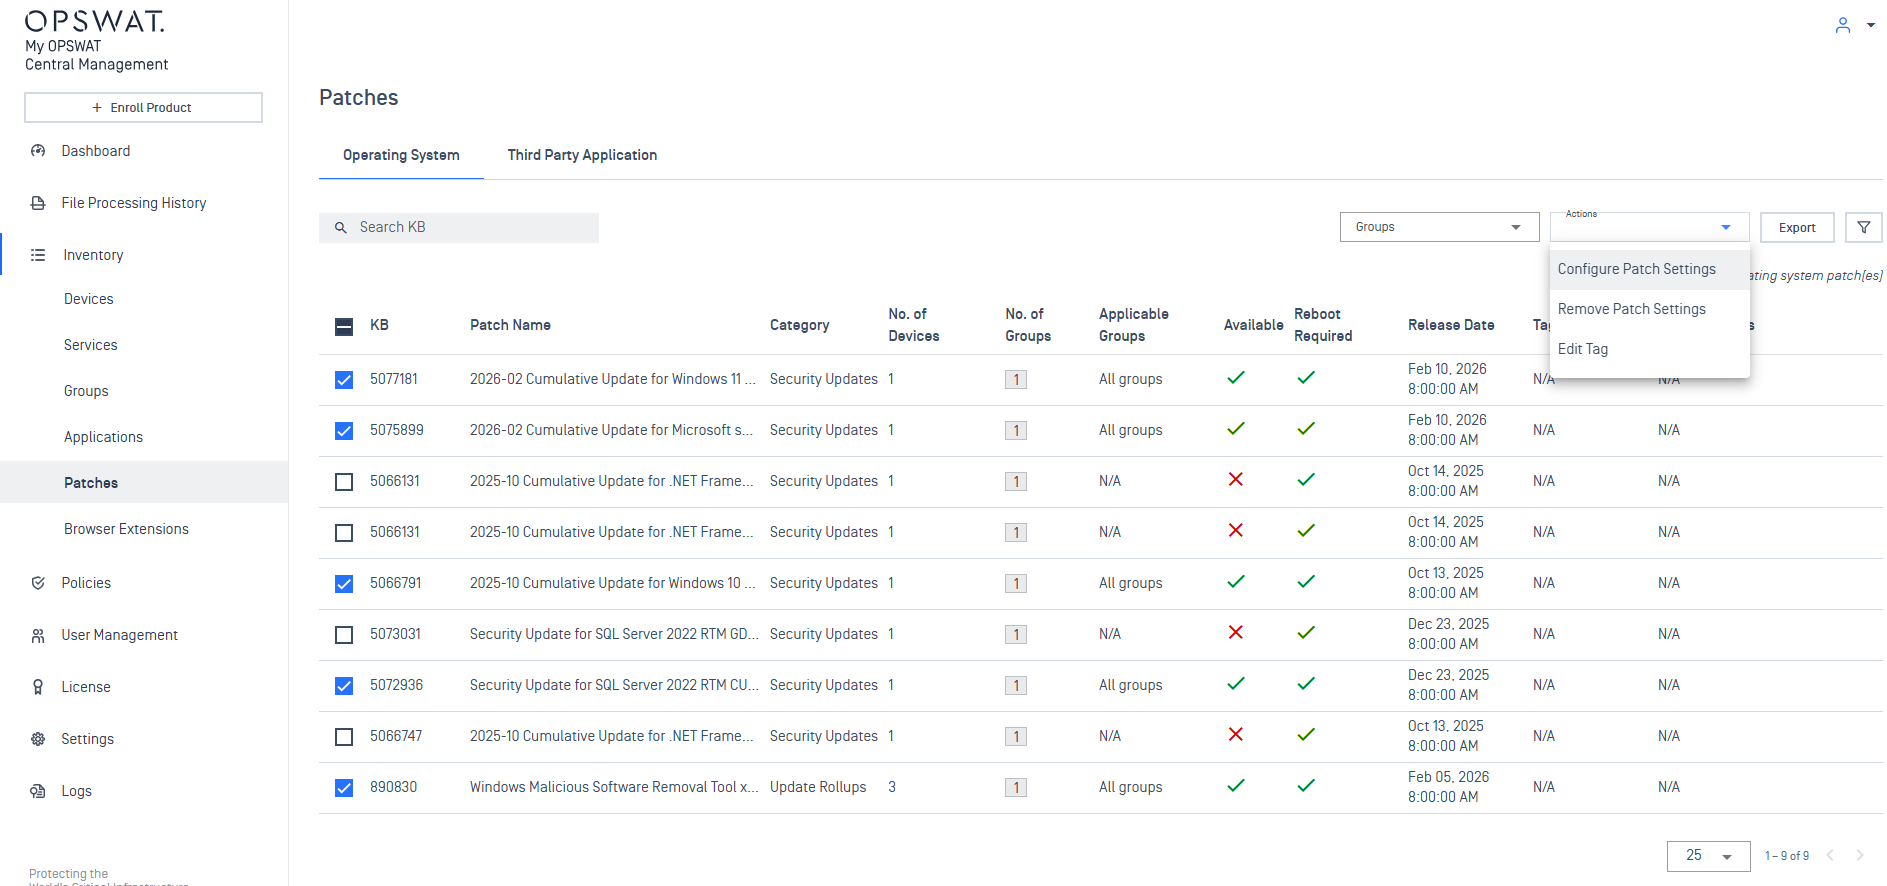
A Patch Settings dialog will then open to configure the patch deployment:
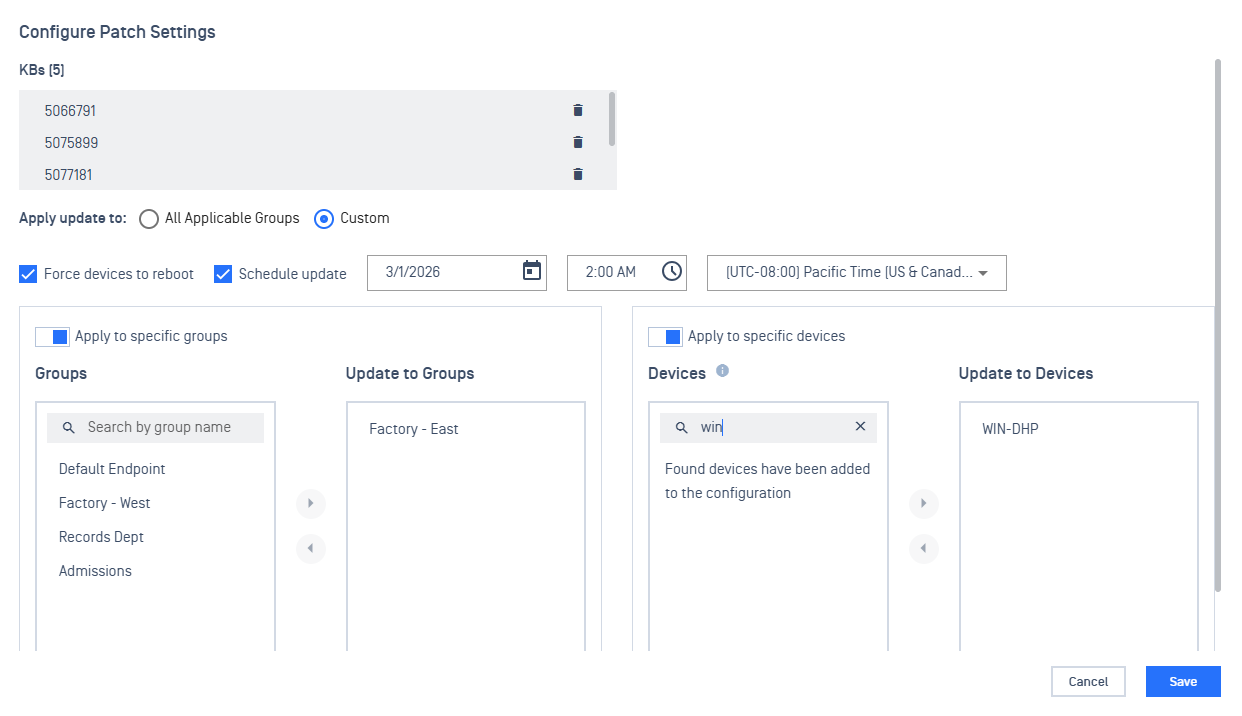
Patch Settings items:
Apply update to
- All Applicable Groups - auto apply patch to the applicable groups
- Custom - enable selection to specify which groups / devices to apply the patch
Force devices to reboot
- After the patch is applied, immediately auto reboot the device
- If disabled and a reboot is required, the status of the patch will be marked as pending reboot
Schedule update
- Set the date, time, and time zone to apply the patch deployment on the endpoint
- If not set, endpoints will immediately attempt to download and apply the patch the next time it syncs and sees the patch setting
Apply to specific groups
- Select from the list of Endpoint groups to apply the patch to
Apply to specific devices
- Search for devices to select to apply the patch to
When the Patch Setting is saved, Endpoints will see the scheduled deployment the next time they sync with My OPSWAT Central Management.
Third Party Application Patches
From the Patches inventory, available patches can be selected and configured:
Select the applications to configure.
A Patch Settings dialog will then open to configure the patch deployment:
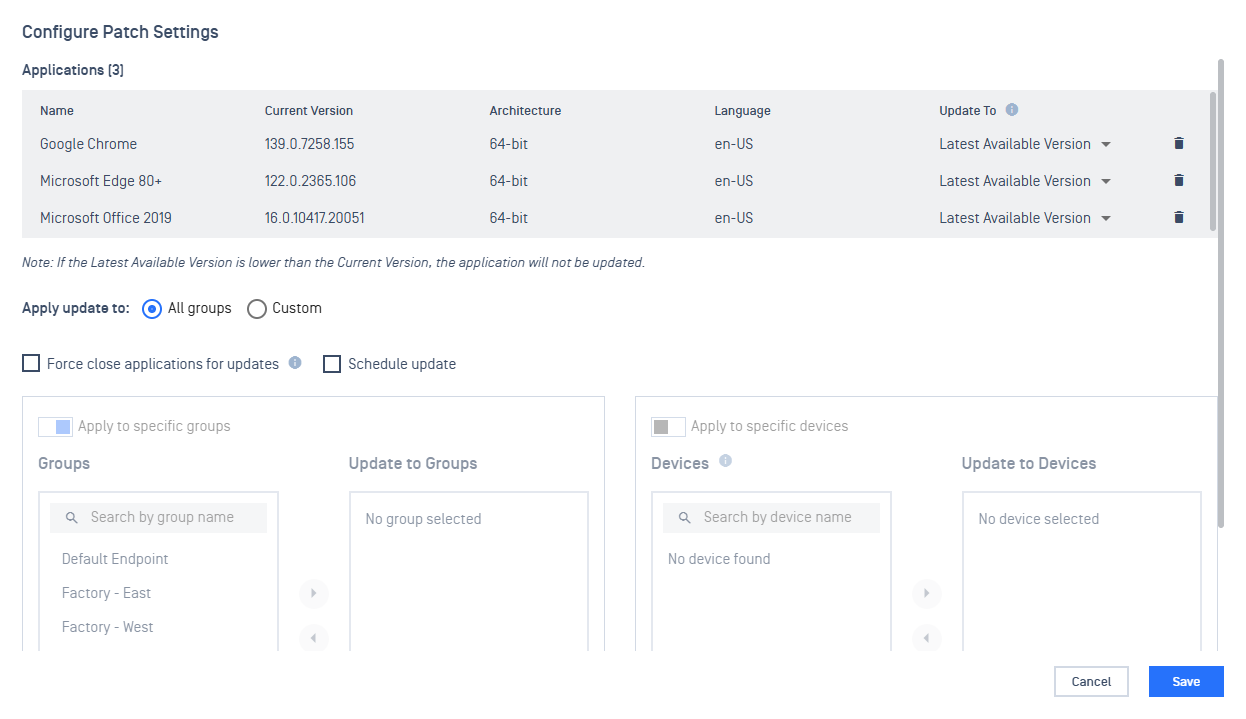
Patch Settings items:
Update to (dropdown to select which version to target to update to)
- Latest Available Version - update the app to the latest version
- <version available> - multiple available versions listed for selection if they exist
Apply update to
- All Groups - auto apply patch to all endpoint groups
- Custom - enable selection to specify which groups / devices to apply the patch
Force close applications for updates
- Close the application to apply the patch
- If disabled, user will be prompted to close the application
Schedule update
- Set the date, time, and time zone to apply the patch deployment on the endpoint
- If not set, endpoints will immediately attempt to download and apply the patch the next time it syncs and sees the patch setting
Apply to specific groups
- Select from the list of Endpoint groups to apply the patch to
Apply to specific devices
- Search for devices to select to apply the patch to
When the Patch Setting is saved, Endpoints will see the scheduled deployment the next time they sync with My OPSWAT Central Management.
Configured patch settings will be displayed in the inventory of patches.
Remove a patch setting
If a patch setting is no longer applicable, select a patch that already has a patch setting configured.
From the Actions dropdown menu, select Remove Patch Settings to delete the saved patch setting.
Configure a Cache Node
By default, all Endpoints will reach out to My OPSWAT Central Management to download and apply patches.
This can introduce a large bottleneck on the server if there are many Endpoints enrolled for management.
To reduce this load, Endpoints can be selected to serve as a Cache Node to help distribute patches to other Endpoints instead if solely relying on My OPSWAT Central Management.
Cache Nodes support distributing patches to configured device groups. Up to 2 devices can serve as a Cache Node for a specific group. A single Cache Node can span multiple groups.
To configure an Endpoint as a Cache Node, navigate to Inventory > Devices > select device to set.
On the device's details page, open the Actions dropdown in the top right corner and select Set as Cache Node.
A dialog menu will open describing the requirements and important information:
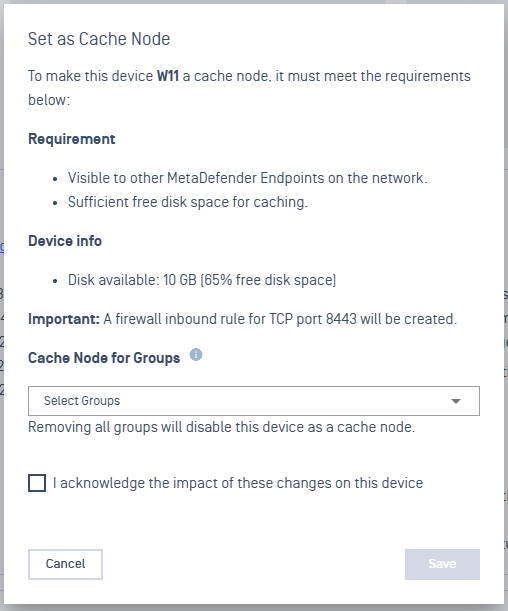
Set as Cache Node
To set the device as a Cache Node, select the Groups for which the device will serve as a node. Check the acknowledgement and click Save.
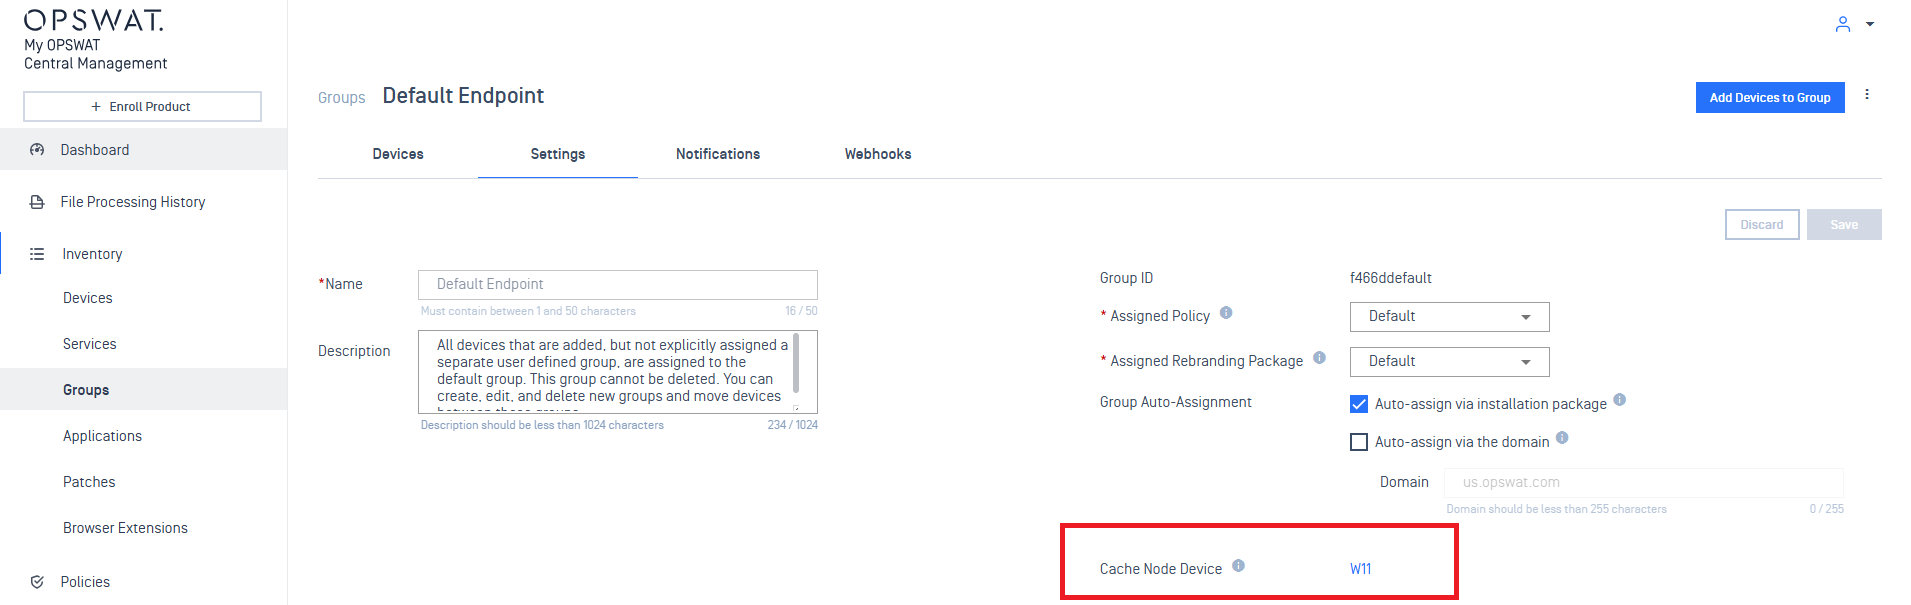
View which device is a Cache Node
Verifying which device is a cache node can be seen in a device's System Information:

Or in a Device Group's Settings:
Remove a Cache Node
To remove a device as a Cache Node.
To remove an Endpoint as a Cache Node, navigate to Inventory > Devices > select device to set.
On the device's details page, open the Actions dropdown in the top right corner and select Set as Cache Node.
In the dialog menu, de-select the configured groups, check the acknowledgement, and click Save.
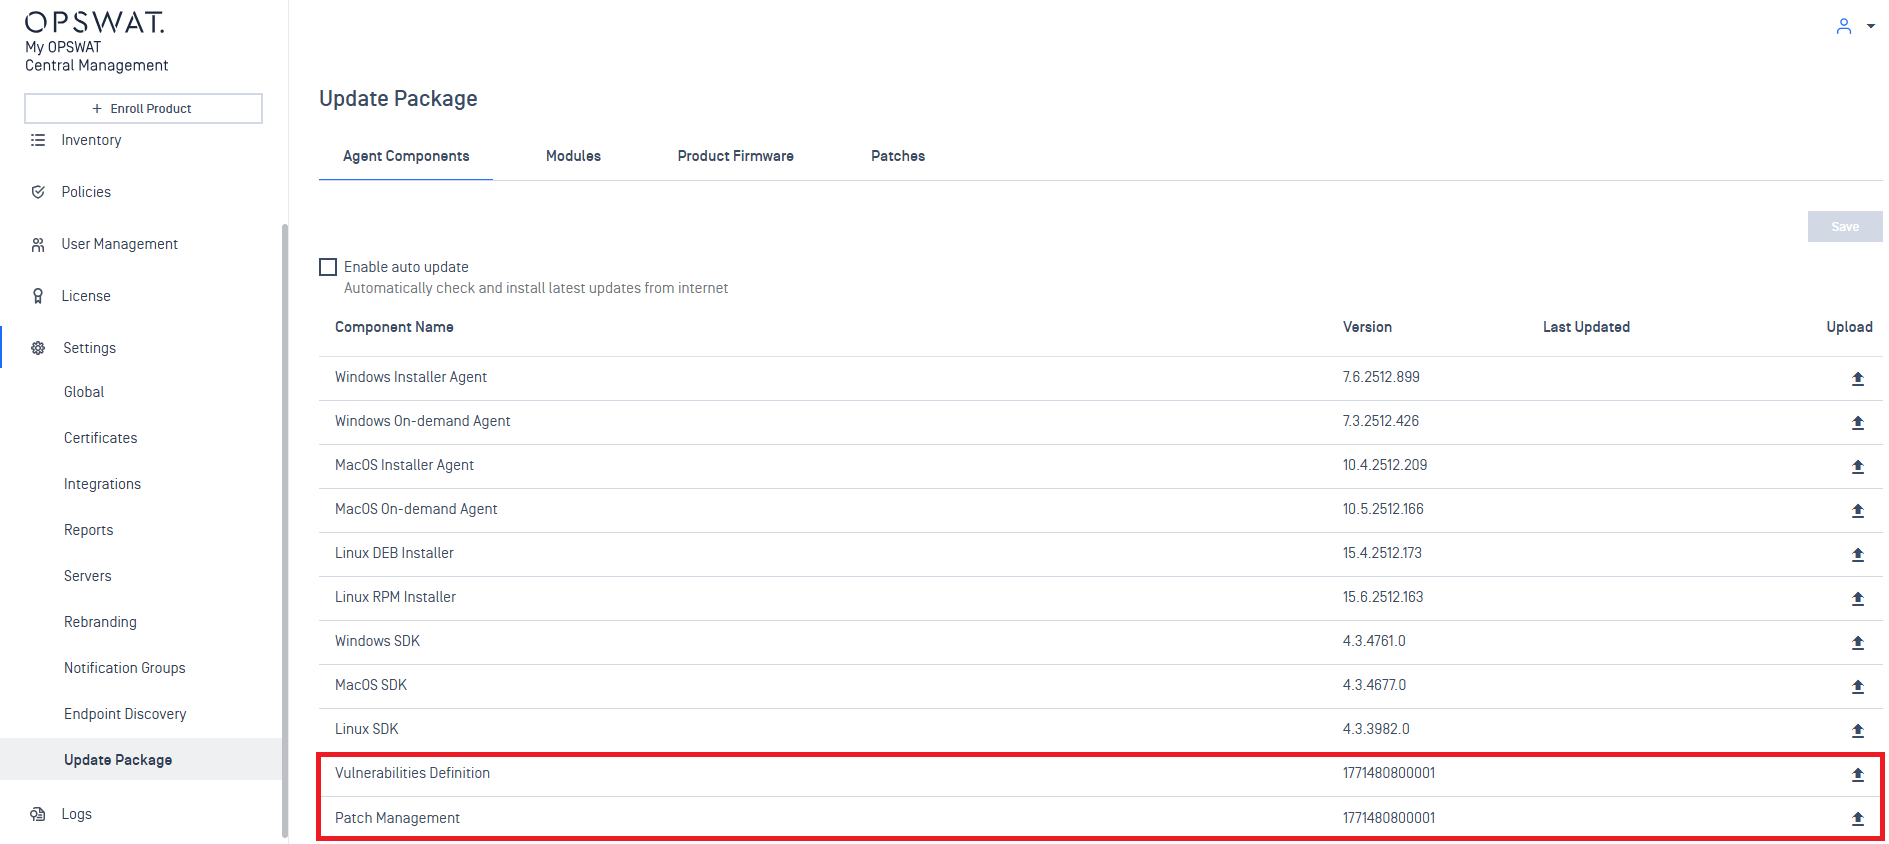
Update Patch database definitions
My OPSWAT Central Management comes pre-bundled with vulnerability and patch management definitions.
These databases will be downloaded by MetaDefender Endpoint when it syncs with the management server. They enable the ability for Endpoint to scan the local system and identify what patches are missing and vulnerabilities associated with versions installed on the system.
To ensure identification is up to date, new definitions can either be downloaded from your vendor or from My OPSWAT Portal.
Definitions can then be uploaded in Settings > Update Package > Agent Components > Vulnerability Definitions / Patch Management
OS Patch Compliance Report
A compliance report for OS patches can be downloaded for reviewing the status of all patches among devices.
Only patches that are uploaded will be reported on.
To retrieve the OS patch compliance report:
- Navigate to Settings > Update Package > Patches > Operating System
- Click the Export button to download a .csv of the compliance report
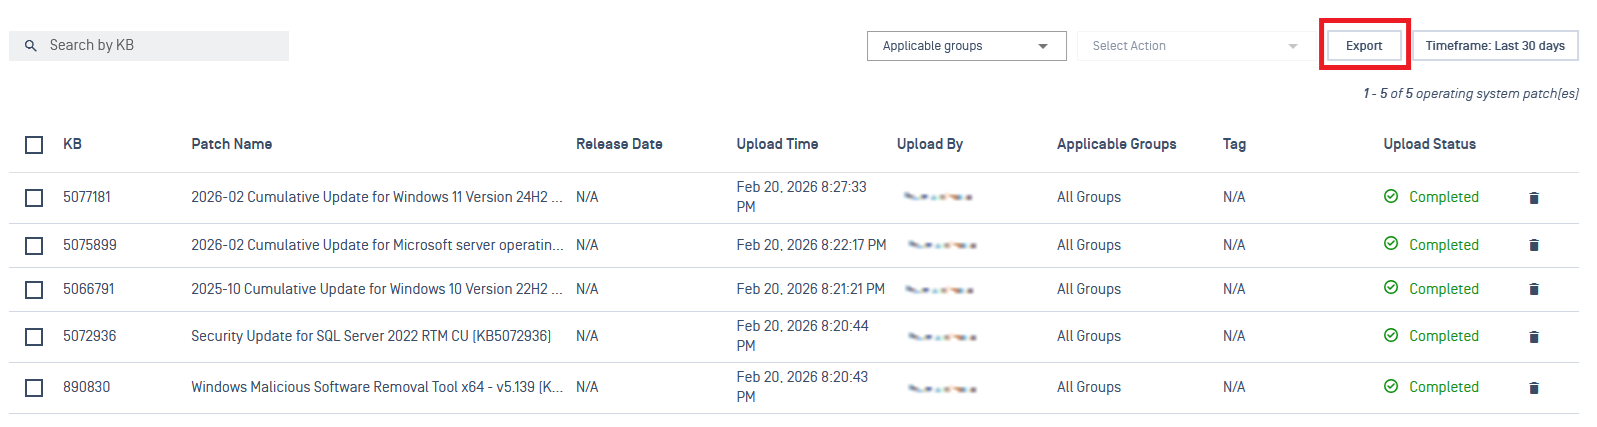
compliance report export
Sample compliance report:

Compliance Report
Columns in report:
Patch - KB ID of the patch
Applicable devices - count of devices the patch is currently applicable to
Date Available - date timestamp when the patch was uploaded to the mgmt server
- date format: YYYY-MM-DD HH:MM:SS AM/PM UTC+offset
Device Name - name of the applicable device for the patch
Applicable - Yes/No if the patch is applicable to the device
Date Installed - date timestamp when the patch was successfully applied
Status - status of patch on device
- values: Not Installed / Pending Reboot / Installed