MetaDefender IT Access features an integration with Microsoft Entra ID (formerly Azure Active Directory) that can be found under Secure Access > Access Methods > Microsoft Entra ID.
The integration with Microsoft Entra ID applies to the current MetaDefender IT Access Console and MetaDefender Endpoint releases deployed on Windows and macOS systems.
When enabled, MetaDefender IT Access facilitates the established integration to propagate the compliant status of devices assessed by our system to organizations' Microsoft Entra ID, ensuring secure access to Microsoft services.
1. Enroll your devices with Microsoft Entra ID
To ensure the integration between MetaDefender IT Access and Microsoft Entra ID functions seamlessly, the organization’s devices must be registered properly with Microsoft Entra ID.
To enroll a Windows device using this method, you can follow these steps:
- On your Windows device, go to Settings > Accounts > Access work or school.
- Click Connect. A dialog for setting up a work or school account opens.
- Click Join this device to Microsoft Entra ID.
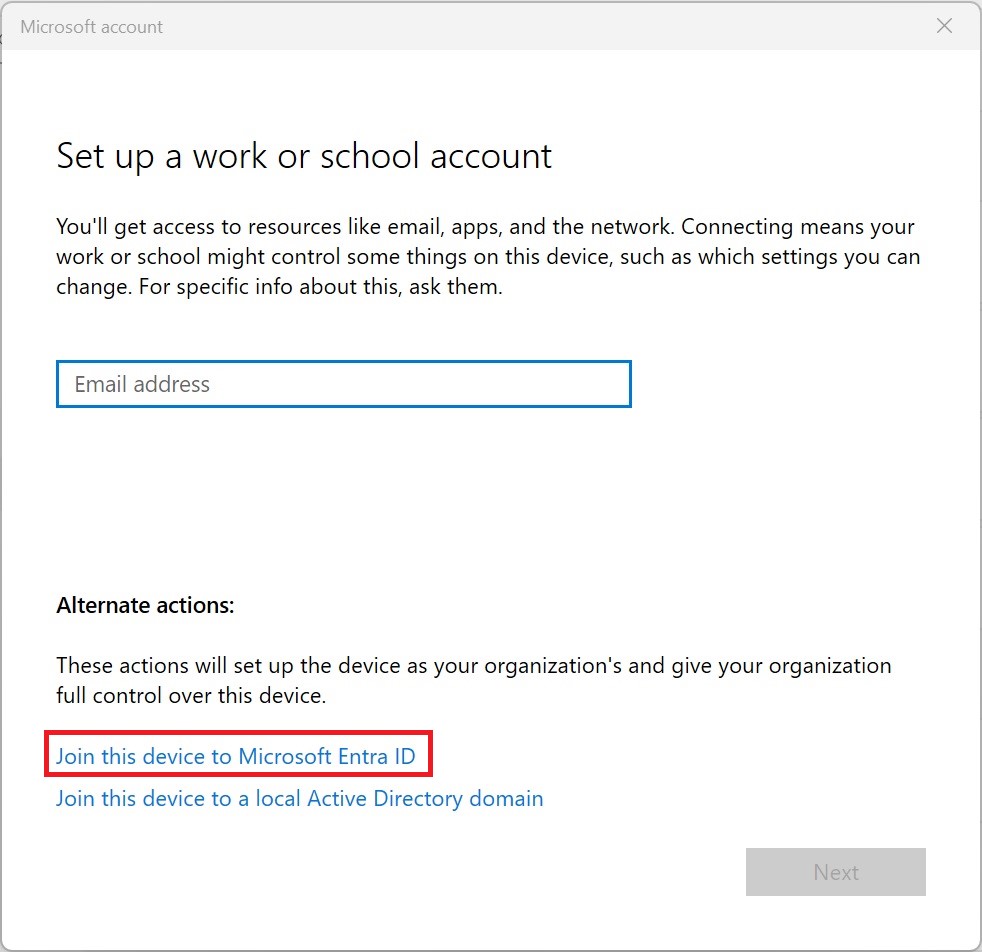
- Enter your Microsoft Entra ID email and click Next.
- Enter your password and click Sign In.
- If prompted, accept the terms of use and the organization’s policies.
- Wait for the setup process to complete.
To enroll a macOS device, you may use the Company Portal app as guided here
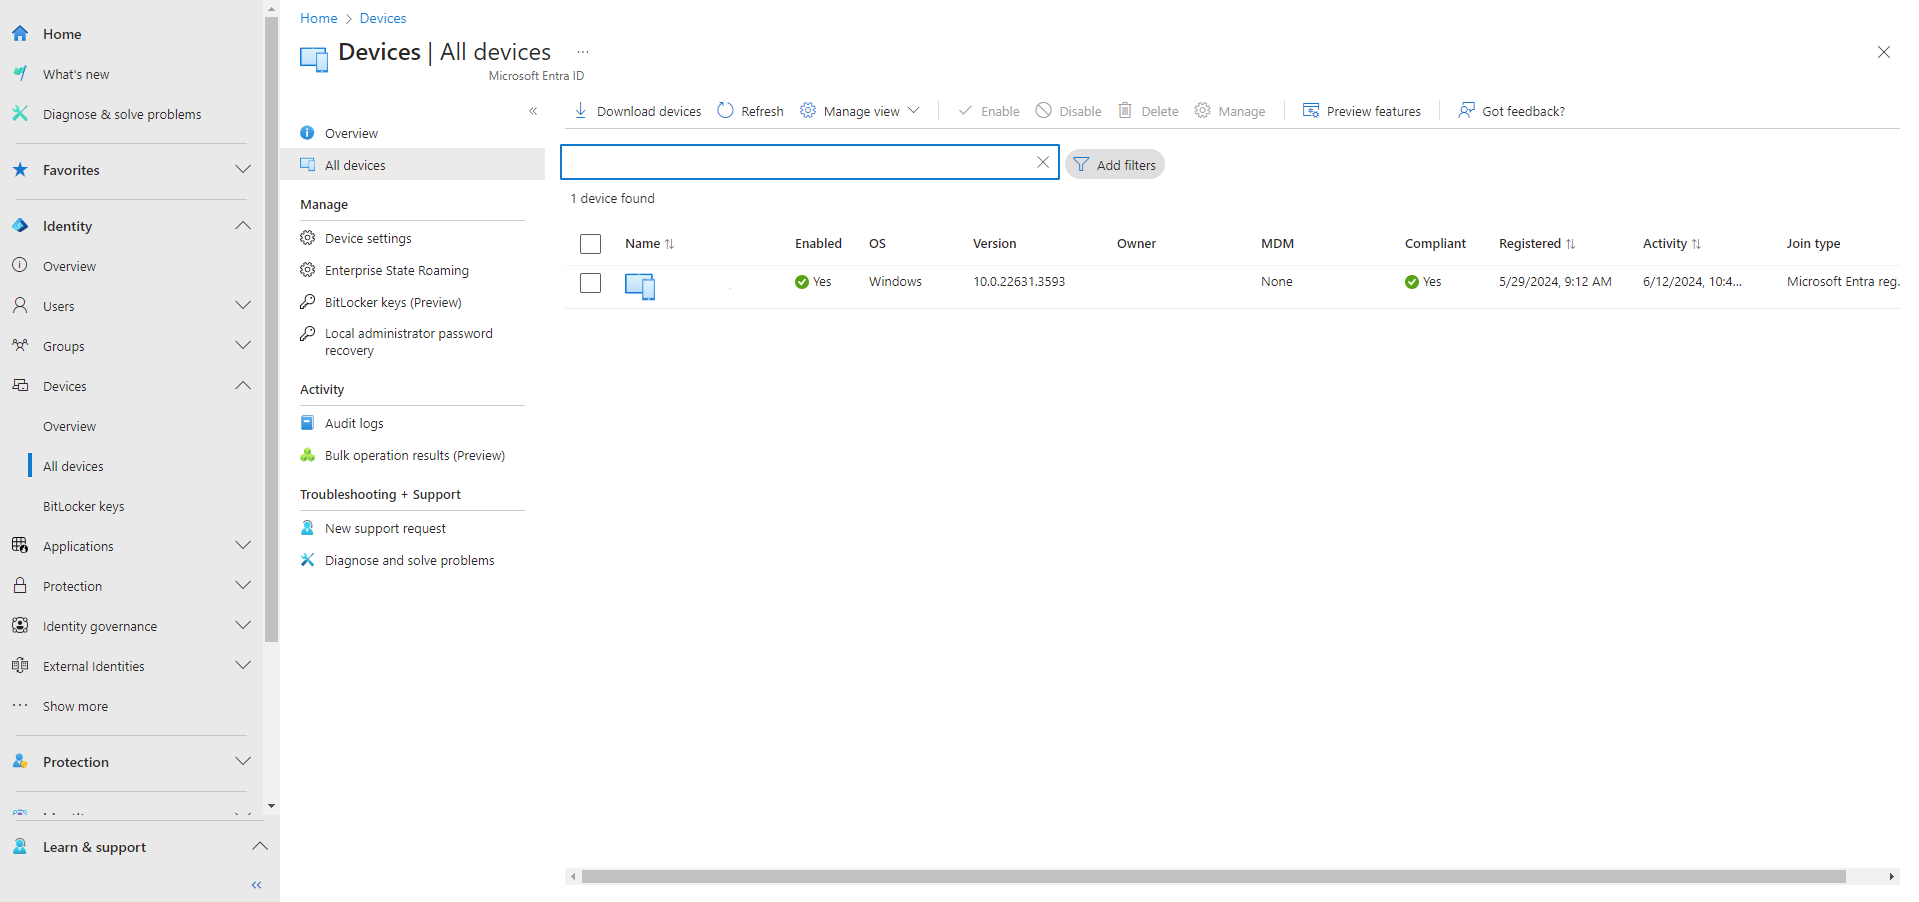
Administrators may sign in to the Microsoft Entra admin center with an account that has proper privileges and go to Devices > All devices to check if the device has been joined successfully to Microsoft Entra ID.
2. Microsoft Entra ID Configuration
An integration application works as a bridge that allows MetaDefender IT Access to communicate with Microsoft Entra ID and transfer the devices' compliant status. To set up the integration application, administrators should proceed with the following steps:
- Sign in to the Microsoft Entra admin center with an account that has proper privileges.
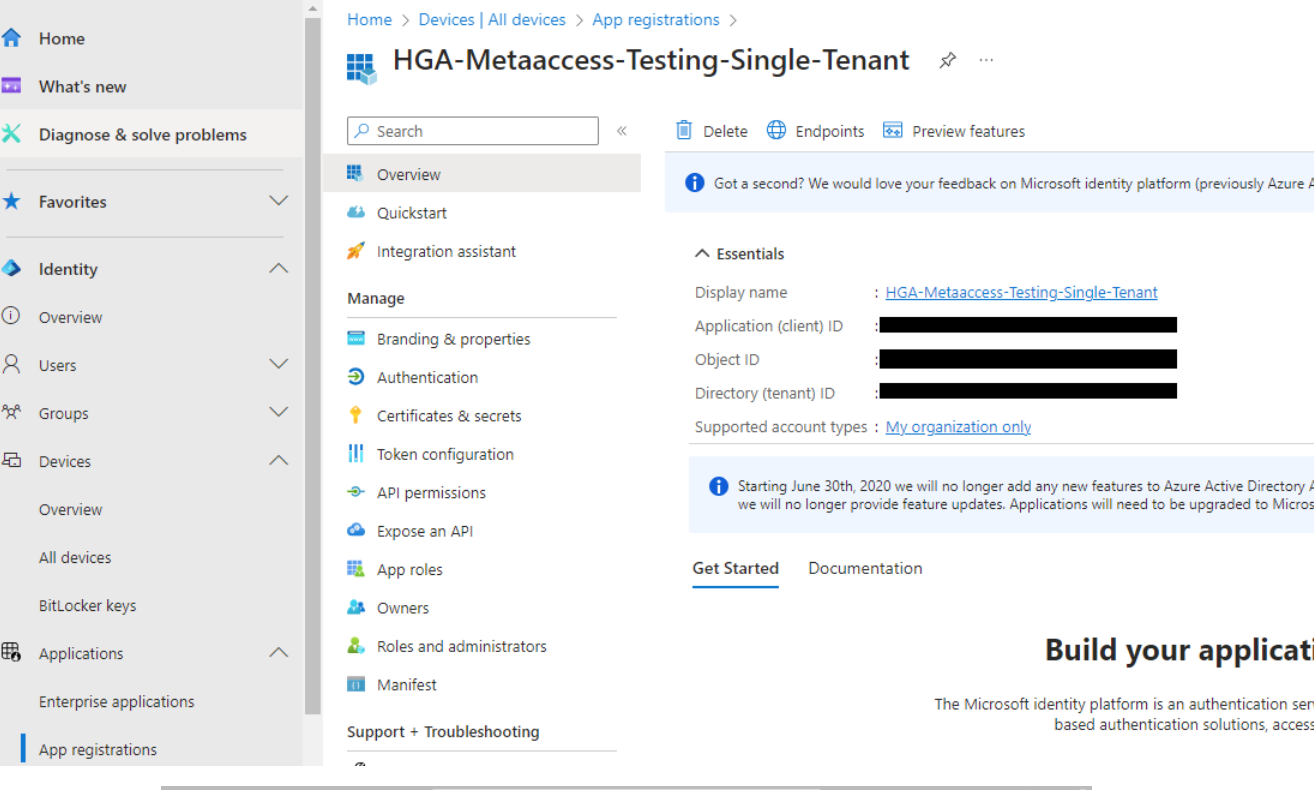
- On the left menu, go to Identity > Applications > App registrations.
- Click New registration on the header. On the Register an application page, specify a descriptive name for the integration application, then click Register.
- Once the registration process is completed, obtain the Application (client) ID and Directory (tenant) ID information on the Overview page.
- Navigate to Certificates & secrets. Under the Client secrets tab, click New client secret to create a credential for the application. Specify a descriptive name and choose a proper validity period for your credential. Administrators should perform a key rotation process when this credential is expired by creating a new one and setting it up on MetaDefender IT Access (see below for the integration process with MetaDefender IT Access).
- Once completed, obtain the value displayed on the Secret ID and Value tab. This is the secret ID and client secret and will later be used for configuring the integration on MetaDefender IT Access.
- The integration application needs to have permission to read and modify properties on the devices managed by Microsoft Entra ID. Navigate to API permissions, select Add a permission, and choose the Device.ReadWrite.All permission under Microsoft Graph > Application permissions.
- Once the permissions are updated, click Grant admin consent for <Organization Name> to complete the setup process.
Configure the Entra Conditional Access policy
To use devices' compliant status as a check to secure access to Microsoft services, administrators should configure two proper Conditional Access policies: One for Windows devices, and another for macOS and Linux devices.
Windows - Conditional Access policy
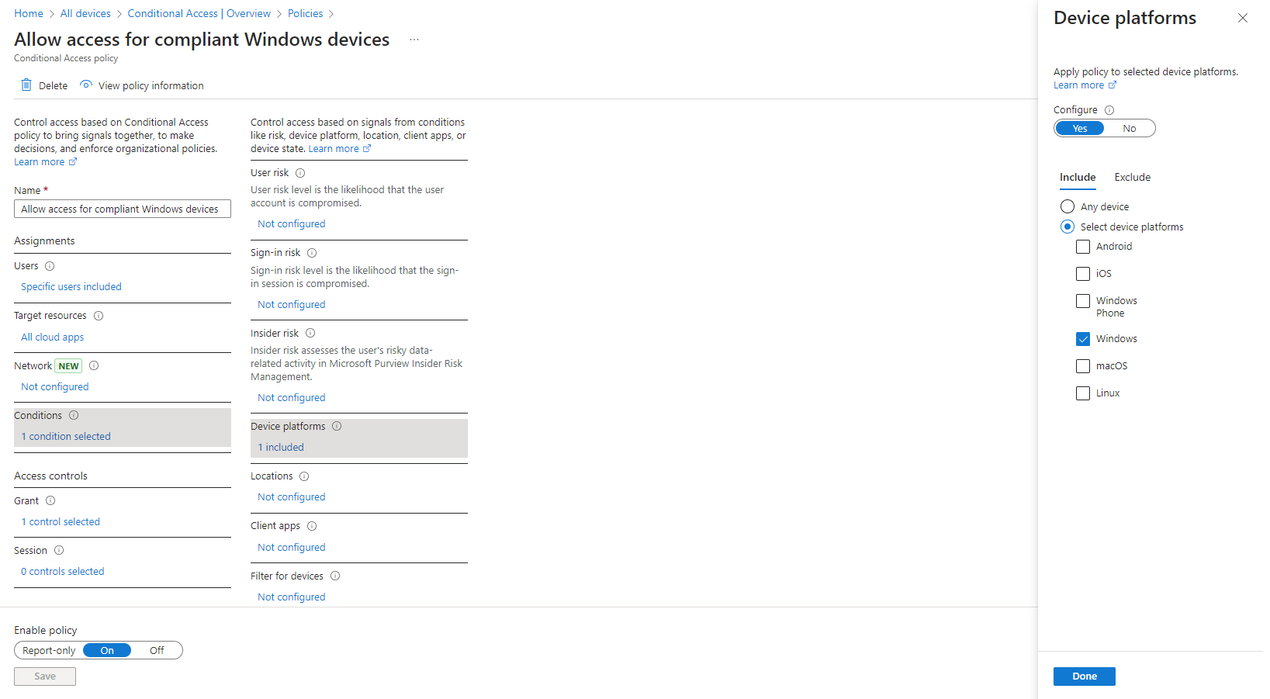
To setup a Conditional Access policy targeting Windows devices, you can follow these steps.
- On the Entra admin center, go to Protection > Conditional Access. Create a new policy or navigate to an existing one.
- On the Conditions > Device platforms section, select Windows as the targeted device platform.

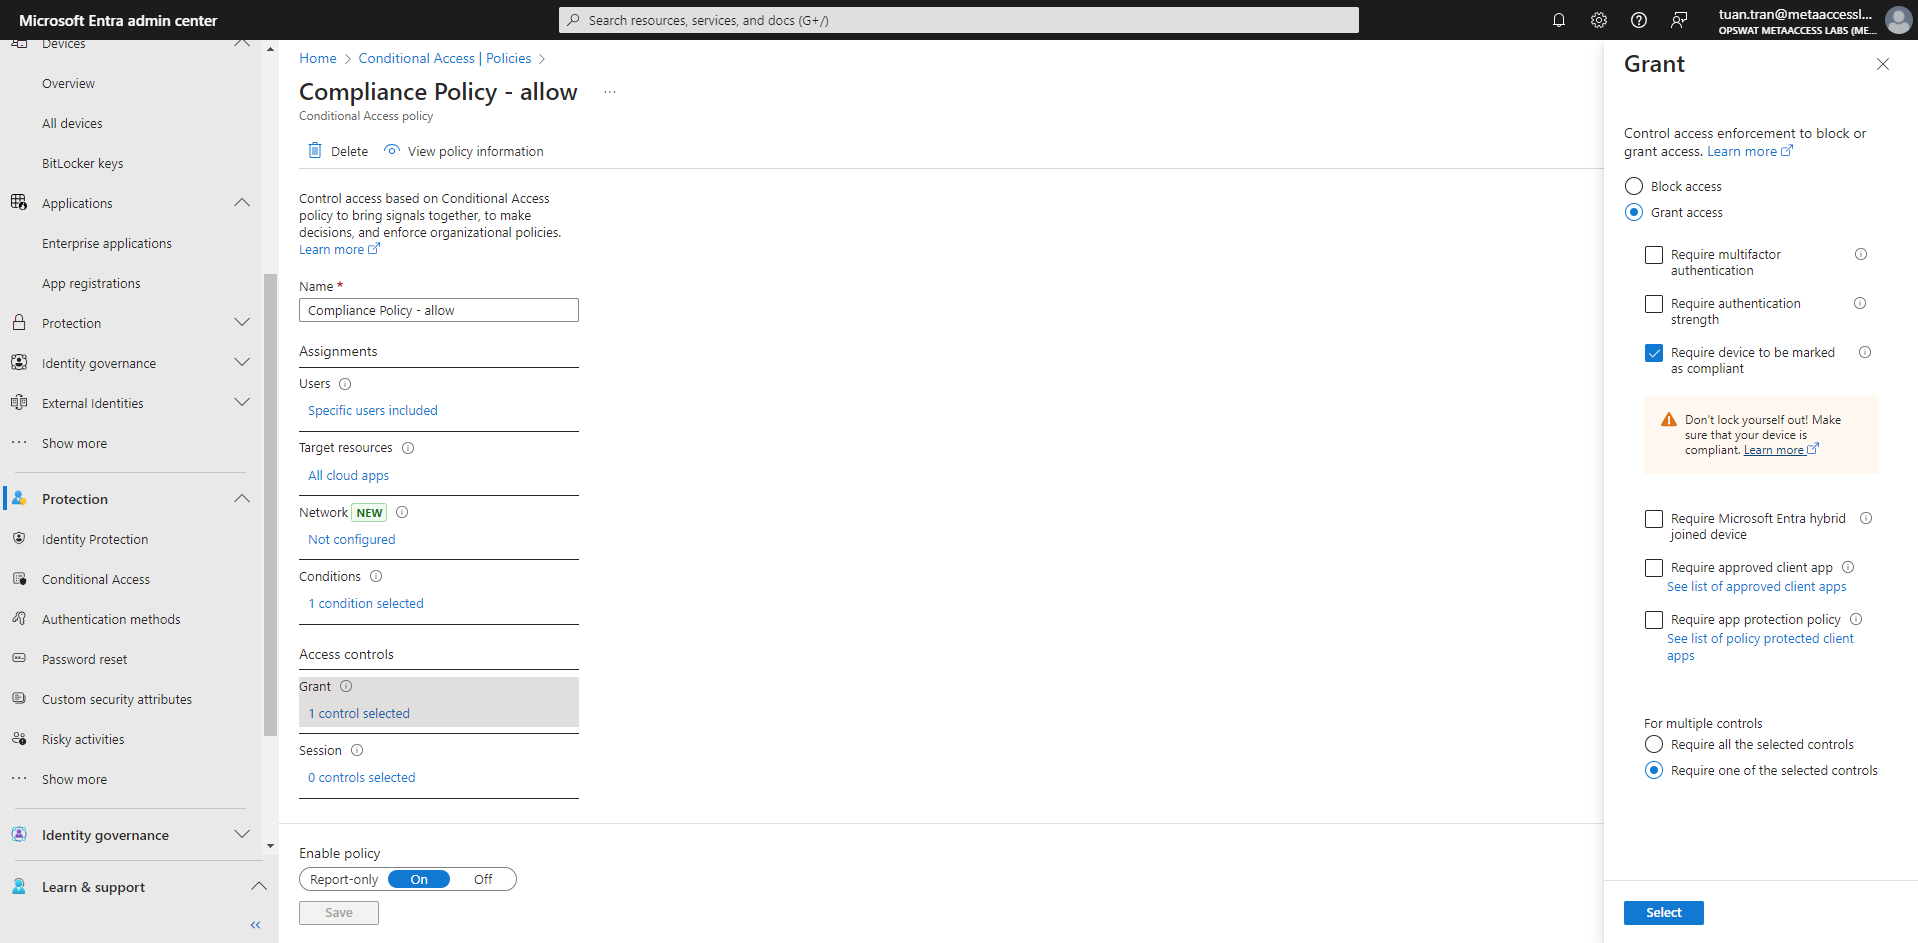
- On the Grant section, enable the option Require device to be marked as compliant. Before saving the policy, make sure that your device is compliant or that the policy’s targeted users have been set up properly to not lock yourself out.
macOS - Conditional Access policy
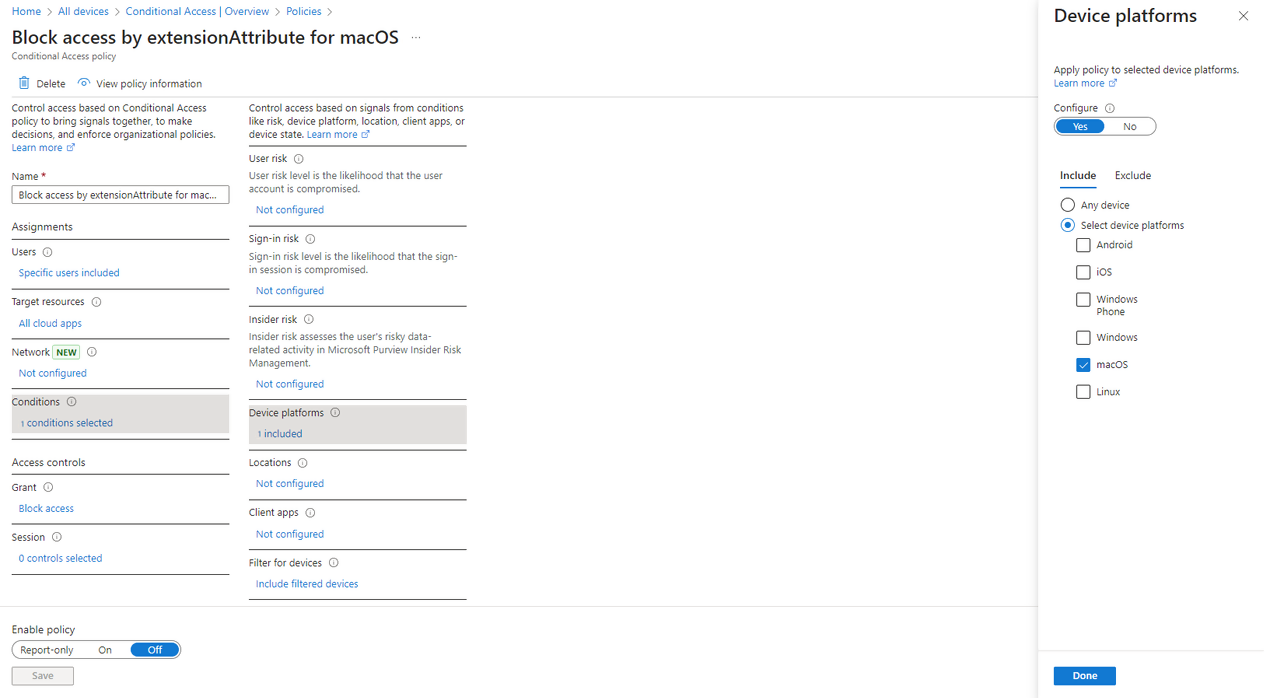
To setup a Conditional Access policy targeting macOS and Linux devices, you can follow these steps.
- On the Entra admin center, go to Protection > Conditional Access. Create a new policy or navigate to an existing one.
- On the Conditions > Device platforms section, select macOS as the targeted device platforms.
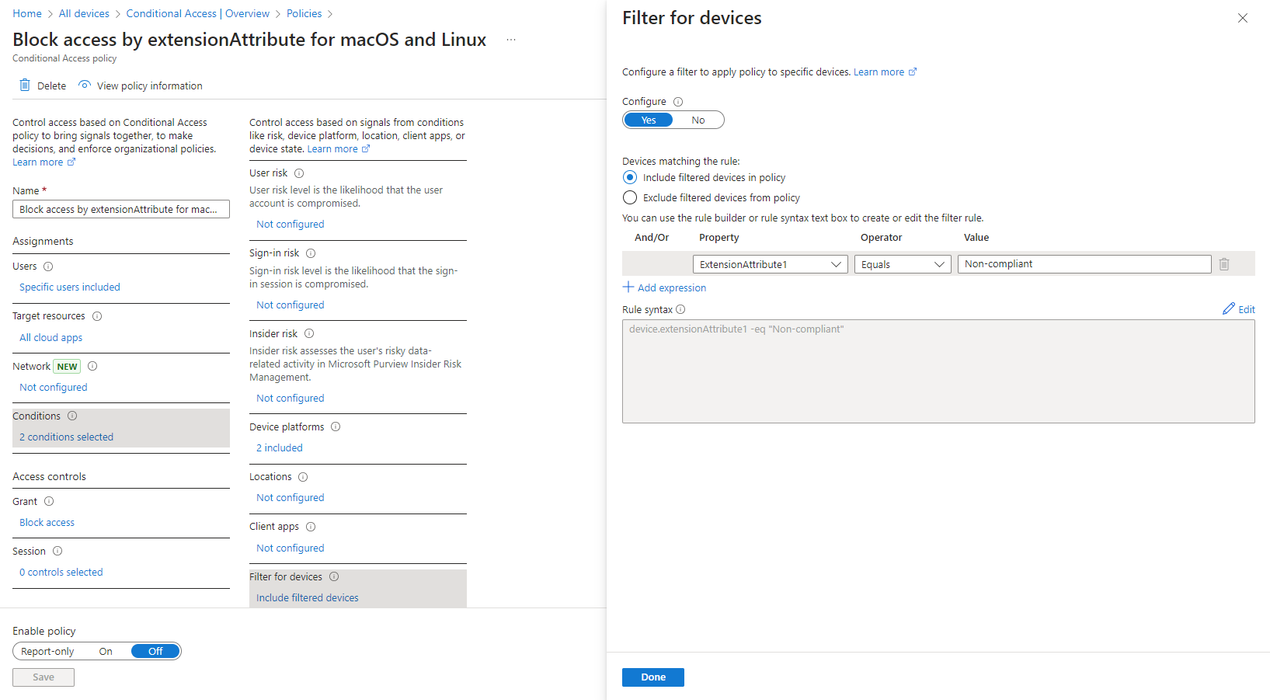
- On the Conditions > Filter for devices, configure the following:
- Configure: Yes
- Devices matching the rule: Include filtered devices in policy
- Property: You may choose any property in the range from ExtensionAttribute1 to ExtensionAttribute15.
- Operator: Equals.
- Value: Non-compliant.
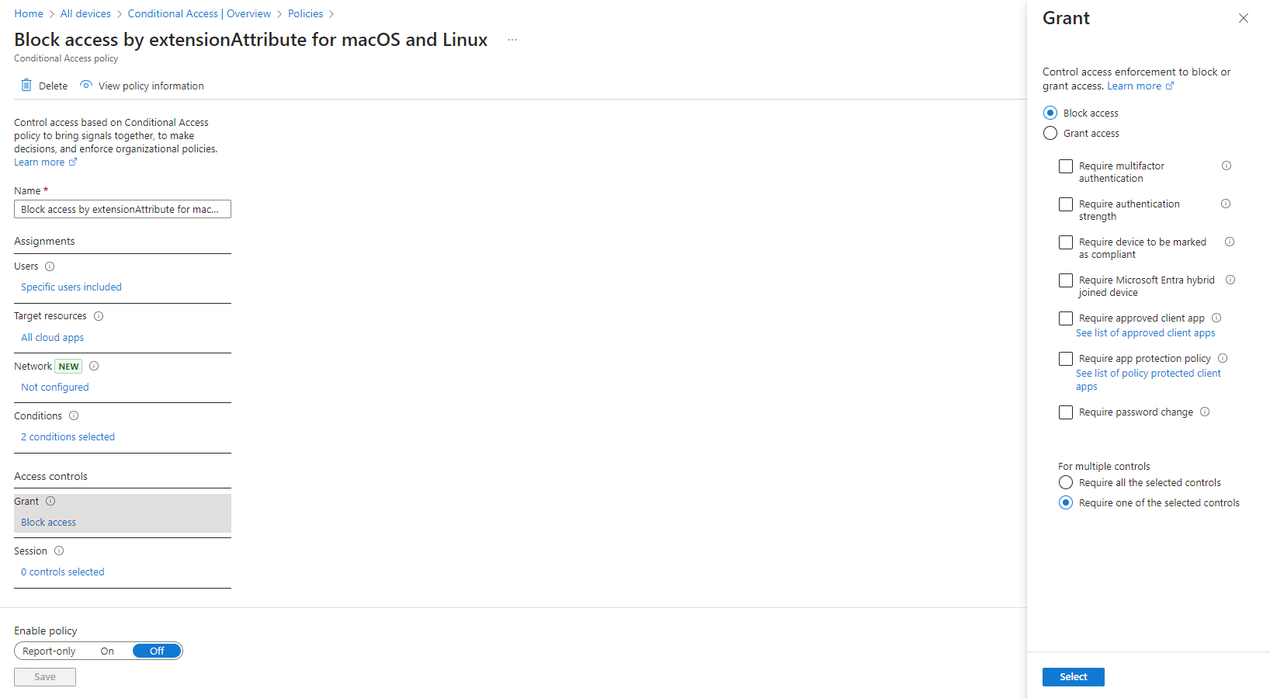
- On the Grant section, choose Block access.
3. OPSWAT MetaDefender IT Access Configuration
Once the integration application is established successfully, administrators may proceed to configure the integration on the MetaDefender IT Access console.
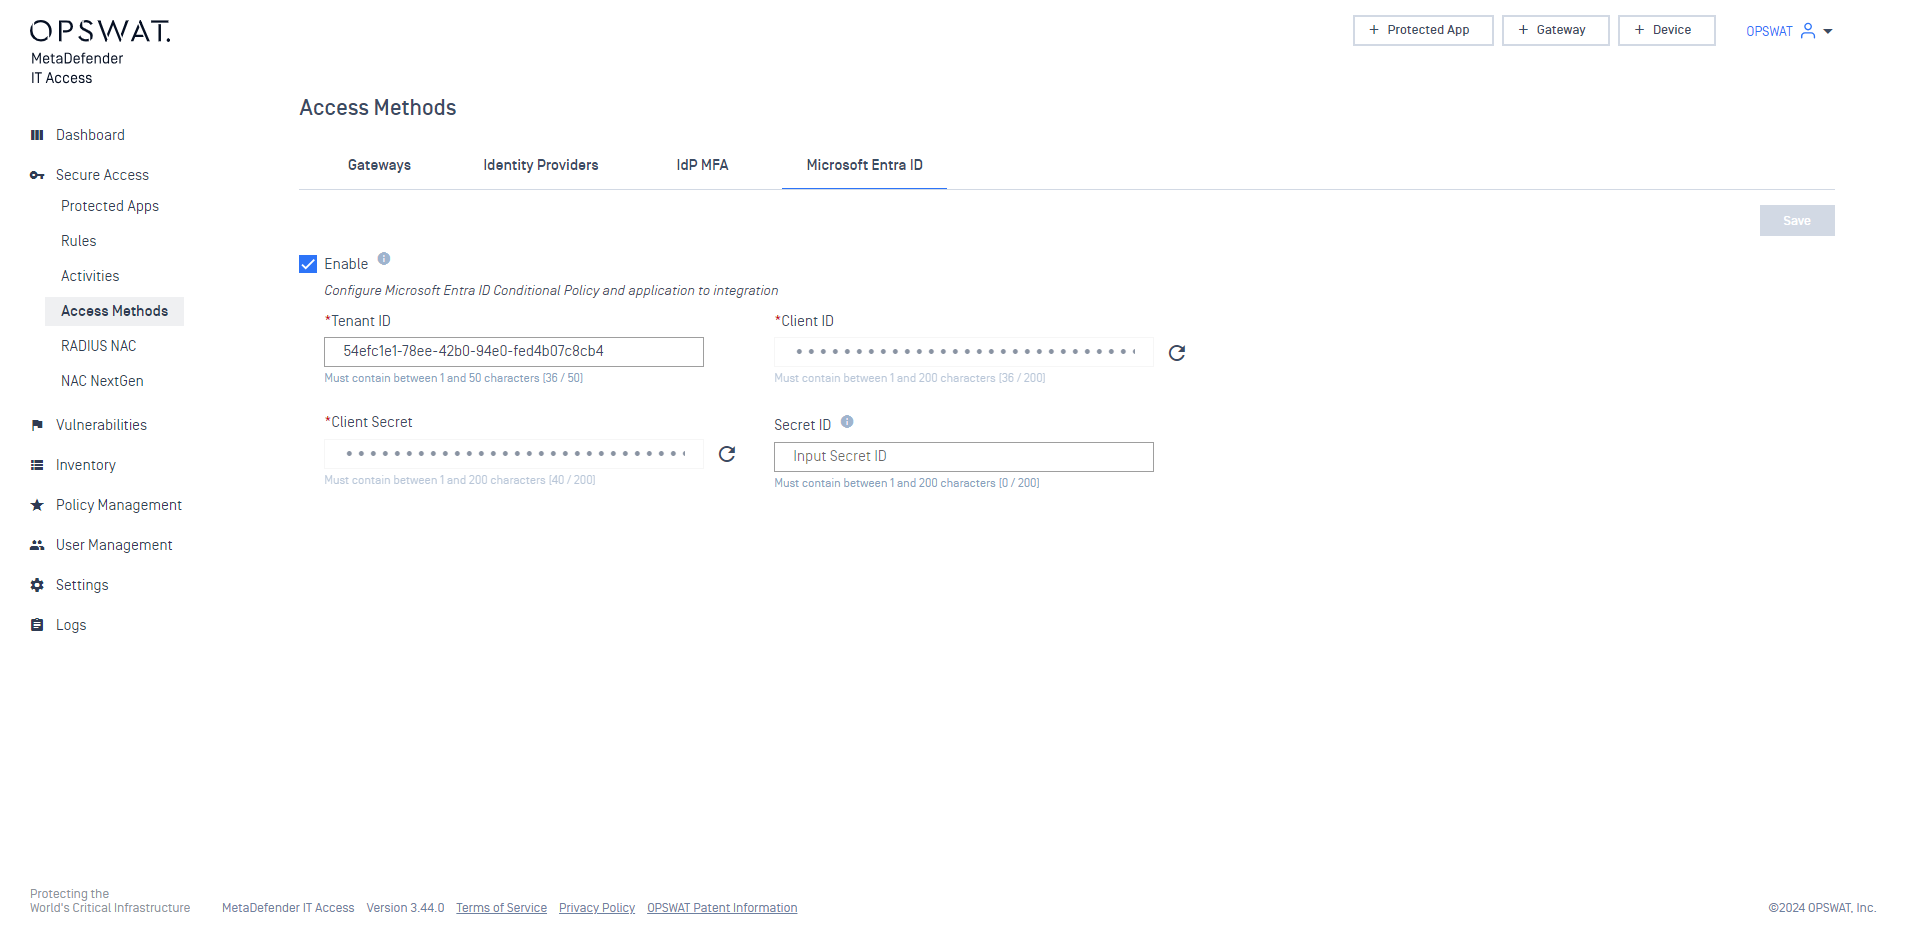
- Sign in to the MetaDefender IT Access. On the left menu, navigate to Secure Access > Access Methods > Microsoft Entra ID.
- Select Enable and prompt the Tenant ID, Client ID, Secret ID, and Client Secret previously obtained from the integration application.
- Select the same Extension Attribute as the one that you have configured previously on the Conditional Access policies for macOS and Linux devices.
- When completed, select Save.
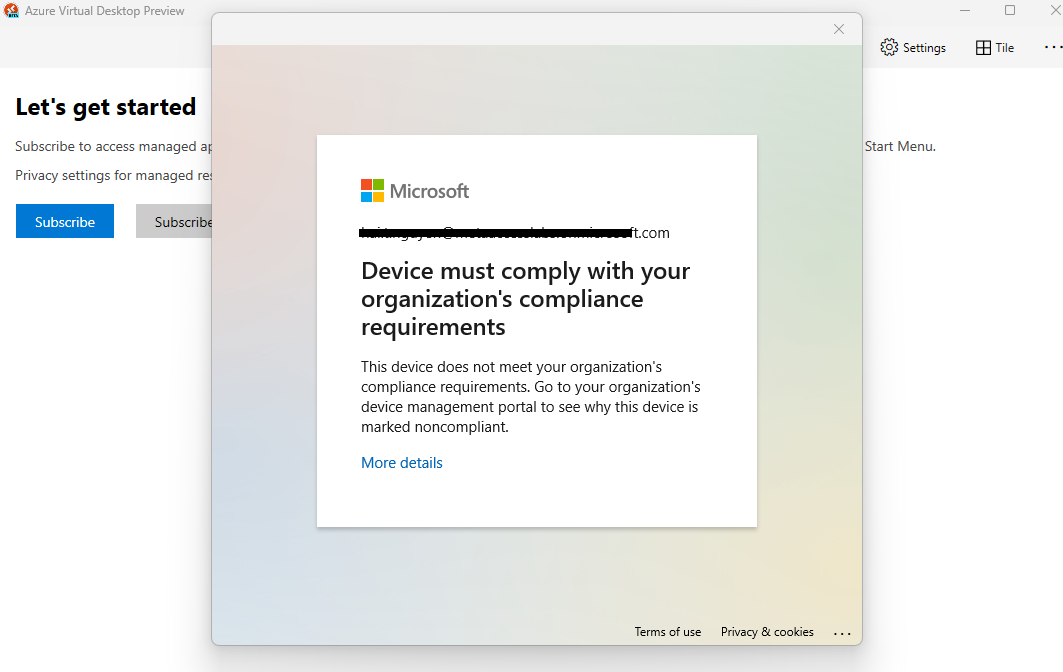
4. Test the integration
When users use non-compliant devices to log in to their Microsoft accounts to access protected resources, a message will show up indicating that the device must comply with the organization's compliance requirements.
5. Troubleshooting
If the integration between MetaDefender IT Access and Microsoft Entra ID does not function properly, the console provides a series of messages to indicate the underlying reasons.
Your credentials will expire soon / Your credentials have expired
This message appears when the credential you create in the Microsoft Entra ID integration application and use in the MetaDefender IT Access console will expire in the upcoming days or has already expired. In this situation, you need to visit your Microsoft Entra ID integration application, create a new credential, and perform a credential rotation in the MetaDefender IT Access console. You can refer to the sections Initialize the integration application and Setup the integration on MetaDefender IT Access for detailed steps.
Unable to connect to Microsoft Entra ID due to invalid credentials
This message appears when the credential you use in the MetaDefender IT Access console is invalid, thus the MetaDefender IT Access can not connect to your Microsoft Entra ID site to perform actions.
In this situation, you can review the following configurations on your Microsoft Entra ID to see whether they are configured correctly.
- Go to your integration application and verify that the Tenant ID and Client ID are the same as those you have configured in the MetaDefender IT Access console.
- Navigate to Certificates & secrets and verify that the Secret ID and Secret Value are the same as those you have configured in the MetaDefender IT Access console.
- Navigate to API permissions and verify that you have added and granted the Device.ReadWrite.All permission to your application.
In case the device’s compliant status from MetaDefender IT Access and Microsoft Entra ID still does not match after having done the above steps, you can try to do a compliance check:
- On the MetaDefender IT Access console, navigate to Inventory > Devices > Device Detail. On the top-right corner, select Actions > Compliance Check.
- On the MetaDefender Endpoint, right-click on the tray icon and click Recheck.