This article applies to all MetaDefender Core v5 releases deployed on Windows and Linux systems.
Overview
The YARA engine in MetaDefender Core scans files against custom rules that you provide, in addition to the curated rule set delivered with the engine. A common point of confusion is that placing a .yara file on the server is not enough on its own — a custom rule will only match scanned files when all of the following are true:
- The rule is reachable through a configured YARA source
- A YARA package has been generated after the source was added or changed
- The YARA engine is enabled in the workflow that scans the file
- The "Yara Rule Matched" verdict is not treated as Allowed in that workflow (this is the default behavior and is the most common reason a correctly-written rule appears to do nothing)
This article walks through the full activation flow, plus verification, common gotchas, and example rules to get started with.
Prerequisites
- Administrator access to the MetaDefender Core Management Console (default URL is the server's IP or hostname on the nginx port,
8008) - A syntactically valid
.yara(or.yar) rule file. Validate rule syntax with theyaracommand-line tool before adding it as a source if you are unsure - For local-directory sources: write access to a folder on the MetaDefender Core server
- For network sources: an HTTP or HTTPS URL that returns a
.ziparchive of one or more rule files
Activation Steps
Step 1 — Stage the rule file on the server
Create a dedicated folder on the MetaDefender Core server (for example, C:\YARA\custom\ on Windows or /opt/yara/custom/ on Linux) and place the .yara rule file inside it. The folder may contain multiple rule files; all of them will be loaded.
Important: When you add the source in the next step, you point MetaDefender Core at the folder, not at the individual rule file. Pointing at a file directly will not work.
Step 2 — Add the folder as a YARA source
In the Management Console, navigate to:
Inventory → Modules → Utilities → YARA
Click Add source. Two source types are supported:
- Local directory — the absolute path to the folder containing your rule files on the MetaDefender Core server. MetaDefender Core creates an internal copy of the directory contents for the engine to use
- Network (HTTP/HTTPS) — a URL pointing to a
.ziparchive of rule files. The archive is downloaded and its contents are used
Save the source. You can enable or disable each source individually; only enabled sources are included when the package is generated.
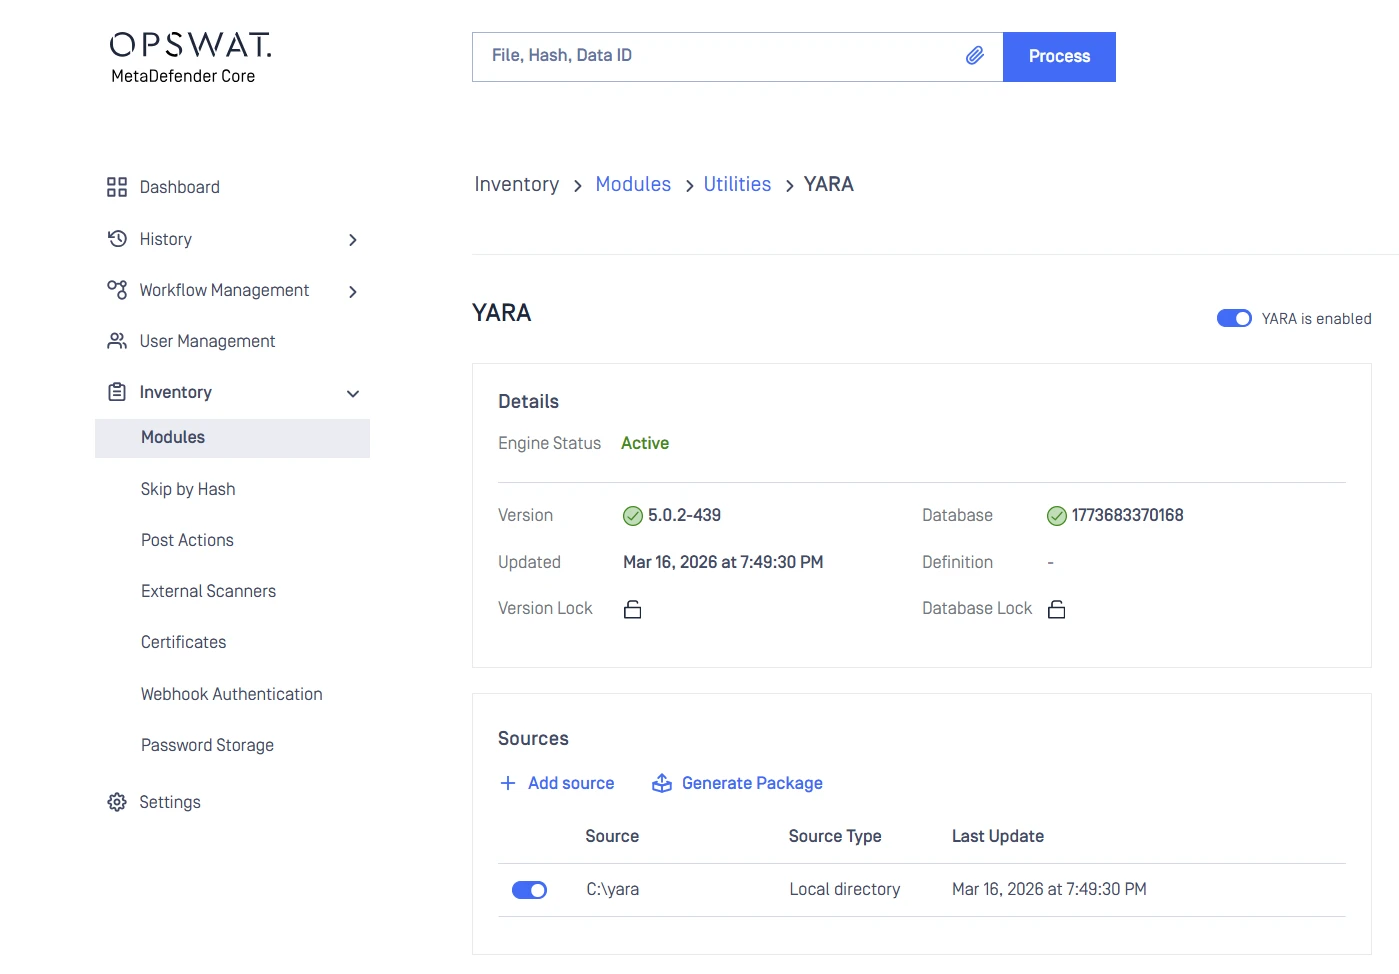
Step 3 — Generate the YARA package
Still on the Inventory → Modules → Utilities → YARA page, click Generate package. This compiles all enabled sources into the active rule package that the engine uses at scan time. The generation start time is displayed next to the button, and the status can be polled.
Note: Adding, modifying, or removing a source does not take effect until you generate a new package. Every rule change requires a regeneration.
Step 4 — Enable YARA in the workflow
The YARA engine must be enabled in the workflow that will scan the file. In the Management Console, navigate to:
Workflow Management → Workflows → [select your workflow] → YARA tab
Confirm the YARA engine is enabled for that workflow, then save.
Step 5 — Make matched files actually blockable (the common gotcha)
By default, MetaDefender Core treats "Yara Rule Matched" as an Allowed verdict at the workflow level. That means even if your rule fires correctly, the file is still allowed through and the case looks like "YARA isn't working" from the client side.
To make matches actionable:
- Open the workflow template (Workflow Management → Templates) or the workflow rule, and go to the General tab
- Locate "Override scan results classified as allowed"
- Uncheck the "Yara Rule Matched" entry so it is no longer classified as allowed
- Save the template/rule
After this change, files matching a YARA rule will be processed as blocked (subject to your other workflow settings).
Verification
To confirm the activation worked end to end:
- Take a sample file that you know matches your rule (or craft a small test file whose contents match the rule's
stringsandcondition) - Submit it through the workflow you configured in Step 4 — either via the Management Console scan page or via the REST API
- Open the scan result and expand the YARA section. A successful activation shows the rule name under the YARA engine's results
- If Step 5 was applied, the overall verdict for the file should be Blocked rather than No Threat Detected
If the rule does not match, the most common causes are: the package was not regenerated after the source was added (Step 3), the source path pointed at the file instead of the folder (Step 2), or the file did not actually traverse the workflow you configured (Step 4).
Example YARA Rules
The following examples can be used to test the activation flow or as starting points for custom rules. Save any of these into a .yara file inside the source folder configured in Step 1.
Simple string match
Case-insensitive string match
Binary pattern match
Multiple strings match
Regular expression match
Managing YARA Sources via REST API
For automation or for environments managed through OPSWAT Central Management, the same operations are available through the MetaDefender Core REST API:
GET /yara/sources— Retrieve all configured YARA sourcesPUT /yara/sources— Replace the YARA source configuration (overwrites existing entries)POST /yara/package/generate— Trigger a new package generationGET /yara/package/status— Poll the status of the current package generation
If you need further assistance, don't hesitate to create a support case or chat with our support engineer.