Microsoft Entra ID requires MetaDefender Core to enable HTTPS for connections. Please follow these steps to first enable HTTPS on MetaDefender Core.
Register a new application in Azure
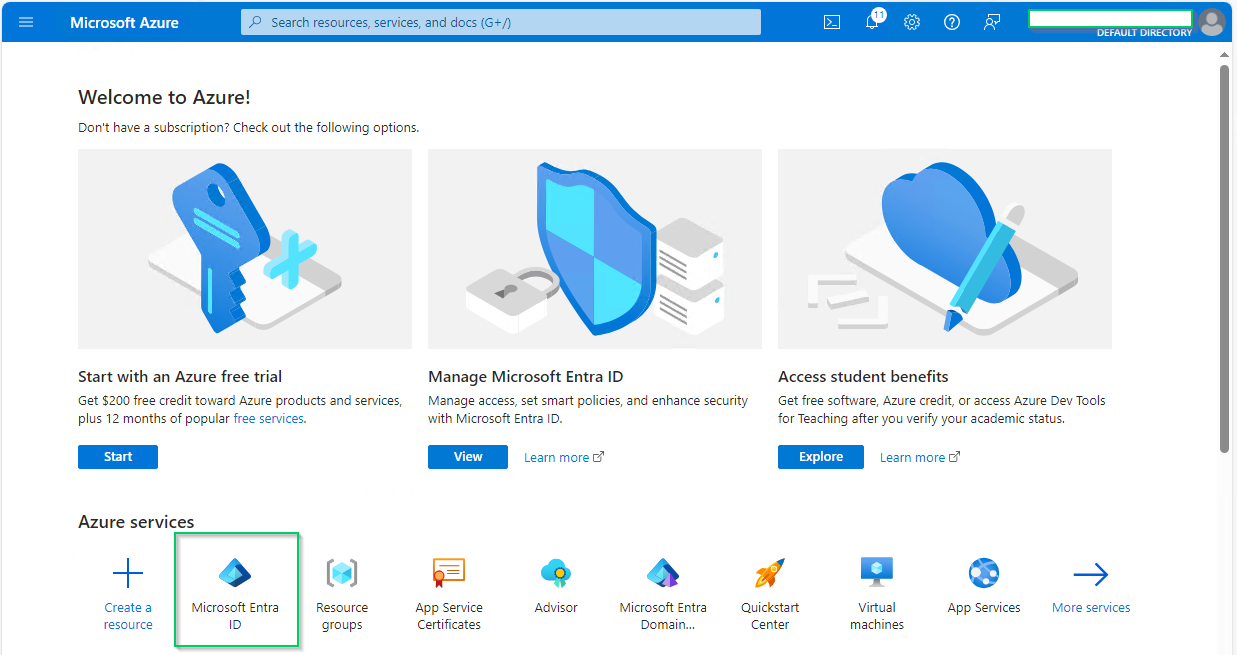
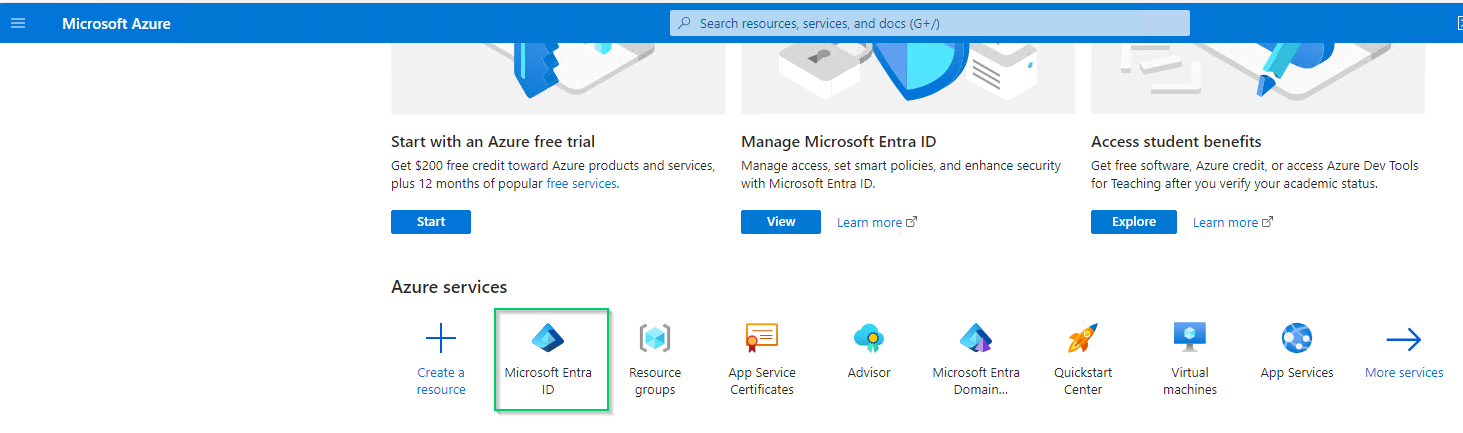
- Access Azure portal and sign in.
- On the homepage, select
Microsoft Entra IDunderAzure services.
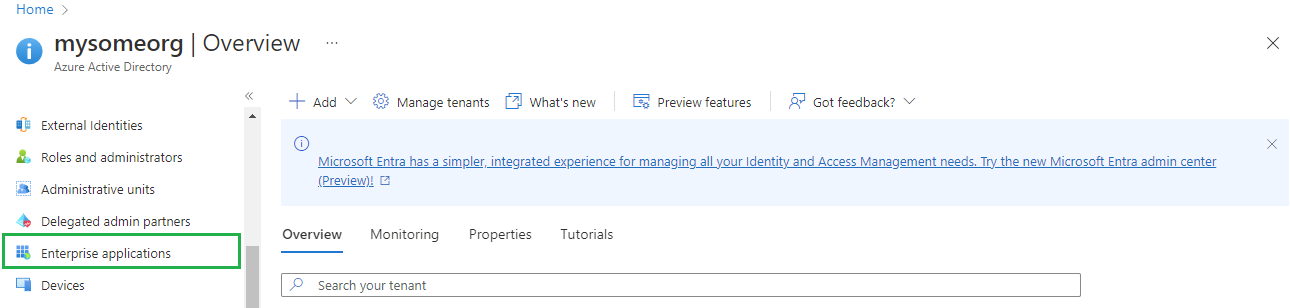
- Select
Enterprise applicationsin the left sidebar.
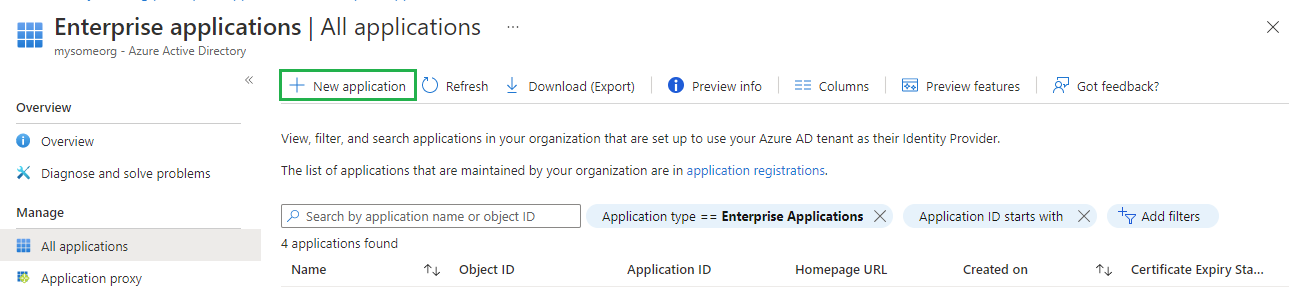
- On
All applicationspage, clickNew application.
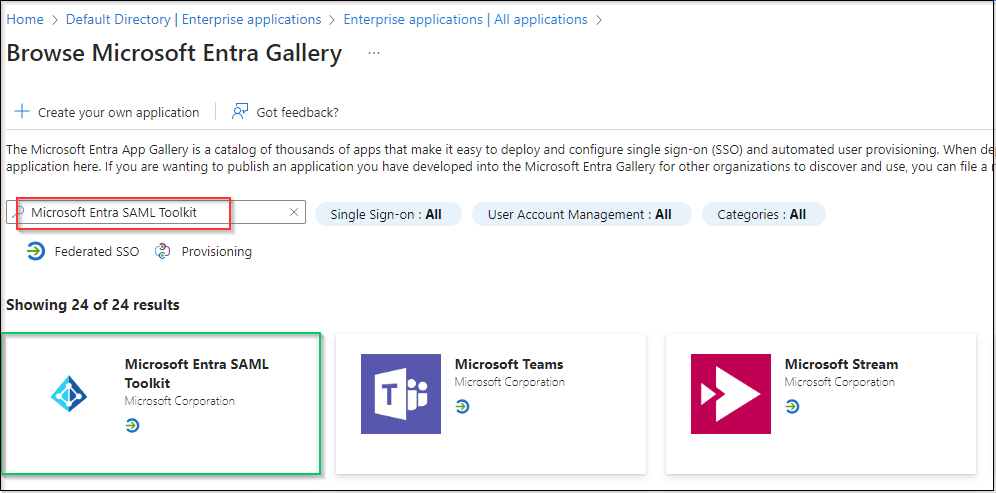
- On
Browse Azure AD Gallerypage, search for "Microsoft Entra SAML Toolkit" and click onMicrosoft Entra SAML Toolkitin the result panel.
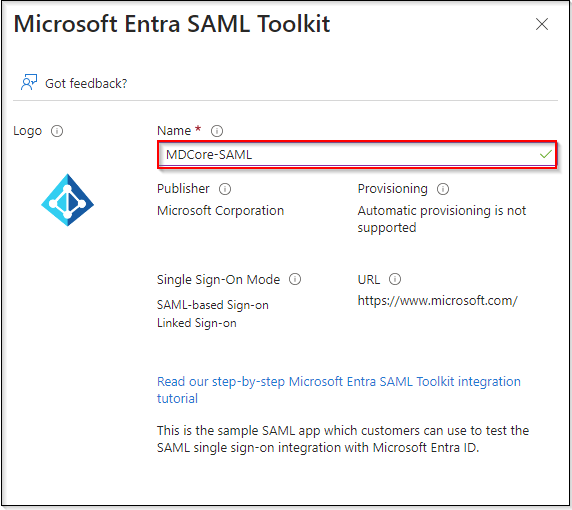
- Fill in
Namefield with MDCore-SAML, for example, and clickCreatein the right sidebar.
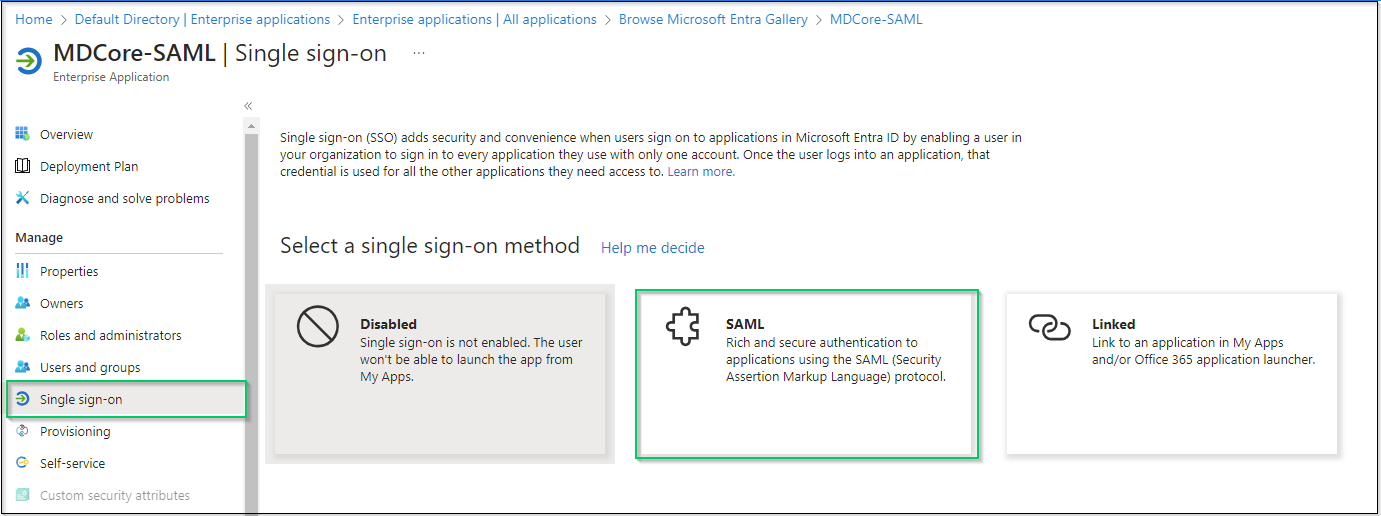
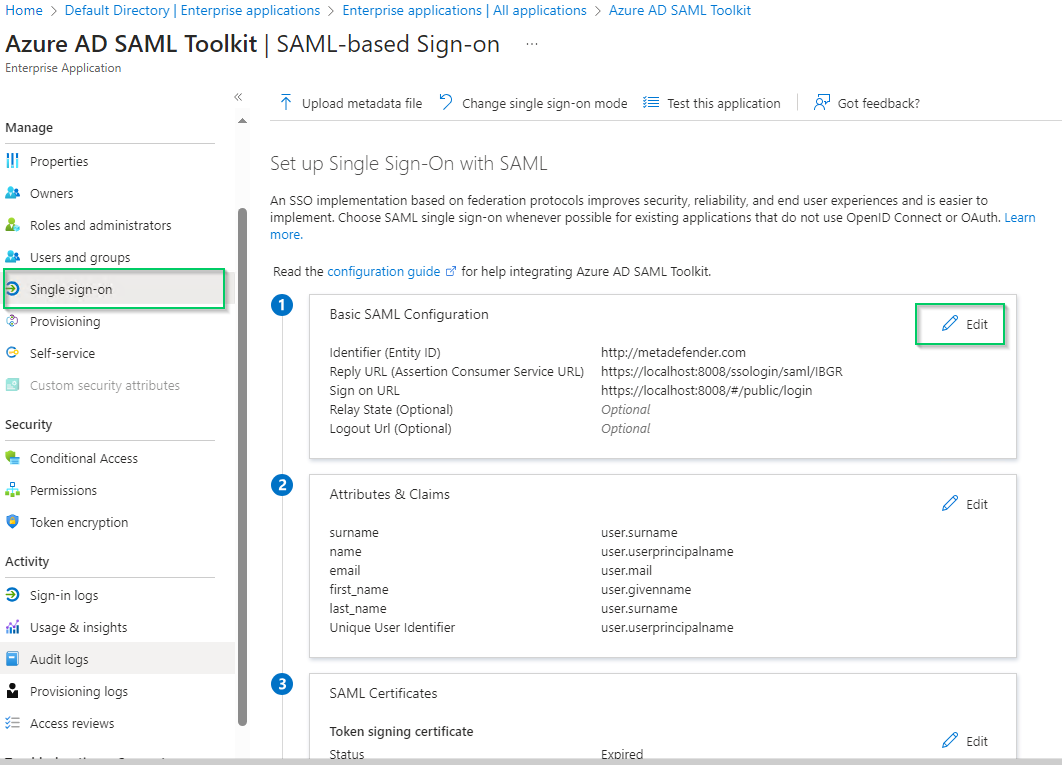
- Navigate to
Single sign-onon the left sidebar and clickSAML.
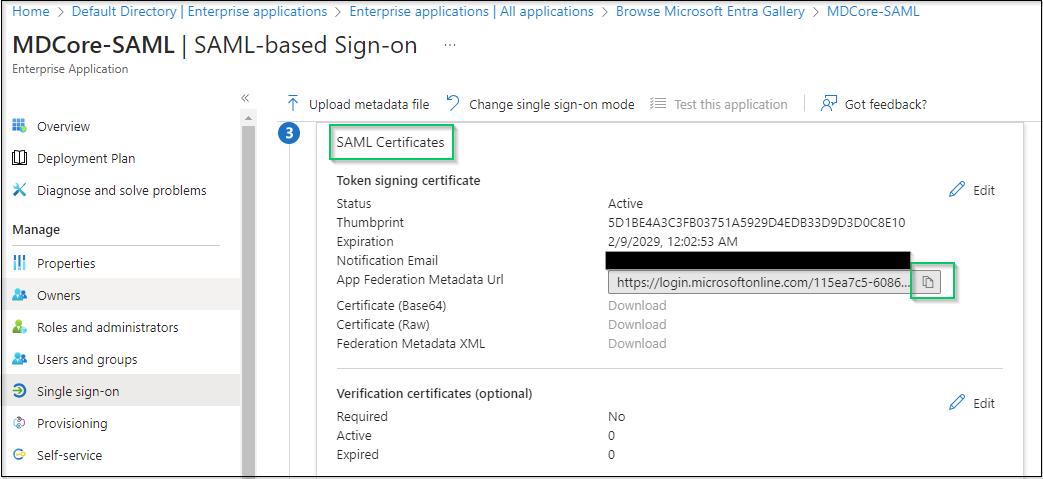
- Go to
SAML Certificatessection, click the copy button at the far right ofApp Federation Metadata Urland store as metadata_uri.
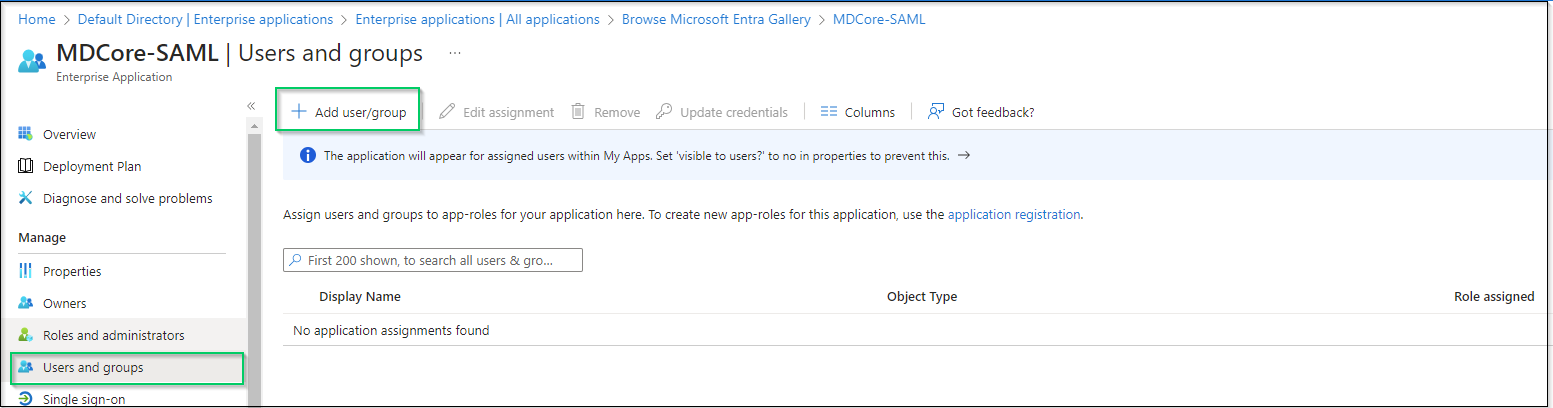
- Navigate to
Users and groupsin the left sidebar, clickAdd user/group.
- On
Add Assignmentscreen, clickNon Selectedand add users who are allowed to log in to the app, then clickSelectin the right panel.
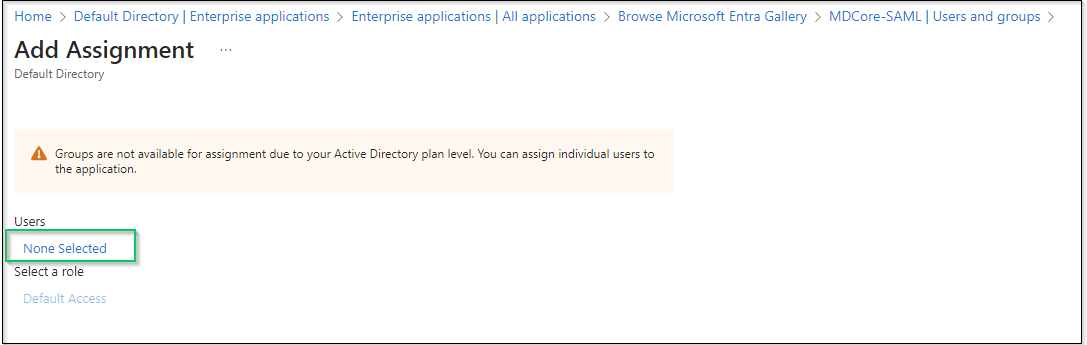
- Finally, click
Assignto complete.
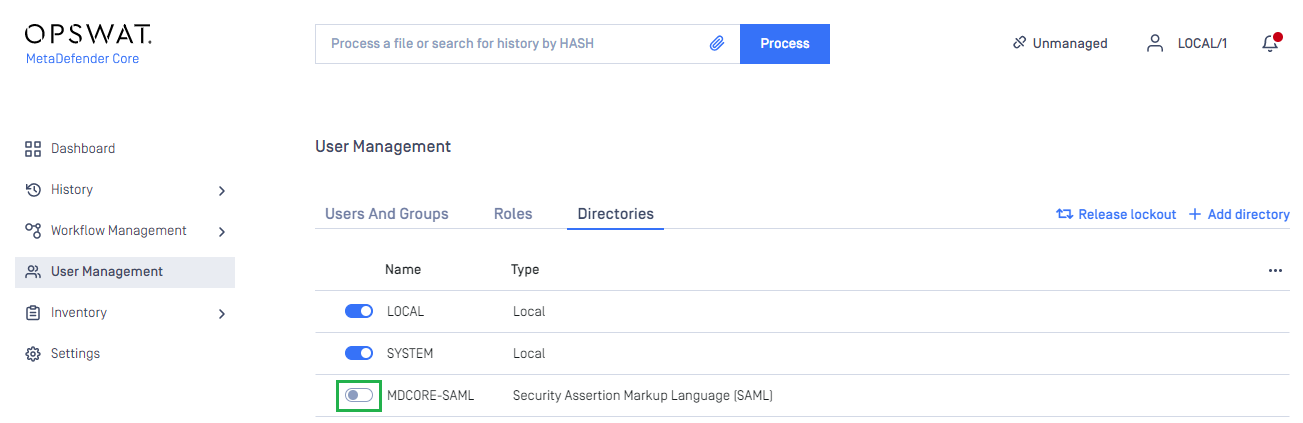
Create SAML directory in MetaDefender Core
- Sign in to MetaDefender Core management console.
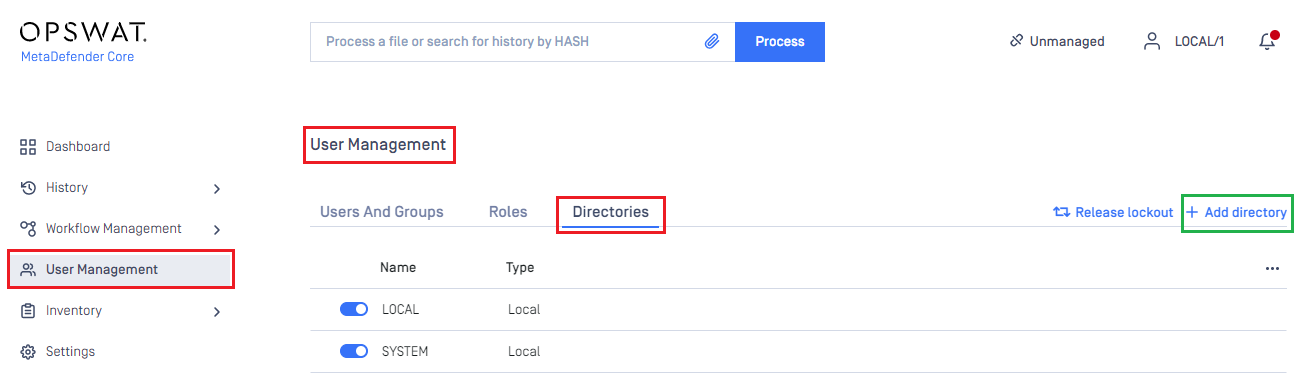
- On the dashboard, click
User Managementin the left sidebar. - In
User Managementpage, selectDirectoriestab and click onAdd directoryin the top right corner.
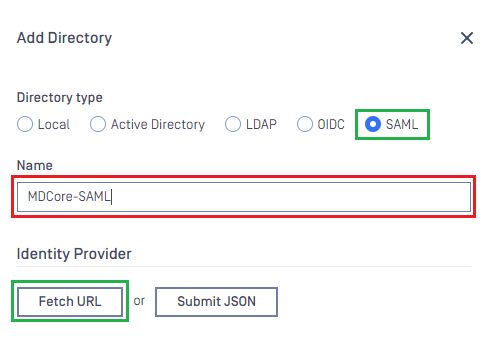
- In
Add Directorypage, choose SAML inDirectory type, enter a name for the new directory, such as MDCore-SAML and clickFetch URL.
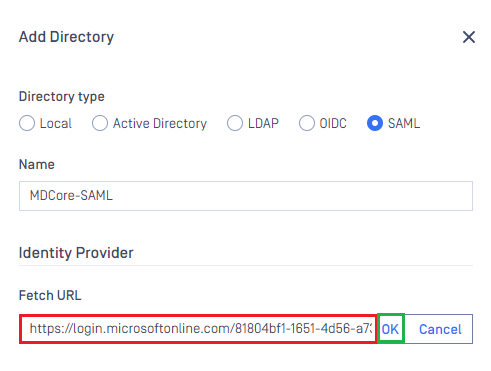
- Paste the URI stored in metadata_uri into the box under
Fetch URL, then clickOKand wait a moment for MetaDefender Core to set Microsoft Entra ID as its IDP.
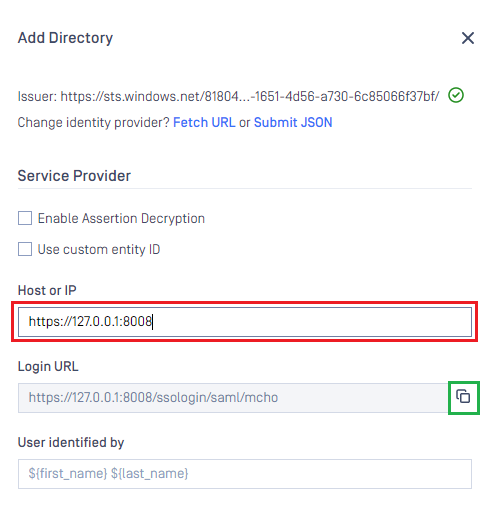
- In
Service Providersection, fill inHost or IPwith the address where MetaDefender Core is hosted, for example https://127.0.0.1:8008. - Copy the
Login URLand store in reply_uri for the later steps.
Complete configuration in Entra ID
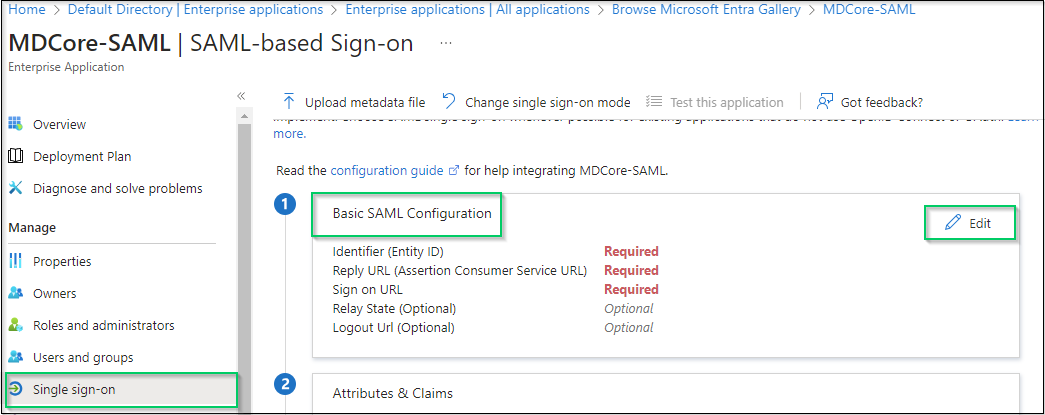
- Switch back to Microsoft Entra ID, on
SAML-based Sign-onpage, navigate toBasic SAML Configurationand clickEditin the top right corner.
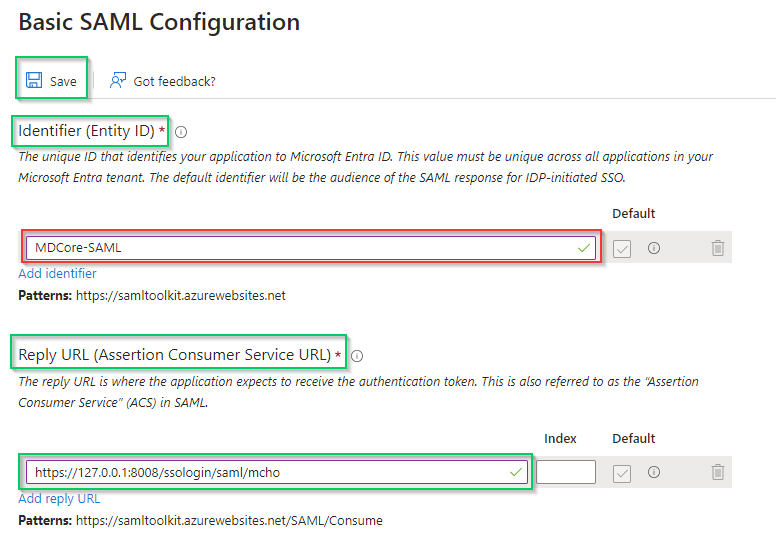
- Navigate to
Identifier (Entity ID)in the right sidebar, clickAdd identifier, then enter a unique ID to identify MDCore, such as MDCore-SAML. Store the identifier to identifier. - Navigate to
Reply URL(Assertion Consumer Service URL), clickAdd reply URLand fill in the URI with the value stored in reply_uri and clickSave.
- Navigate to
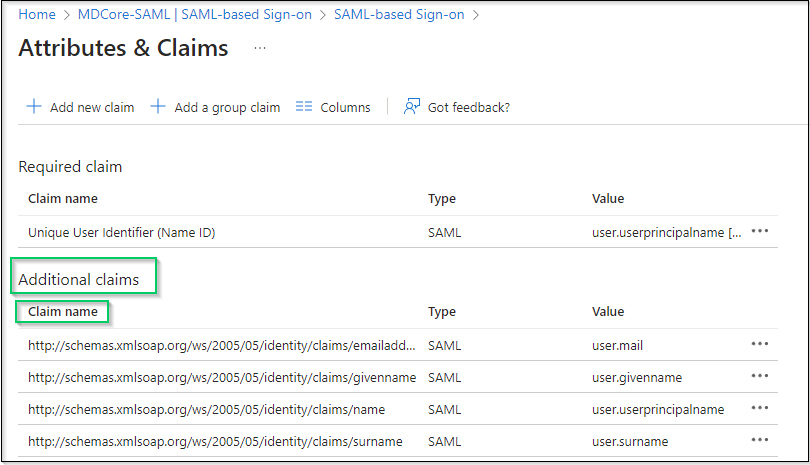
Attributes & Claims, then clickEdit.
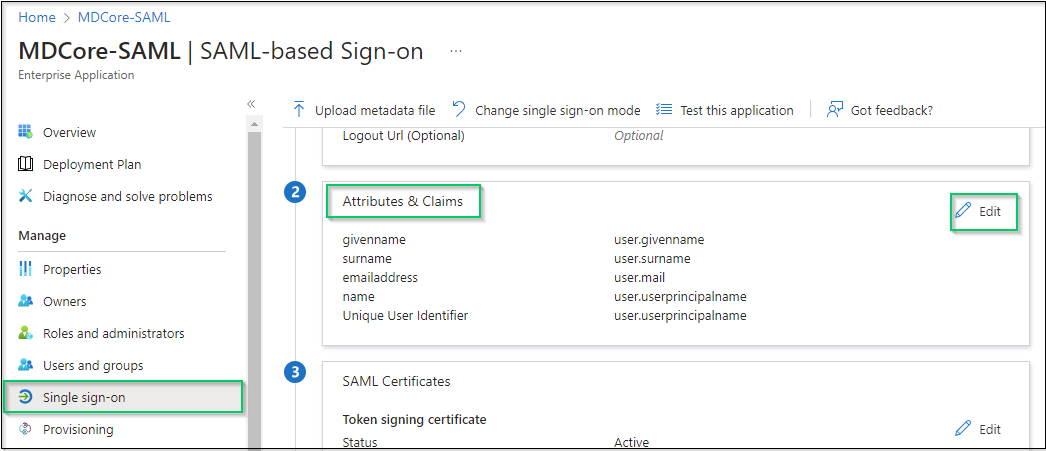
- In
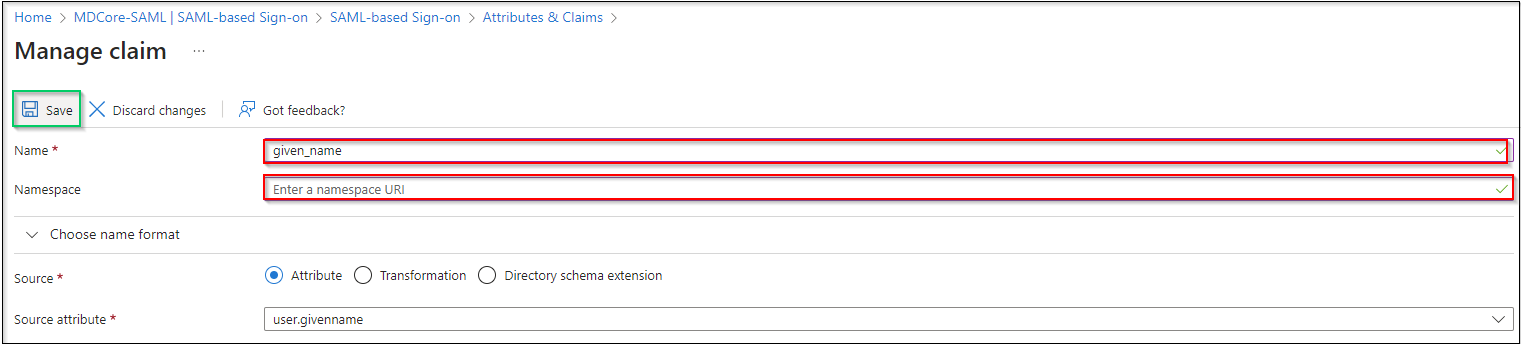
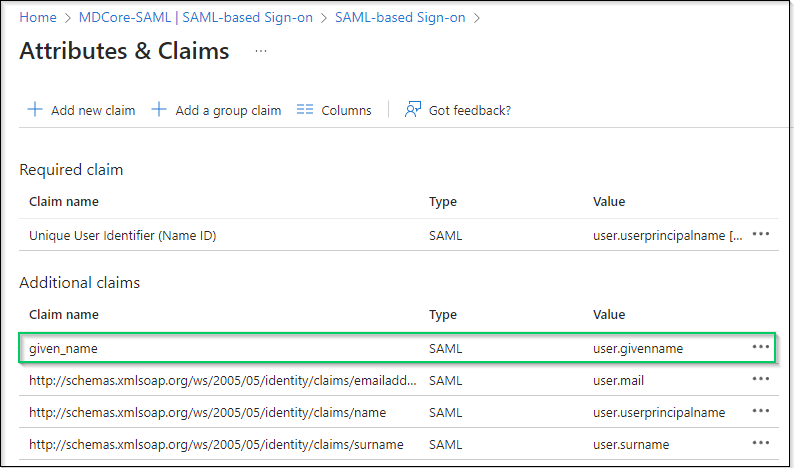
Attributes & Claimspage, go toAdditional claims, and click on any item underClaim nameto change its name.
- Change value of
Namefield, leaveNamespaceempty and clickSaveto complete. In this instruction, the claim name is changed to given_name, which will be used later to identify the logged-in user on MetaDefender Core.
If the names of attributes and claims provided by Microsoft Entra ID are sufficient, the customers are recommended for direct use in identifying the logged-in user in MetaDefender Core.
Complete configuration in MetaDefender Core
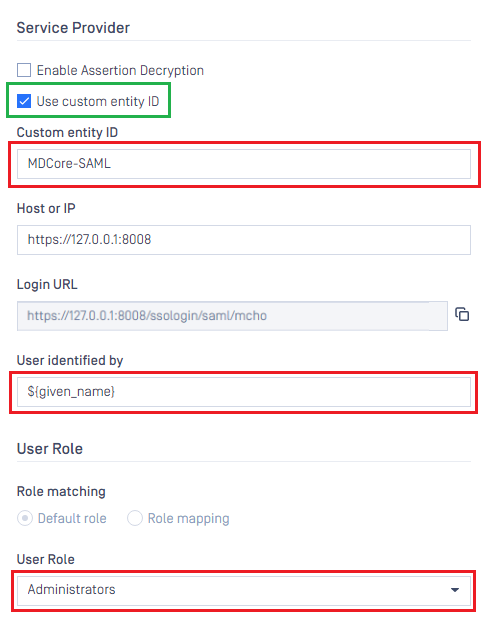
- Switch back to MetaDefender Core screen. Under
Service Provider, go toUse custom entity IDand fill in it with value stored in identifier, MDCore-SAML in this example. - Fill in
User identified bywith ${given_name}.
If the namespace is not removed from the claim name in step 6 of the previous section, the full claim name including the namespace must be used here to build user identity.
For example, if the claim of http://schemas.xmlsoap.org/ws/2005/05/identitity/clams/given_name is added to Microsoft Entra ID, then ${http://schemas.xmlsoap.org/ws/2005/05/identitity/clams/given_name} should be used by MetaDefender Core to build user identity.
- Select appropriate role for the user under
User Role. - Click
Addto complete the settings.
- In
User Managementscreen of MetaDefender Core, toggle the new directory named MDCORE-SAML. A dialog box appears to confirm the action. OnceEnableis clicked, all sessions are expired immediately.
Test the integration
- At the home screen of MetaDefender Core, click
Login; the user is redirected to Microsoft Entra ID sign-in page.
- Sign in using the account registered with Microsoft Entra ID.
- If everything goes correctly, MetaDefender Core dashboard is displayed with user's identity shown in the top right corner.
- Otherwise, access backup login page at
<mdcore-host>#/public/backuploginfor trouble shooting.
Setup pseudo IdP-initiated SSO
Microsoft Entra ID does not support IdP-initiated SSO in the same way as other Identity Providers. It actually accesses the login page of its SP and does initiate Single Sign-in from there; so basically, it is SP-initiated.
- Sign in to Azure management page.
- Navigate to
Azure servicessection, click onMicrosoft Entra ID.
- In the left sidebar, click on
Enterprise applications.

- Select
Azure AD SAML Toolkitfrom the list of enterprise applications.

- Choose
Single sign-onin the left sidebar, go toBasic SAML Configurationsection, and clickEditat the top right of the section.
- In
Basic SAML Configurationright sidebar, enter Core login URL in the field underSign on URL.
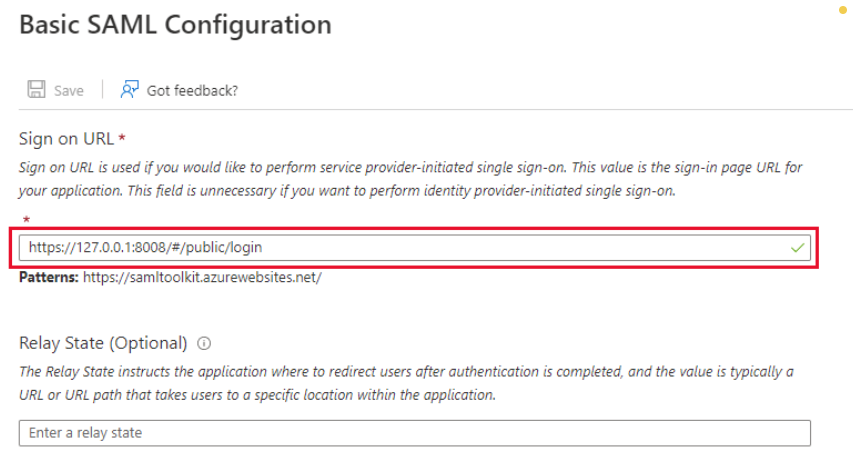
- Click
Saveto complete.
Test IdP-initiated SSO
- Sign in to Azure management page.
- Navigate to
Azure servicessection, and selectMicrosoft Entra ID. - In the left sidebar, click on
Enterprise applications. - Choose
Azure AD SAML Toolkitfrom the list of enterprise applications. - Go to
Propertiestab.
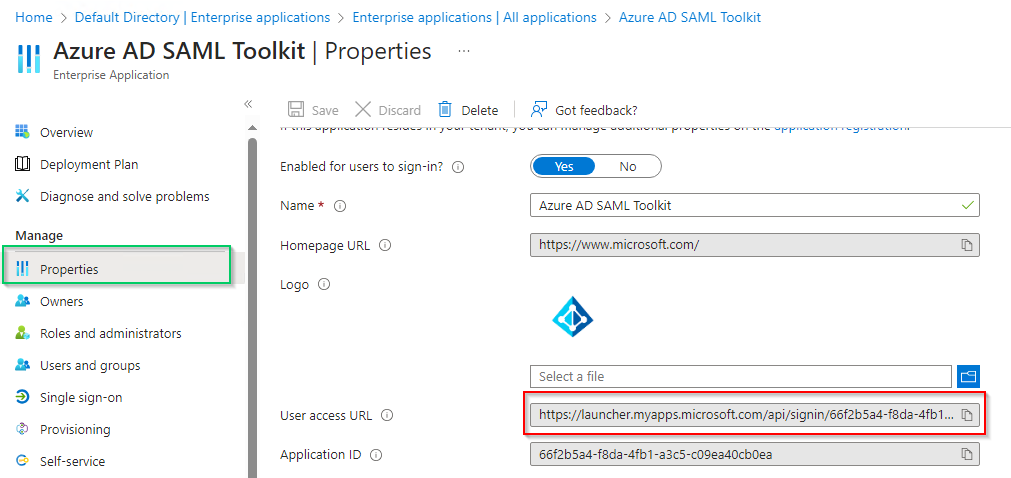
- Copy the URL next to
User access URL. - Paste the copied URL into your browser and sign in.
- If everything goes well, MetaDefender Core dashboard will appear with the user identity displayed in the top right corner.

- Otherwise, access backup login page at
<mdcore-host>#/public/backuploginfor trouble shooting.