Overview
The following guide covers Cisco Catalyst 9800 WLAN Controller configurations required to integrate the controller with NAC. Cisco Catalyst 9800 WLAN controllers running 17.3 or later are supported for centrally switched traffic. Radius Based Enforcement (RBE) is supported for Open networks and for Secure networks using WPA2E/802.1x. By configuring your NAC Enforcer as an Authentication and Accounting Server, creating Access-Lists and leveraging features available in the WLAN controller, NAC will be enabled to block, redirect or limit access based on NAC Policy Group definitions.
Network Preparation and Testing
Prior to integration with NAC, please confirm that the WLANs you will be integrating are fully functional. A simple test of successfully associating with the SSID and browsing to a non-cached website should suffice.
Static Route
The following steps ensure that any devices on your network using public DNS are still shown block pages on your NAC VM when redirected to portal.myweblogon.com . To accomplish this, we need to create a static route so traffic destined for the "magic" 198.31.193.211 IP is instead forwarded to your NACs private IP. If this static route is already present on a Layer 3 routing device upstream of your wireless controller (e.g. if NAC was previously integrated with your core router for L3 enforcement), you can skip the rest of this section. If this static route is not present on the upstream router, follow the steps below to add the static route on the WLC.

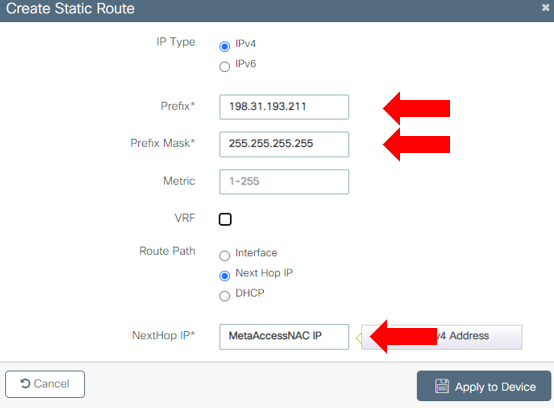
NOTE: The NAC appliance must be no more than one L3 hop away from the WLC for this static route to work properly. If this is not the case in your environment, please contact OPSWAT Support if you require assistance with this task.
Config NAC Enforcer as a RADIUS server globally
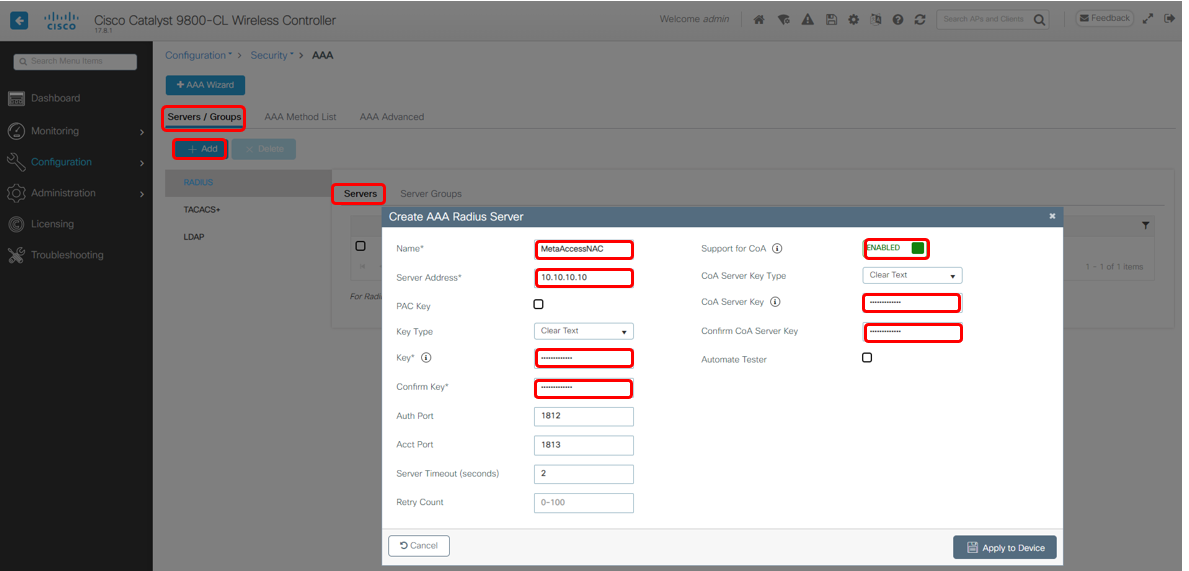
1. Create a new AAA Server
Click on Configuration then on Security → AAA. Create a new Radius Server. Ensure that Support for CoA is set to Enabled . In the following examples, the NAC IP is 10.10.10.10 *. Make a note of the IP address and shared secret as this information will need to be provided to your Impulse representative to complete the configuration on the appliance.
*If you have a separate RBE appliance, that IP should be used here instead of the Enforcer IP
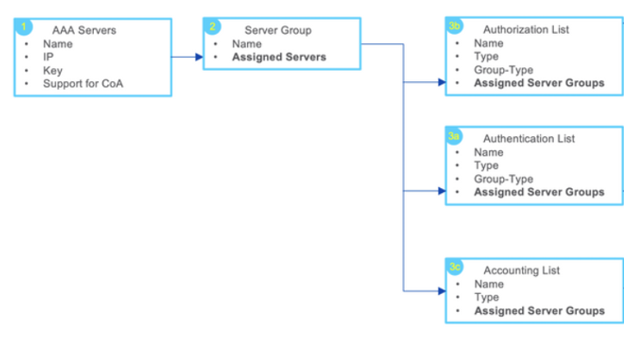
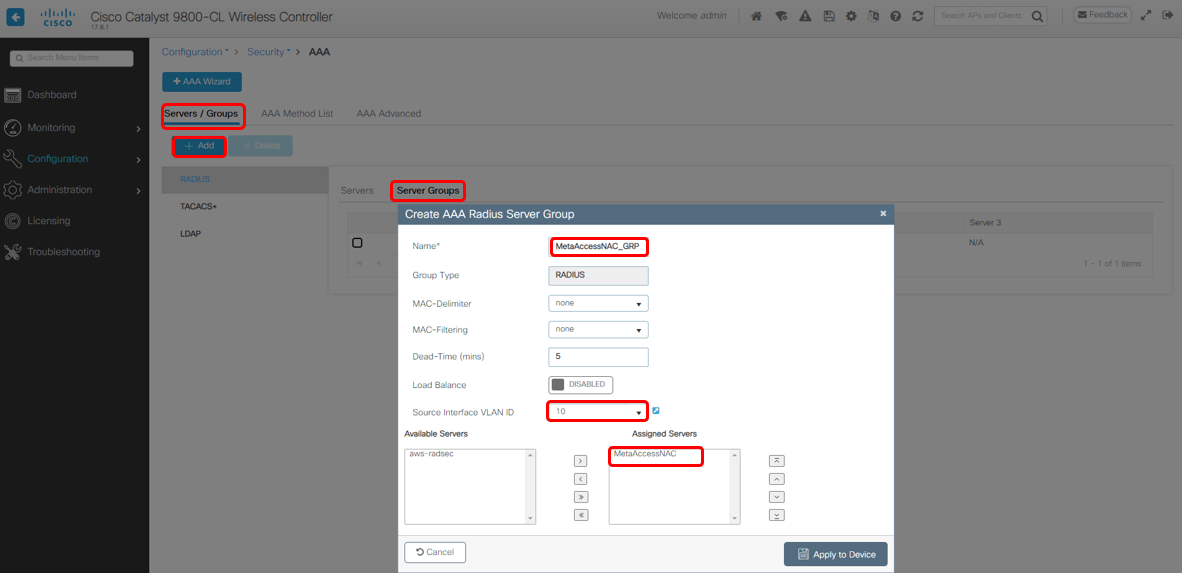
2. Create a new Server Group
Go to Configuration > Security > AAA > Servers / Groups > Server Groups, and Click Add
3. Create Authorization/Authentication/Accounting List
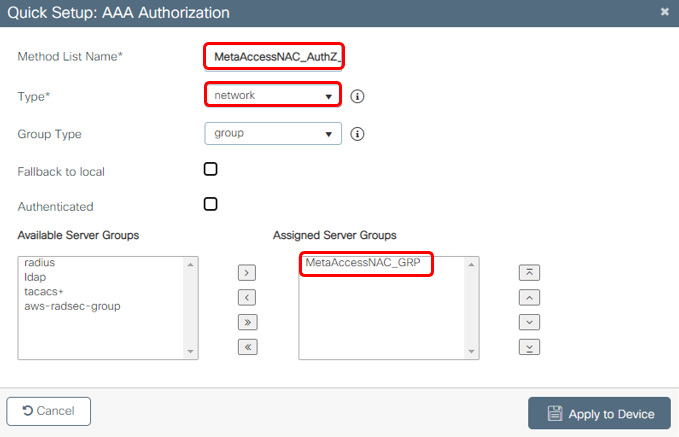
3a. Create Authorization List
Go to Configuration > Security > AAA > AAA Method List > Authorization, Click Add
3b. Create Authentication List
Go to Configuration > Security > AAA > AAA Method List > Authentication, Click Add
Create Authentication list using following information that will be used for both OPEN SSID and SECURE SSID

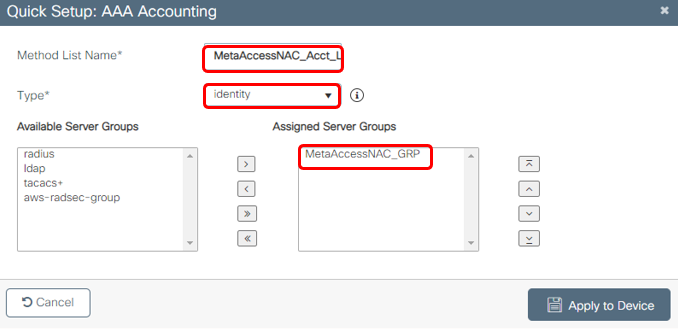
3c. Create Accounting List
Go to Configuration > Security > AAA > AAA Method List > Accounting, Click Add
ACL Configuration
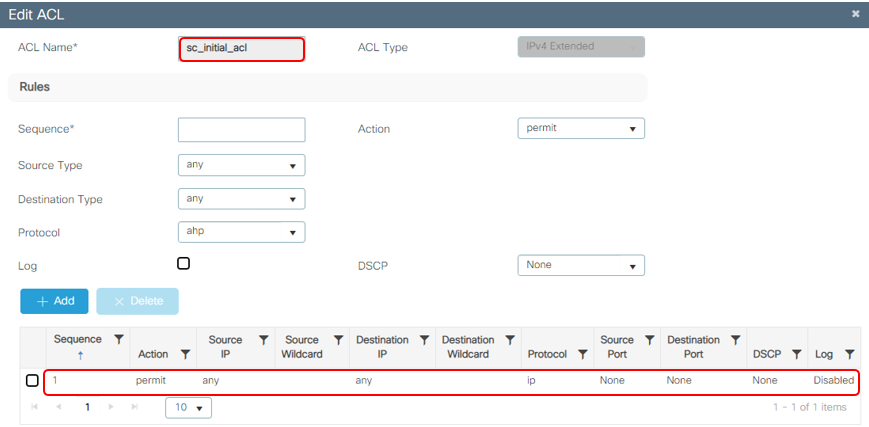
Configure "sc_initial_acl"
Go to Configuration > Security > ACL, Click Add
The sc ACL defines what access is permitted while an endpoint is being evaluated for policy. In the example below all access is permitted but restricted access may be configured as desired. NOTE – If the sc_initial acl ACL is restricted, ensure DNS, DHCP, traffic for your NAC Enforcer* and 198.31.193.211 are permitted. These are mandatory entries for restricted ACLs
*If you have a separate RBE appliance, allow access to your NAC enforcer AND the RBE appliance IPs
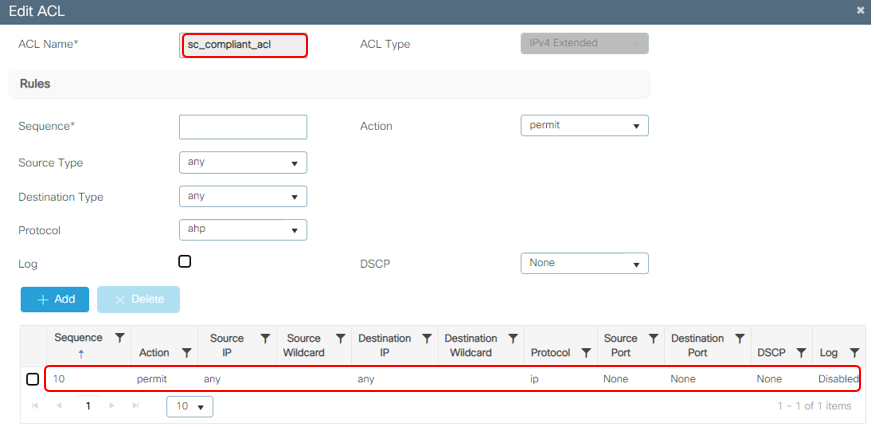
Configure "sc_compliant_acl"
Go to Configuration > Security > ACL, Click Add
The sc__compliant__acl ACL defines what access is allowed after successful authentication. In the example below full access is permitted but access may be configured as desired. NOTE - If additional different levels of access are to be defined for different roles, names must be unique. Example: “guest_compliant_acl”, “fac_compliant_acl”, “stu_compliant_acl”, etc.
Configure "sc_quarantine_acl" (redirect ACL)
Go to Configuration > Security > ACL, Click Add
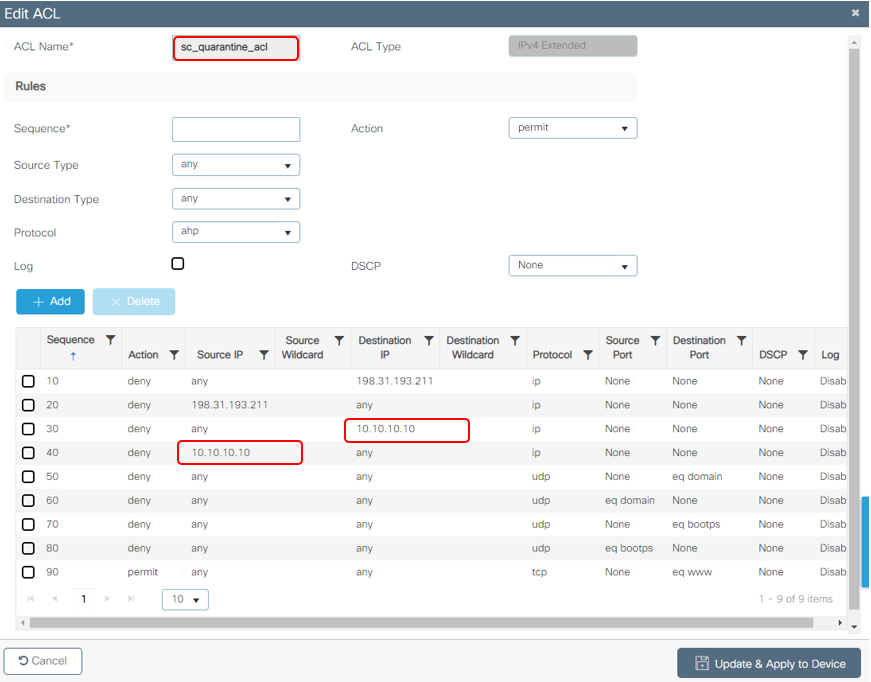
Note: For the redirection ACL, think of the deny action as a deny redirection (not deny traffic) and the permit action as permit redirection. The WLC only looks into traffic that it can redirect (ports 80 and 443 by default).
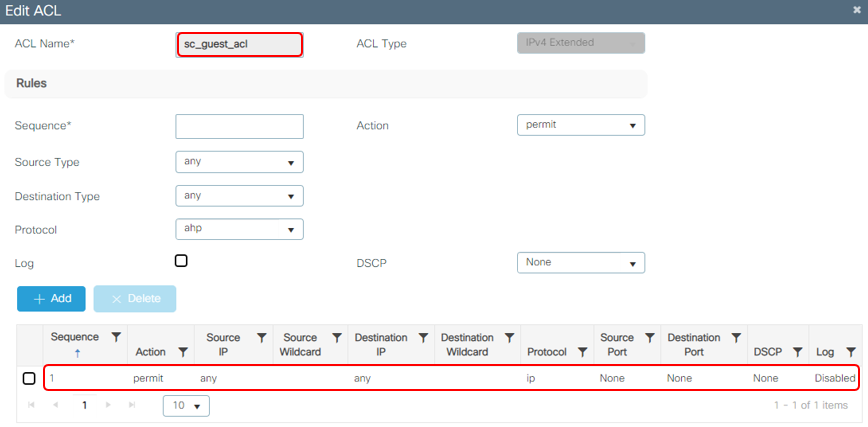
Configure "sc_guest_acl"
Go to Configuration > Security > ACL, Click Add
The sc_guest_acl ACL defines what access is allowed to compliant guest pass users.
NOTE - If different levels of access are to be defined for different roles, names must be unique. Example: VIP_guest_acl , vendor_guest_acl , etc.
NOTE – For custom guest ACLs, ensure DNS, DHCP, traffic for your NAC private IP, and the "magic" 198.31.193.211 IP are permitted.
Enable Redirection for HTTP or HTTPS
The web admin portal configuration is tied with the web authentication portal configuration and it needs to listen on port 80 in order to redirect. Therefore, HTTP has to be enabled for the redirection to work properly. You can either choose to enable it globally (with the use of the command ip http server) or you can enable HTTP for the web authentication module only (with the use of the command webauth-http-enable under the parameter map).
If you want to be redirected when you try to access an HTTPS URL, then add the command intercept-https-enable under the parameter map but note this is not an optimal configuration, that it has an impact on the WLC CPU and generates certificate errors anyway
Captive Portal Bypass is enabled to improve the end user experience for mobile devices. More information on Cisco’s implementation of this feature can be found [here](%5Bhttp://www.cisco.com/c/en/us/td/docs/wireless/controller/7-%5D(http://www.cisco.com/c/en/us/td/docs/wireless/controller/7-)
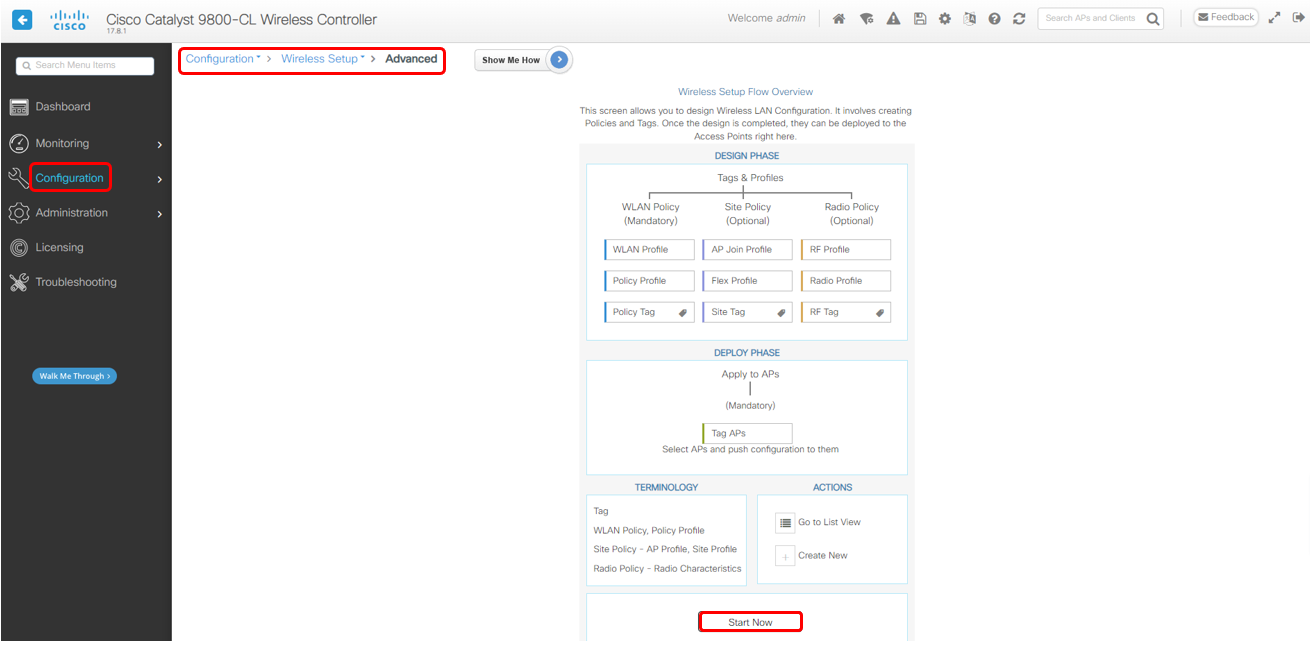
Secure WPA2E Wireless RBE Configuration
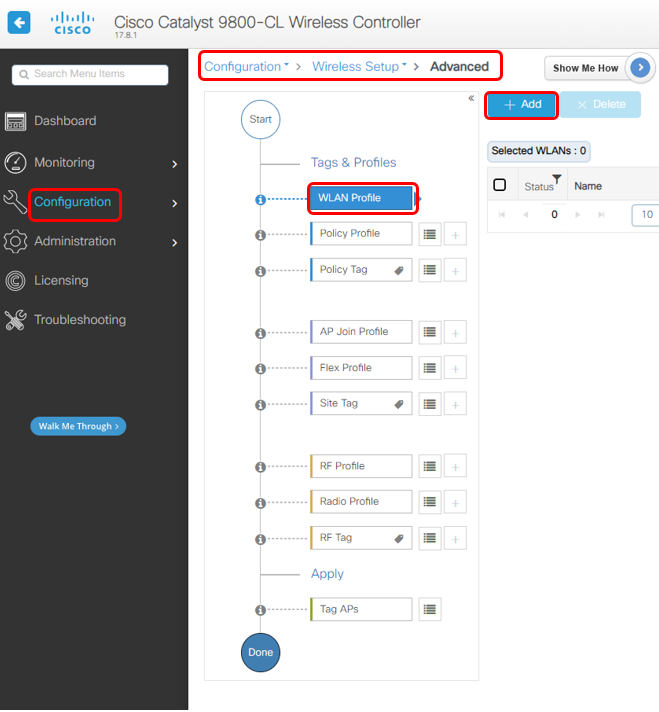
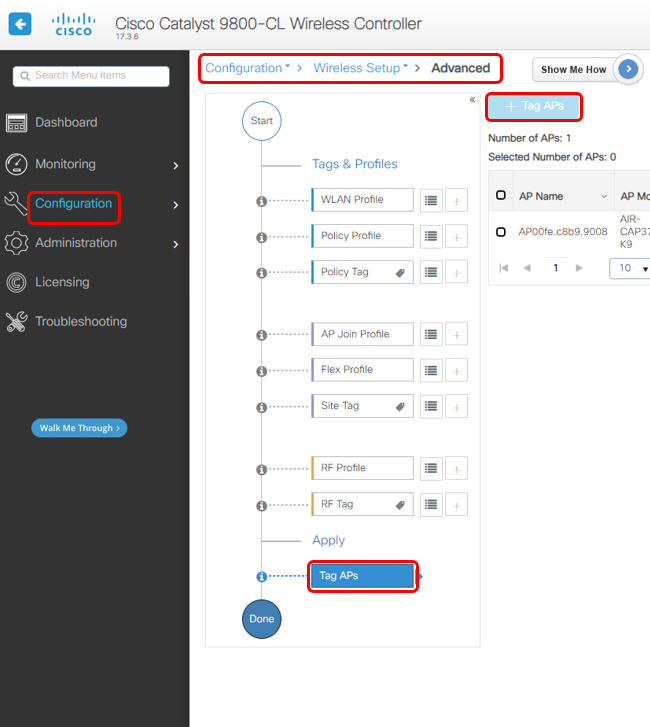
We use Wireless Setup => Advanced for create Secure WPA2E Wireless RBE
Go to Configuration > Wireless Setup > Advanced, click Start Now
WPA2E/802.1x Wireless RBE Configuration
1. Configure WLAN Profile
1a. Create new WLAN Profile
Choose on WLAN Profile, click Add
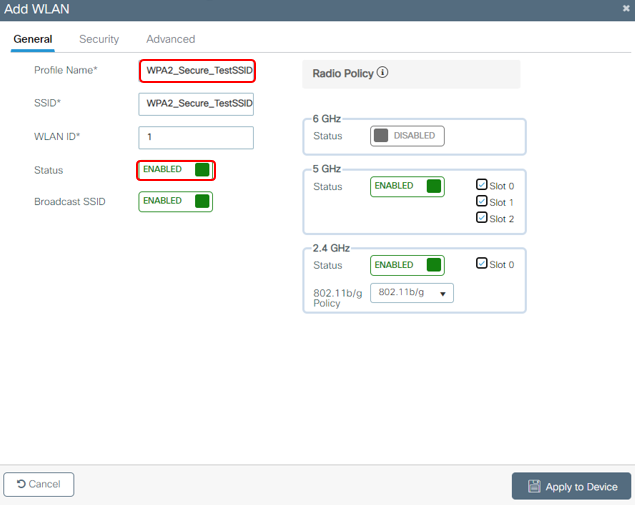
1b . Enter the WLAN general information
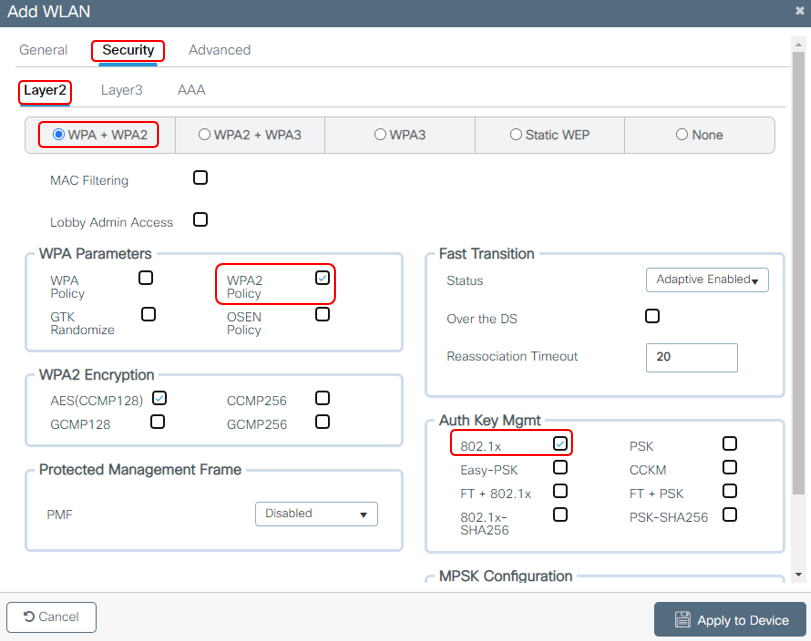
1c. Configure Secure WLAN Settings - Layer 2
Click on Security tab of the WLAN, click on the Layer 2 tab. Verify Layer 2 Security is set to ‘WPA+WPA2’ and Authentication Key Mgmt is set to 802.1x .
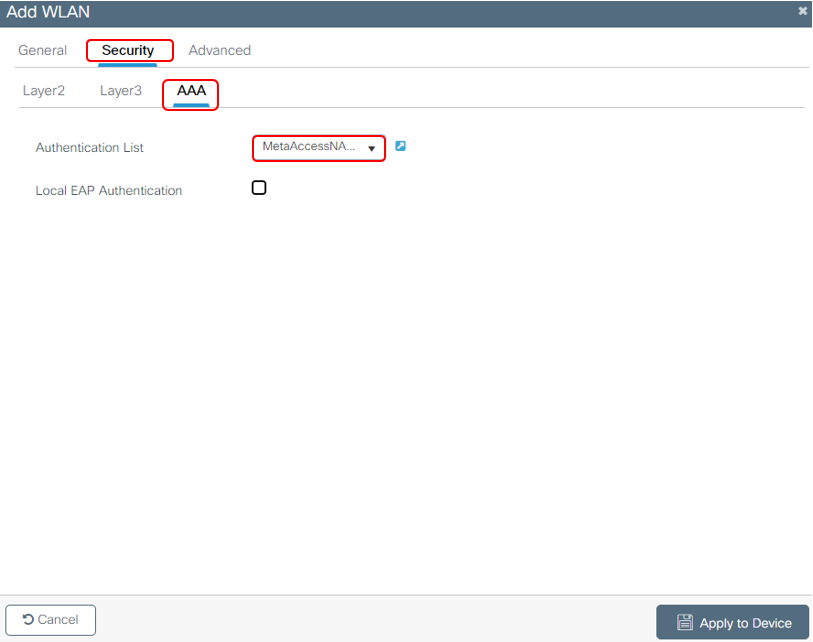
1d. Configure Secure WLAN Setting AAA
Under the Security tab of the WLAN, click on the AAA Servers tab. Add the NAC_Auth_List as an Authentication List
2. Create Policy Profile
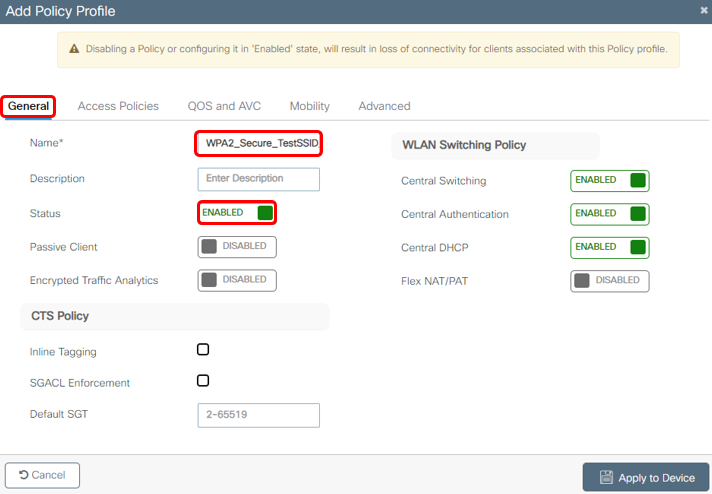
2a Create Policy Profile
Choose on Policy Profile, click Add

2b Enter the WLAN general information
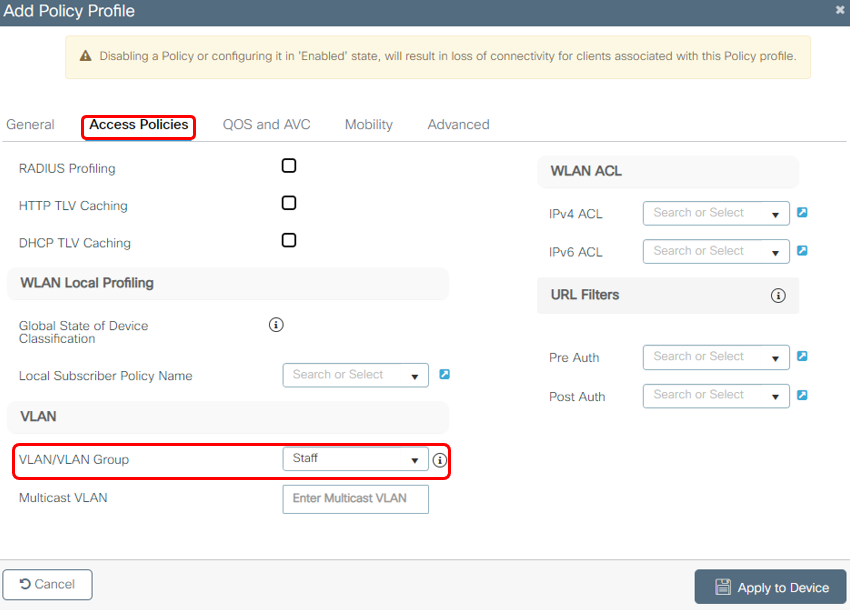
2c Assign VLAN for Policy Profile on Access Polices tab
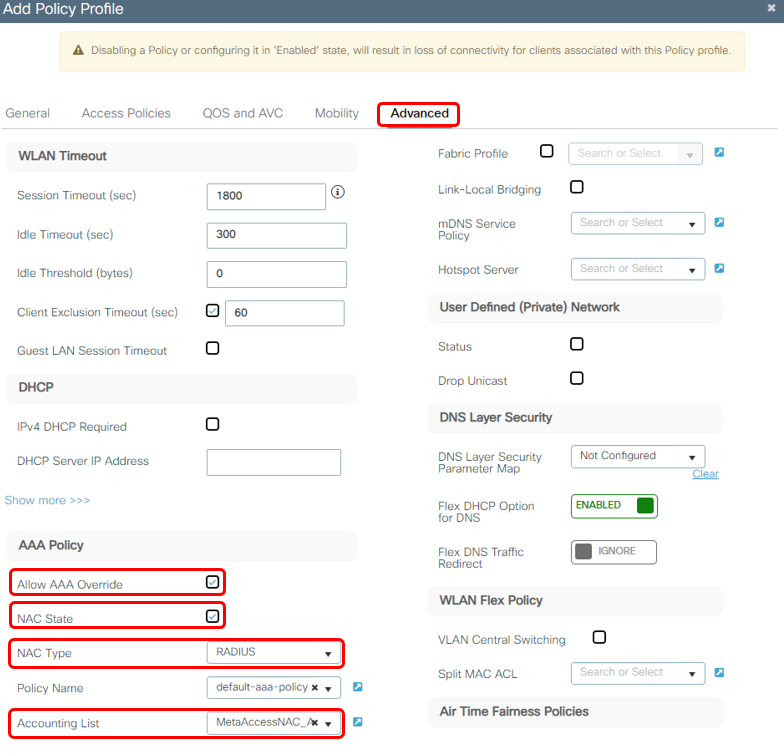
2c Config Advanced Policy Profile
3. Create Policy Tag
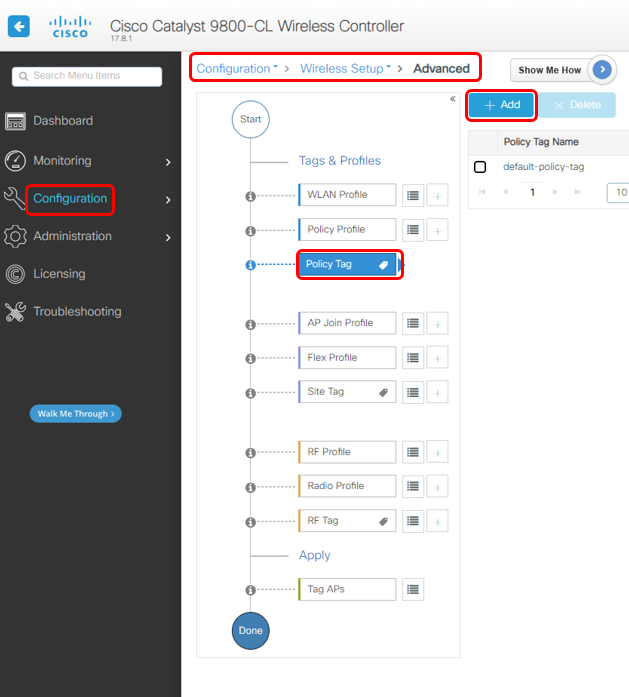
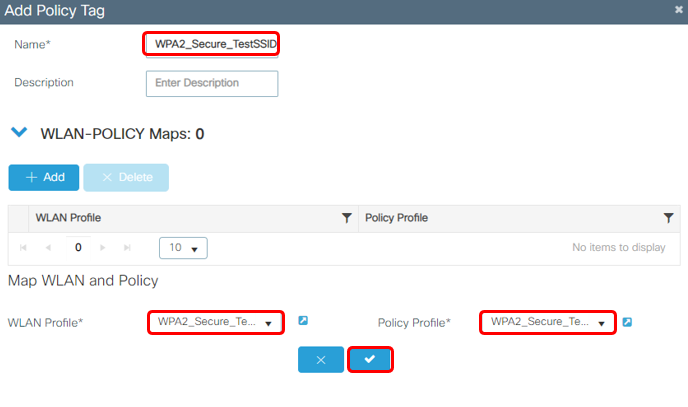
3a Create a new Policy Tag
Choose on Policy Tag, click Add
3b Enter the Policy Tag name and WLAN profile + Policy profile
4. Create Tag APs
4a Create a new Tag APs
Choose Tag APs, click + Tag APs
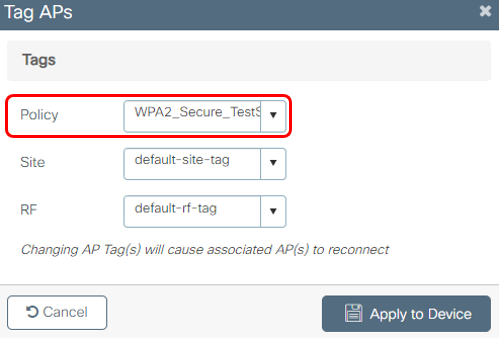
4b Choose the Policy Tag
Open/PSK Wireless RBE Configuration
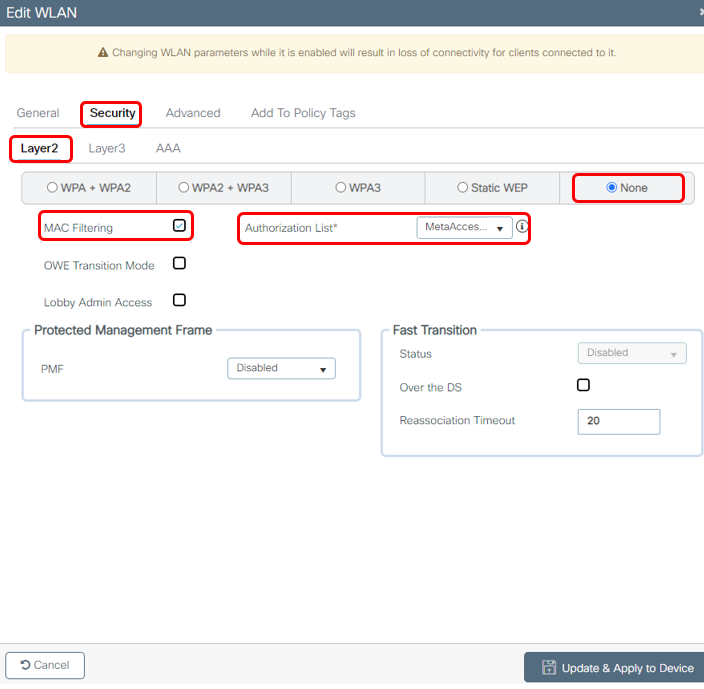
For Open or PSK WLANs, all steps are the same as for WPA2E/802.1x Wireless RBE Configuration, except you will skip section 1c and 1d, and follow the steps below instead:
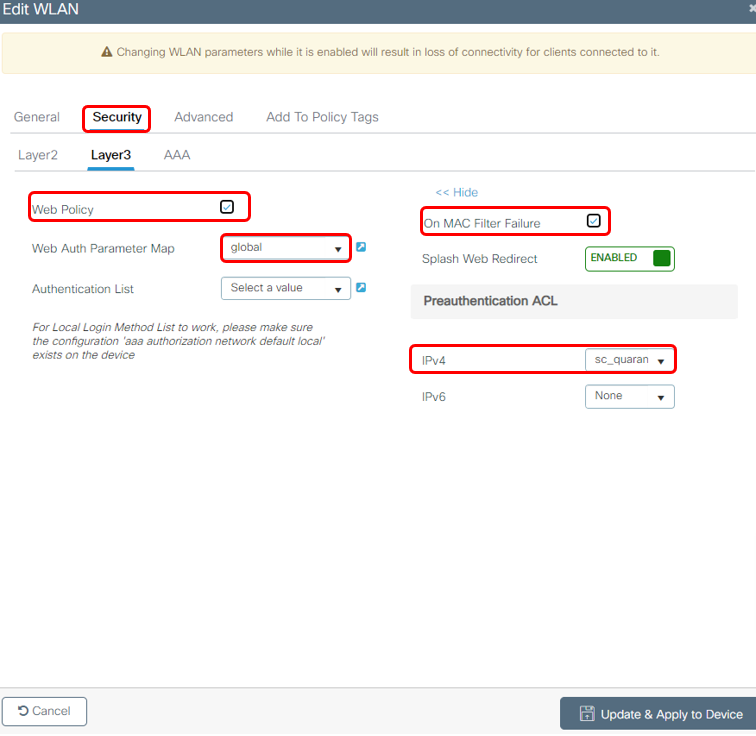
On WLAN > Security > Layer 2, apply settings as below:
On WLAN > Settings > Layer 3, apply settings as below: