OPSWAT MetaDefender IT-OT Access can be easily integrated with an existing F5 BIG-IP & Salesforce integration to ensure that a device is compliant with the organization's security policy before it is granted access to Salesforce. This ensures that the device is not only authenticated by the IdP, but also checked for security risks and vulnerabilities such as encryption, infections or unpatched versions of operating systems, BEFORE it access an organization's cloud services.
You can learn more details for each step here at How to set it up?
Step 1.Enable Secure Access on your MetaDefender IT-OT Access Account
- Log into the MetaDefender IT-OT Access console
- Navigate to Secure Access > Protected Apps
- Check the box Enable Secure Access.
- Navigate to Integrations and then Device Identity, and enable Enable cross-domain API integration at port xxxx
Step 2. Enable Single Sign-On on F5 BIG-IP APM
Note: If you already enabled single sign-on on F5 BIG-IP APM and integrated Salesforce app there, you can jump to downloading a certificate which you configured for Salesforce app on F5 BIG-IP APM for later use. You can refer F5 - Module 1: SAML Identity Provider for more details.
- Log into your F5 BIG-IP console.
- Go to Access → Federation → SAML
Identity Provider → Local IDP Service then
click Create
- General Settings:
- IDP Service Name: an unique name, for ex: F5_AS_IDP
- Idp Entity ID: uniqe ID, for ex: https:<ip address>/F5_AS_IDP
- Scheme: https Host: your host name or IP address
- General Settings:

- Assertion Settings:
- Assertion Subject Type: Unspecificed
- Assertion Subject Value: %{session.logon.last.username}

- Security Settings: Choose your Singing Key and Signing Certificate, we use default key and value for this demo.

- Then click OK.
- Go to Access → Webtops → Webtop Lists to
create new Webtop
- Name: an unique name, for ex: full_webtop
- Type: Full

Then click Finished.
Go to Access → Federation → SAML Resources to create new SAML Resource
- Name: an unique name, for ex: Salesforce
- Publish on Webtop: check Enable
- SSO Configuration: choose the one created in step 2.2.
Click Finished.

- Authentication: F5 BIGIP provides many authentication methods like Kerberos, Active Directory, LDAP,... We use Local User DB for this demo.
- Go to Access → Profiles
/ Policies → Access Profiles then click on
- Create Name: an unique name, for ex: F5_AS_IDP
- Profile Type: All

- Then click on Finished.
- Edit Access Policy for the Access Profile
- Click Edit in
the Per-Session Policy field of the newly created Access profile
- Logon page is default
- LocalDB Auth is for demonstration purposes only
- Click Edit in
the Per-Session Policy field of the newly created Access profile
Note: For this example, select a valid LocalDB Instance that you can populate.

- Advanced Resource Assign: Add an expression for LocalDB Auth has Passed and assign the previously created Webtop and SAML Resource based on that success.
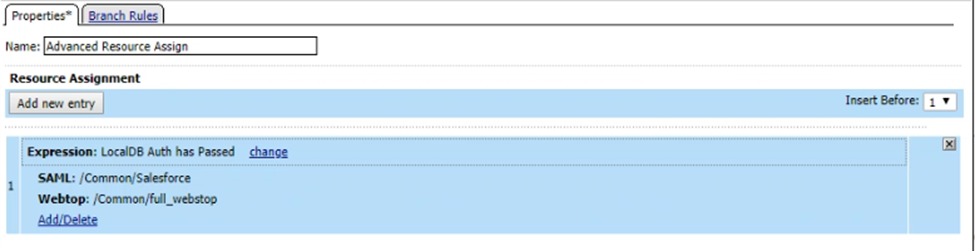
- Change the result of the fallback Branch for Advanced Resource Assign to Allow.
- Create Virtual Server for IdP
Service and Webtop
- Go to Local Traffic → Virtual Servers → Virtual Server List then click Create
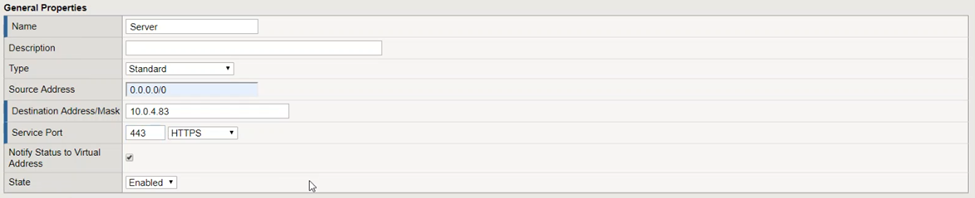
- General Propteries:
- Name: an unique name
- Type: Standard
- Source Address : 0.0.0.0/0
- Destination Address/Mask : your IP address
- Service Port : An available port that aligns with the port specified or implied in previous steps. For ex: 443, HTTPS
- State: Enabled
- Configuration (basic)

- Access Policy
- Access Profile: Select the access profile configured in Step 2.6

- Click Finished.
- Download the certification, as you will need to upload this into MetaDefender IT-OT Access later.
- Go to System → Certificate Management → Traffic Certificate management → SSL Certificate List
- Choose certificate that is used to singing SAML data. We use default certificate for demo purpose.

- Click Export.
Step 3. Add Application on MetaDefender IT-OT Access
Log into the MetaDefender IT-OT Access Console.
Navigate to Secure Access > Protected Apps.
Select Add a Protected Application.
Select IdP Method.
Fill in required fields for the Identity Provider:
- IdP Name: an IdP name, for example: Salesforce
- IdP Certificate: upload BIG-IP APM certificate you downloaded.
Click Continue.
Fill out required information:
- Application: application name, for example: Dropbox
- Login URL: https://<BIGIP host>/saml/idp/res=?id=/<SAML Resource path>/ <SAML Resource name>. For ex: https://10.0.4.83 /saml/idp/res=/Common/Saleforce
- App ACS URL : URL that is provided in Step 6.
- Access Mode: pick an access mode you prefer. See details on the access modes at Add protected applications with IdP Method
Click Add.
After saving your changes successfully, navigate to the Setup Instructions of the Salesforce application you have just added and then copy the URL MetaDefender IT-OT Access generated there. This URL is used to replace Salesforce login URL on BIG-IP APM.
Step 4. Configure SSO settings on applications
- On MetaDefender IT-OT Access console, navigate to Secure Access > Protected Apps.
- Select the Salesforce app and follow the SSO instructions, you should be prompted to download the OPSWAT Certificate.
- Go to Local IDP Services in BIGIP and choose the one created in Step 2.2 Click on Export Metadata
- Log into Salesforce as an administrator
- Navigate to Setup > Security Controls > Single Sign-On Settings , click on New from Metadata File then choose the file get from above step.

- Upload the OPSWAT certificate from your MetaDefender IT-OT Access account which you downloaded.
- Get Login URL

- Get Logout URL
- You can find "Logout" link when you click on your name.
- Right-click Logout link and select "Copy link address" to copy logout URL.
Step 5. Configure Access Rules
On MetaDefender IT-OT Access console, navigate to Secure Access > Rules
On Rules tab, click "ADD NEW RULE" to add a new rule for this application OR you can update existing access rules to add this application
With a new access rule, you need to specify how you would like to block/allow access a device from the application:
- Rule name: a rule name, for example Block non-compliant devices
- Action: Block or Allow
- Configure conditions to do the action. Details at Configure Access Rules
Click ADD RULE.
Step 6. Update Applications settings on Identity Provider
- Log into your F5 BIG-IP console.
- Go to Access → Federation → SAML Identity Provider → External
SP Connector then click Create to create new SP Connector
- Service__Provider Name: an unique service name
- Service__Provider Entity ID: an unique entity ID
- _ACS URL:_specific URL user will be redirected after login to BIG-IP


- Make sure Response must be signed and Assertion must be signed checked
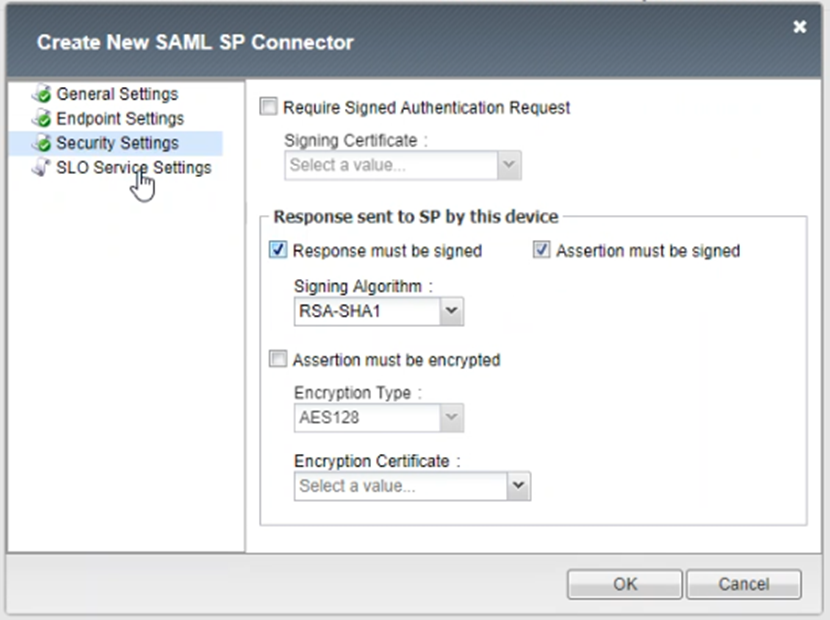
- Then click OK to finish
- Now, choose the IDP Service just created in Step 2.2 then click on Bind/Unbind SP Connectors and choose the SP Connector created in Step 5.2.
- Then click OK.
Step 7. Test your integration
Follow guideline at Test your integration to test your integration to verify if it works as your expectation.