This document provides step-by-step instructions for installing MOCM in Distributed mode on Windows. It covers both 2-machine and 3-machine deployment topologies.
Before starting My OPSWAT Central Management On-premises installation, please make sure your server meets the System Requirements
MongoDB Replica Set must be installed and running before proceeding with this guide. See: MongoDB Replica Set Setup Example for MOCM Distributed Mode
1. Deployment Overview
1.1 Supported Topologies
Topology | Machines | Description |
|---|---|---|
2-Machine | 2-5 | MongoDB Replica Set (1–3 nodes) Web Application + File Storage on 1 Machine |
3-Machine | 3-5 | MongoDB Replica Set (1–3 nodes) File Storage on 1 Machine Web Application on 1 Machine |
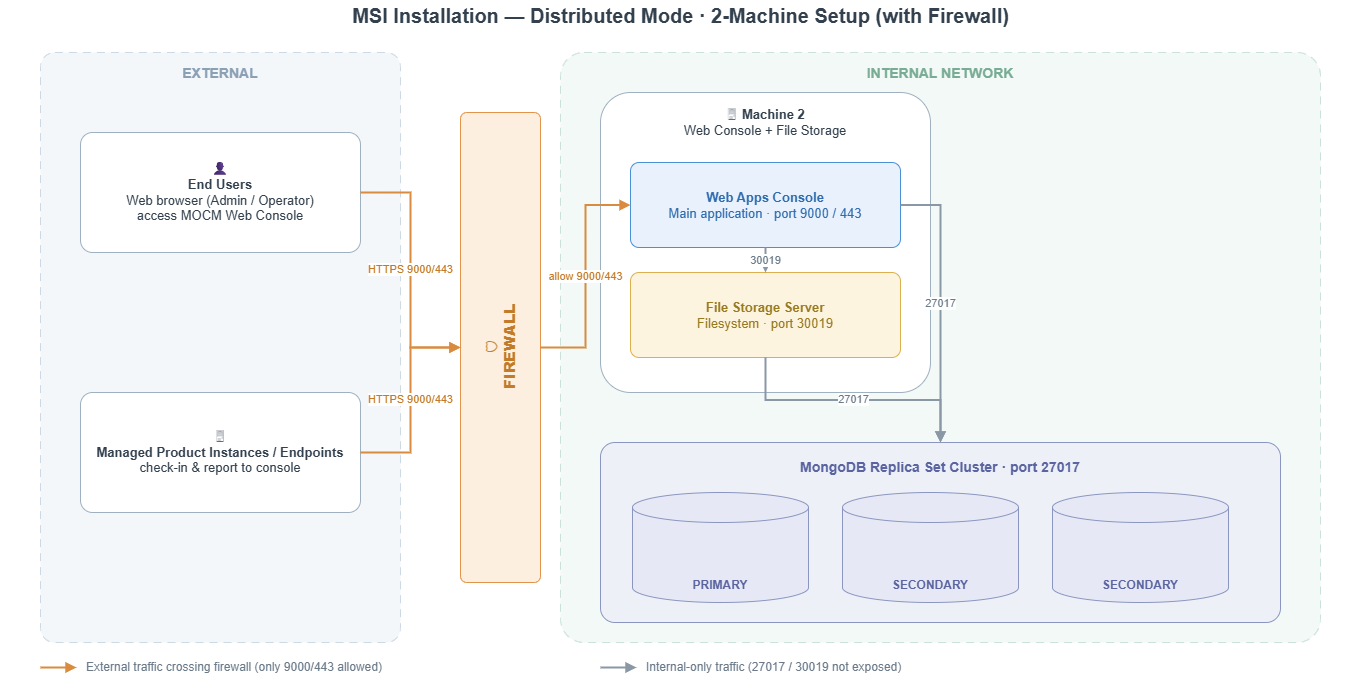
1.2 Architecture — 2-Machine Setup
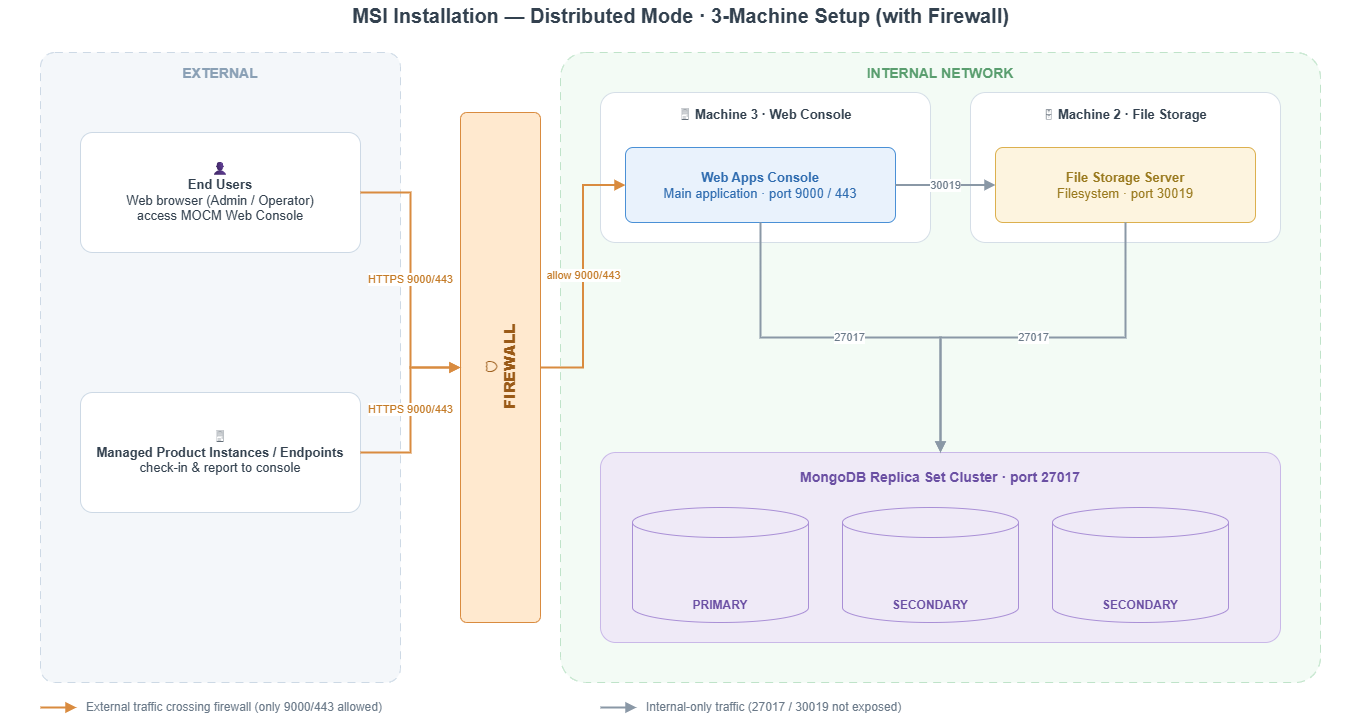
1.3 Architecture — 3-Machine Setup
1.4 Installation Order
Machines must be installed in the following order. Do not proceed to the next machine until the previous one is fully running:
2-Machine: MongoDB Replica Set cluster → Machine 2 (Web Apps Console + File Storage)
3-Machine: MongoDB Replica Set cluster -> Filesystem on 1 machine -> Web Console on 1 machine
2. Prerequisites
2.1 System Requirements
Component | Role | Minimum RAM | Minimum Disk |
|---|---|---|---|
MongoDB Replica Set cluster | Database (1–3 nodes) | 16 GB per node (32 GB recommended) | 100 GB+ SSD |
Machine 2 | Filesystem Server (+ Web Apps Console in 2-machine) | 16 GB (32 GB recommended) | 100 GB+ |
Machine 3 | Web Apps Console (3-machine only) | 16 GB (32 GB recommended} | 100 GB+ |
2.2 Network Requirements
Source | Port | Protocol |
|---|---|---|
Machine 2 (Filesystem Server) | 30019 | TCP/HTTPS |
Machine 2 or 3 (Web Apps Console) | 9000* | TCP/HTTPS |
MongoDB Replica Set cluster | 27017 | TCP |
*Ports may vary based on configuration. Confirm actual ports with your deployment plan.
2.3 Pre-Installation Checklist
MongoDB Replica Set is installed and running
MongoDB admin user is created (see MongoDB guide, Step 7)
Network connectivity verified between all machines
MOCM MSI installer file is available on Machine 2 (and Machine 3 for 3-machine setup)
Database password is known and will be used consistently across all machines
3. MongoDB Replica Set (External)
Follow the MongoDB Replica Set Setup Example for MOCM Distributed Mode to complete this step.
After completion, verify:
MongoDB service is running
Replica set is initialized (1 PRIMARY + 2 SECONDARY, or single node)
Admin user is created
Connection is accessible from Machine 2 (and Machine 3)
4. 2-Machine Setup — Machine 2 (Web Console + Filesystem Server
4.1 Launch the MSI Installer and choose distributed mode
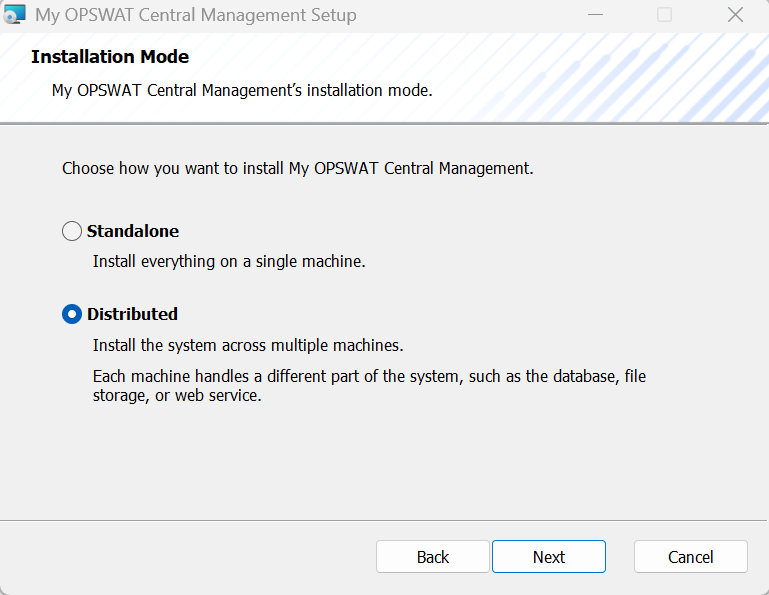
Click Next
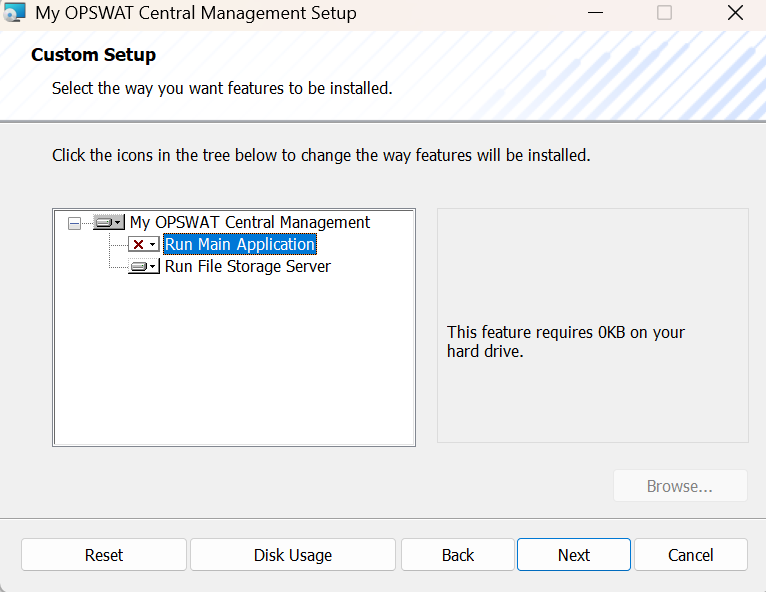
4.2 Custom Setup — Select Components
In the Custom Setup tree, select both:
☑ Run the main application
☑ Run file storage server
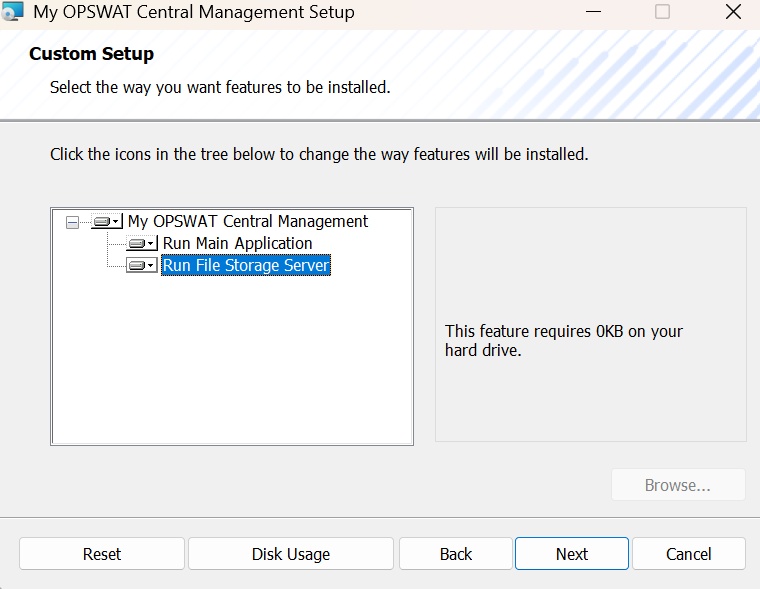
Click Next
4.3 Database Configuration
Enter the connection details for the MongoDB instance
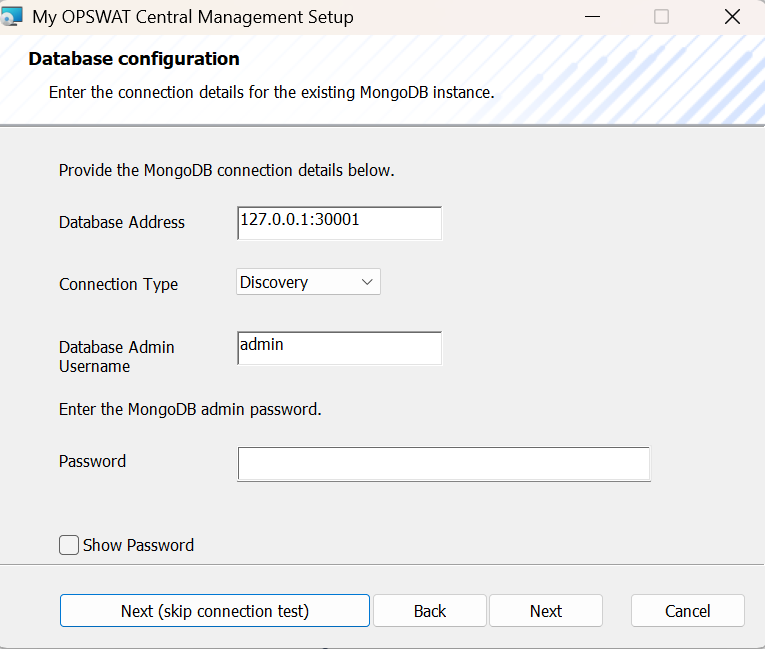
Field | Value |
|---|---|
Database Address | IP1:27017,IP2:27017,IP3:27017 |
Connection Type | Discovery/Direct |
Database Admin Username | adminUser |
Password | The admin password created during MongoDB setup |
Connection Type Reference
Mode | When to Use | Database Address Format |
|---|---|---|
Discovery | MongoDB Replica Set (multiple nodes). The installer automatically discovers all replica set members from the provided seed nodes. | IP1:27017,IP2:27017,IP3:27017 |
Direct | Connect directly to a single MongoDB instance (standalone or a specific node). | IP:27017 |
Recommendation
Distributed mode with Replica Set → select Discovery
Discovery mode: if the Primary node fails, the application automatically fails over to a Secondary node (high availability).
Direct mode: if the connected node goes down, the connection is lost with no automatic failover.
Database Connection Check: The installer will verify the connection to MongoDB.
✅ If check passes → proceed to next step.
❌ If check fails → verify:
MongoDB is running
Firewall port 27017 is open on MongoDB
Username/password is correct
Network connectivity between Machine 2 and MongoDB
Button
Button | Description |
|---|---|
Next | Validates the connection to MongoDB before proceeding. The installer will test connectivity using the provided address, credentials, and connection type. If the test fails, you cannot proceed |
Next (skip connection test) | Skips the connection validation and proceeds directly to the next step. Use this option when MongoDB is not yet running or not reachable from this machine at install time (e.g. installing on a separate network segment, or MongoDB will be started later). The connection details are still saved — the application will attempt to connect at runtime. |
Use "Next" (with connection test) whenever possible to verify your database configuration is correct before completing installation. Only use "Next (skip connection test)" if you are certain the connection details are correct but MongoDB is temporarily unreachable.
4.4 Complete Installation and verify
Continue installation and wait for installation to complete (service auto start)
Once installation is completed, the My OPSWAT Central Management tray icon will appear and display the server's status.

5. 3-Machine Setup — Machine 2 (Filesystem Server)
5.1 Launch MSI Install and choose distributed mode
Note: The Filesystem Server port is hardcoded to 30019 and cannot be changed during installation. Ensure this port is open in your firewall rules between machines
5.2 Custom Setup — Select Components
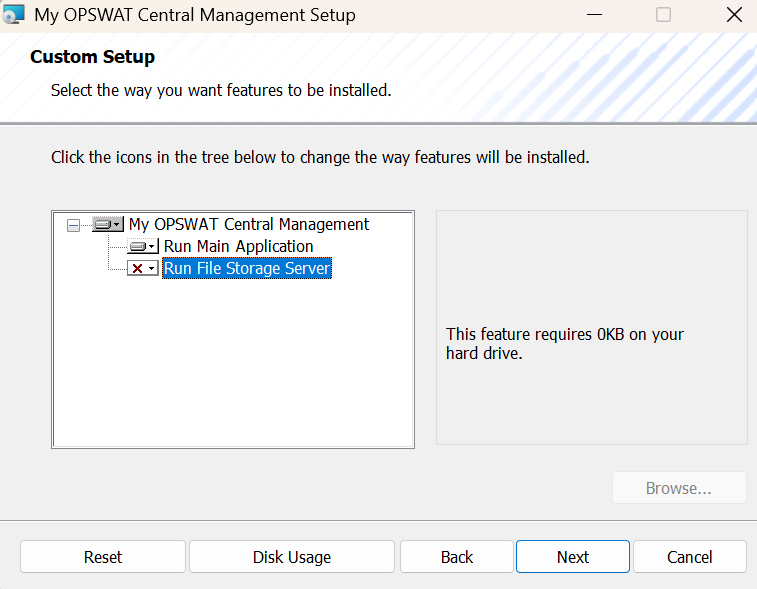
In the Custom Setup tree, select only:
☑ Run file storage server
☐ Run the main application (do NOT select)
Click Next.
5.3 Configuration Inputs
Field | Value |
|---|---|
Database Address (Mono) | <Machine1_IP>:27017,<Machine2_ IP>:27017, <Machine3_IP>:27017 |
Connection Type | Discovery/Direct |
Database Admin Username | adminUser |
Password | Same database password as Machine 1 |
Database Connection Check: The installer will verify the connection to MongoDB on Machine 1.
✅ If check passes → proceed.
❌ If check fails → verify MongoDB connectivity (see Section 4.3 troubleshooting tips).
5.4 Complete Installation and verify
Continue installation and wait for installation to complete (service auto start)
Once installation is completed, the My OPSWAT Central Management tray icon will appear and display the server's status.
Verify
6. 3-Machine Setup — Machine 3 (Web Console)
6.1 Launch MSI Install and choose distributed mode
In the Custom Setup tree, select only:
☑ Run the main application (Web Console)
☐ Run file storage server (do NOT select)
Click Next.
6.3 Configuration Inputs
6.3.1 Configuration Inputs File Storage
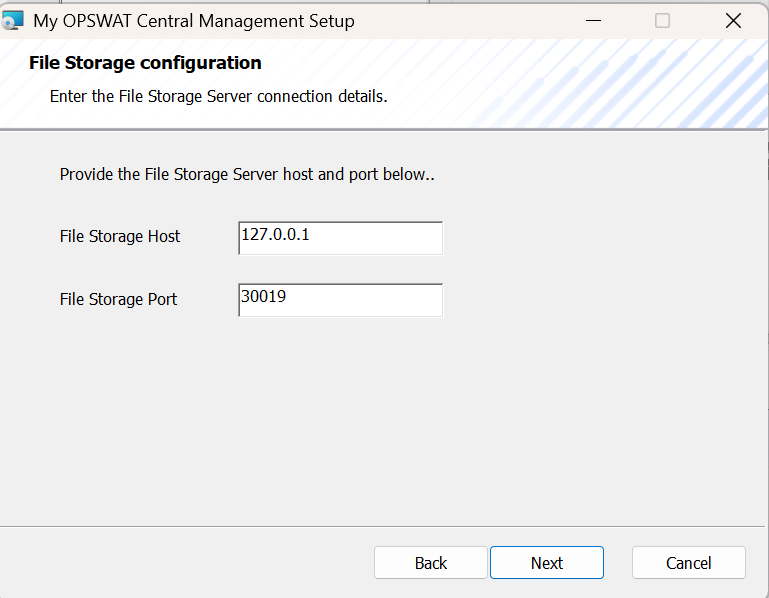
Field | Value | Description |
|---|---|---|
File Storage Host | IP address of Machine | The IP where Filesystem Server is running (e.g., 192.168.1.11). Do NOT use 127.0.0.1 unless both services are on the same machine. |
File Storage Port | 30019 | Hardcoded port. Do not change |
Ensure Machine 2 (Filesystem Server) is already installed and running before proceeding. The Web Apps Console requires an active connection to the Filesystem Server
6.3.2 Configuration Inputs File Database
Field | Value |
|---|---|
Database Address | <Machine1_IP>:27017 |
Connection Type | Discovery/Direct |
Database Admin Username | adminUser |
Password | adminPassword |
Database Connection Check: The installer will verify the connection to both MongoDB and Filesystem Server (Machine 2).
✅ If all checks pass → proceed.
❌ If check fails → verify connectivity to Machine 1 (port 27017) and Machine 2 (port 30019).
Once installation is completed, the My OPSWAT Central Management tray icon will appear and display the server's status.