The File Handling page is divided into two sections: actions to take on blocked files and actions to be taken on allowed files. You can set different file handling options for each, including copying to either new media or a network path.

Remediated file handling
If file sanitization (Deep CDR) and redaction (Proactive DLP) have been configured on the MetaDefender Core, the Kiosk will download the remediated file which stands for the sanitized file or redacted file if any. There are three selections for handling a remediated file with the original media.
Do not copy the remediated version to the original media (the default selection) Specifies that a remediated file will not be copied to the original media and the original file will be left untouched.
Attempt to replace the original file with the remediated version Specifies that the remediated file will be copied to the original media and the original file will be deleted.
Copy the remediated version to the media and keep the original version Specifies that the remediated file will be copied to the original media and the original file will be left untouched.
For a copy-to destination or custom command line script set:
Copy/use the remediated version (the default selection) If a remediated version of a file exists, that will be copied to the destination, or utilized in the script, configured in favor of the original file.
Copy/use the remediated version & original file If a remediated version of a file exists, it will be copied to the destination or utilized in the script configured along with the original file.
Stop processing media when a predefined number of blocked files are found
Selecting this option will cause a Kiosk session to stop processing immediately when the preset number of blocked files is found. Kiosk will alert the user that preset numbers blocked files were found and go directly to the session summary after the user has acknowledged the message.
The number of blocked files can be higher than the setting.
Max value of blocked files can be set is 1000.
Taking no action or removing files
To take no action on blocked or allowed files, select the No Action radio button. To remove any non-remediated blocked files, select the Remove file radio button and select an option from the drop-down menu:
Kiosk Quarantine: blocked file will be added to the Kiosk quarantine and removed from the original media
Core Quarantine: blocked file will be added to the Core quarantine (if configured on Core) and removed from the original media
Delete: blocked file will be removed from the original media
Prompt User for Confirmation: user will be prompted whether to delete all blocked files at the results screen
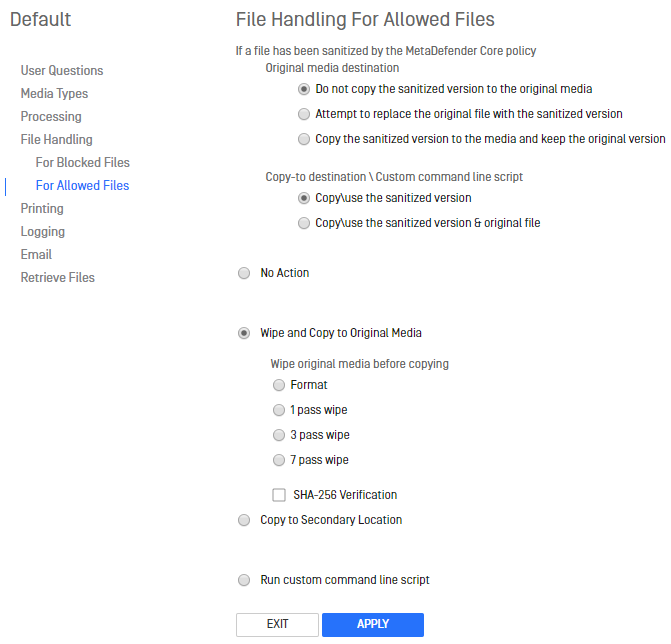
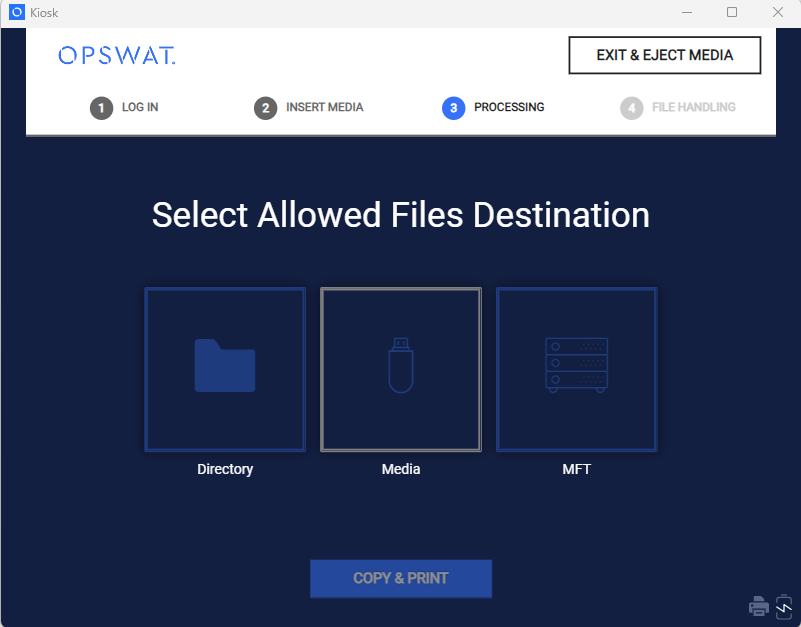
Copying Allowed files to Original Media
This option will delete all files and perform a disk format\wipe on the original media before copying ONLY the allowed files back to the original media.
This option is only available for allowed files. After enabling this option, standard wipe options of Format, 1, 3, or 7 pass wipe are selectable. Please note that the pass wipe options will take significantly more time to complete.
Copying files to a designated locations
Note: If a file has been remediated by MetaDefender Core's Data Sanitization and Copy to is selected here, the remediated file will be copied to the desired location, not the original file.
You can configure files to be copied to a designated location in the Copy to section.
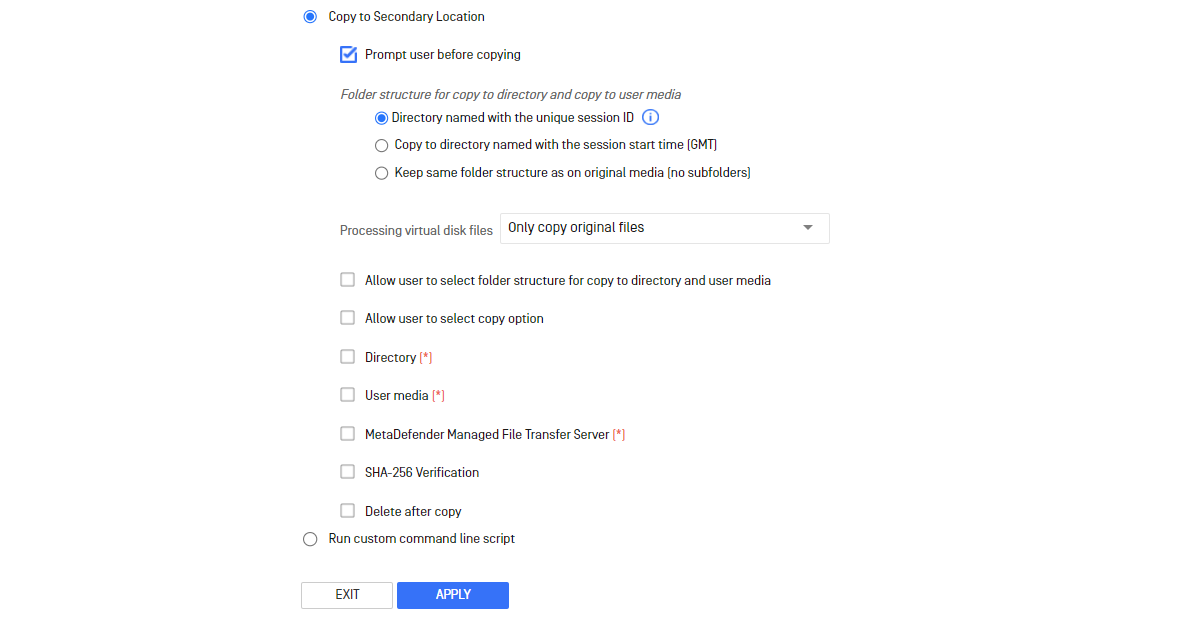
Prompt user before copying
By default, a user will have to initiate copying files from session results screen. If prompting is disabled, files will be copied automatically before the session results are displayed.
Folder structure
MetaDefender Kiosk will copy files to the location specified by one of the three naming conventions selected:
Directory named with the unique session ID: Copies files to a directory identified by the session ID.
Directory named with the session start time (GMT): Copies files to a directory identified by the session start time.
Keep the same folder structure as on original media (no subfolders): Copies files to the same directory as in the original media.
Processing virtual disk files
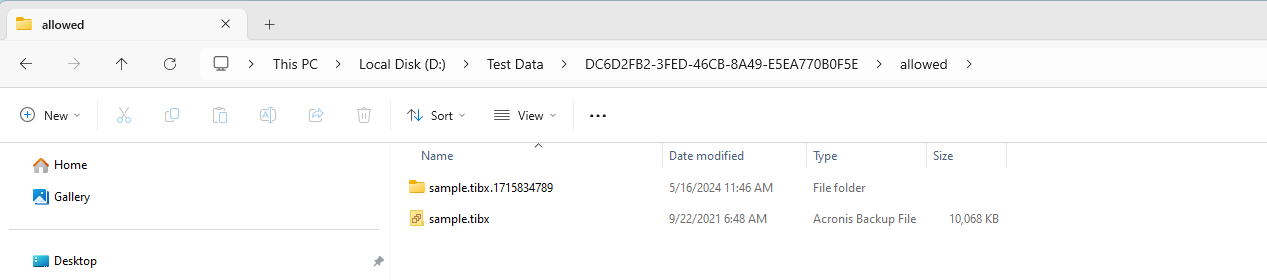
You can select to copy the original files and child files of disk image files that were mounted to scan. By default, only the original files are copied.
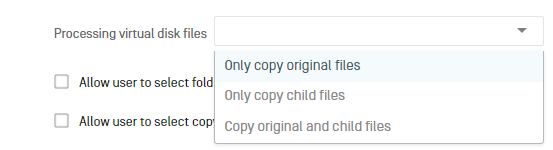
The child files inside the disk image will be copied to the destination on the folder whose name is constructed from the original file name and timestamp suffixes. The child file folder will be in the same folder structure as the original files.
Notes:
This option is available for both allowed and blocked file settings.
Kiosk will not modify the content of original disk image files.
This option only takes effect for the disk image type that is enabled mounting and scanning option at global configuration for disk image files. If the disk image type is disabled mount and scan, only the original file is scanned and copied to destination.

Allow user to select folder structure for copy to directory and user media
This allows users to select the folder structure (outlined above) before copying files.
Allow user to select copy option
This allows users to select which enabled copy option to run at the end of a session. For example, if copying to a Directory and User Media is set, a user can choose to run both, neither or only one. If multiple directories are configured, a user will be able to choose among the list of configured directories.
Directory
The Directory option allows you to specify locations for blocked or allowed files. Files will be copied to all configured directories by default. The copy to directory uses AD user's credentials that is logged into the Kiosk session for copying privileges.
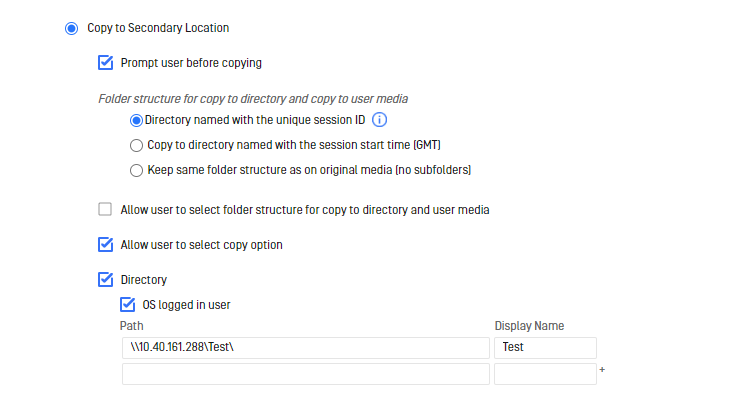
Path: indicates the destination location files will be copied to.
Display Name: indicates the value that is displayed on the UI to the user for selection.
OS logged in user: An Admin can enable utilizing the OS logged in user's credentials if the copy initially fails with the AD user credentials.
Maximum number of directories can be added is 100
Path and Display Name must be unique
If Allow user to select copy option is enabled, then the user will be able to browse and select which directories will be utilized, including the sub-directories

You can copy files to a remote server (i.e. network share) by providing a UNC path. To allow for more restrictive permissions on a network share, a MetaDefender Kiosk workflow will need to be created containing users that have, at minimum, write permission to the network share. When a user logs into a session, MetaDefender Kiosk will attempt to use the permissions of the user to copy files to the network share.
The predefined ‘%%%%’ variable can be used within the designated location in the Path field to allow MetaDefender Kiosk to copy files to a folder (e.g. ‘username’). This is for the user logged into the session.
Responses to user questions can also be utilized in the Path field via the predefined '%%%userresponse#%%%' variable, where '#' is the number of the response to the corresponding user question. For example, to utilize the answer to the question 2, the variable to use would be '%%%%'. If no response to the question was given or no such question exists for the user response to exist (e.g. %%%%), then the variable will exist in the path created.
User media
Selecting the User media checkbox will prompt users to insert secondary media to copy files to.
Supported media are USB, CD/DVD (must be blank and non-finalized), and Floppy.
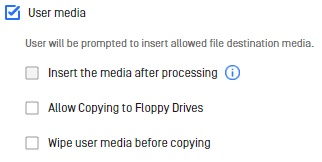
Insert the media after processing - (option only applies to a Copy&Go session) this locks users to insert the media after all files are processed. If disabled, users can insert the secondary media at the start of a session.
Allow Copying to Floppy Drives - displays a floppy disk detection button to copy files to floppy.
Wipe user media before copying - displays the wipe option to automatically apply to the destination media before files are copied to it.
The wiping of CD/DVD is not supported by Kiosk, if user try to copy to a disc with data, the warning message will be shown and inform user to try again with blank disc.
This process may take a long time if the destination media is large or multiple pass wipes are configured
These encrypted media types do not support secure wipe: BitLocker, McAfee, and Flash Security
MetaDefender Managed File Transfer Server
MFT Server: See 6. Configuring with MFT for instructions and more details
Select a MFT account option for file uploads: Choose a MFT account option in this section
Select how files will be uploaded to MFT: Choose a file upload option
File Chunk Upload Size: Size of chunks a file will be broken into for uploading to MFT
Synchronize with Data Diode: Alleviates any issues seen with uploading files through a data diode (note: this will increase overall upload time)
MFT account options for file uploads
Always upload to a MFT guest account A temporary guest login ID is created and displayed to the Kiosk user both on the scan results screen as well as in the digital and printed logs
Attempt to use user credentials if they are available Kiosk uploads files to the user account that matches the one used during authentication
Enter MFT user to upload files to Kiosk uploads files to the user account supplied (this can be useful when custom authentication users do not match users synced with MFT)
If upload using the user credentials authentication fails, files will be uploaded to the MFT using guest account
MFT file upload options
Upload files and preserve directory structure Files are upload to MFT while maintaining the directory structure
Upload files, preserve directory structure and send scan results In addition to the previous option, files are uploaded along with their scan result obtained from Core. MFT will opt to use these results rather than rescanning the uploaded files.
Upload a zip archive containing the allowed files Files are packaged into one zip resulting in one file upload to MFT.
Only Copy Remediated Files
This option only exists for blocked files.
If enabled, only remediated versions of blocked files will be copied to the destination. Any blocked file that was not remediated will not be copied.
SHA-256 Verification
If enabled, MetaDefender Kiosk compares the hash value of files on the target directory with the ones from the original directory. Any mismatches are displayed and logged. No retry of the copy is performed in the case of a hash value mismatch.
Delete after copy
Select this checkbox if you want MetaDefender Kiosk to delete the blocked or allowed file after copying it to the specified location.
Run custom command line script
Kiosk will execute the custom command line script at post-processing phase. See Custom Command Line Script for more details.